|
   
| Tutorial: - Compositing in FCP |
September, 2001
Compositing
in FCP
A basic guide to building a 'virtual set'
By Phil
Ashby
First steps towards your Award
When the scenery you see in the
background of a shot has been added in post-production, and especially
when it's been computer generated, that's a 'virtual set'. Putting
the elements of the shot together is as much an editing art as
a science, just like audio mixing, shot juxtaposition, and all
the other wonderful effort-intensive skills you can now spend
time on. This particular art is called 'compositing'.
A few words in justification: the
sort of compositing this article describes isn't going to win
any Academy Awards for special effects but has got two things
going for it:
1) it's the sort of bread-and-butter
process that us ordinary folk need to get on with our daily tasks
of editing, and
2) the techniques you'll learn
may come in useful for that Award one day.
Compositing is the term we use
whenever more than one video track comes into play in a shot
- at its simplest, when text is superimposed, or when a picture-in-picture
effect is utilised. I'd guess the next most common use is to
add a different background to a shot. You've got a presenter
against blue-screen or (as we'll see here) a plain black backing,
and you want to change that backing to something else - a video
shot or a still, say.
What we're aiming for
Figure 1a
shows the master (foreground) shot: a presenter with the thing
he's going to talk about. (Should you wonder, it's a digital
radio gizmo that attaches to a pc). The original intention was
to shoot the piece in the lab or at an office desk, but we had
to change plans, and record this (and several other pieces) against
a black drape. Figure 1b shows the end result we're aiming
for.

Figure 1a. Master Shot |
|
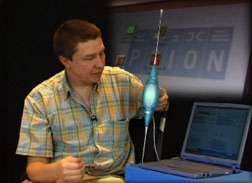
Figure 1b. Completed Composite |
You may be wondering why we didn't make shoot against the familiar
blue or green screens for compositing. (Known as Chroma Key or,
in more traditional corners of the TV world, colour separation
overlay, CSO). FCP can do chroma keying, but it wasn't feasible
on this shoot, because of lighting, time and clothing constraints.
By which I mean, another guy came wearing blue.
The first rule in succesful, that is,
well keyed, compositing, is to get the best original material
at the shoot. Lighting is more critical for colour keying than
against a black cloth. Apart from good portaiture of the presenter,
it's essential to get an even light onto the screen, with as
little shadow from the artist as possible, and a good rim or
back light on the presenter, to avoid too flat a 2d look to the
end result.
A safer option is to shoot against black.
In the simplest case, it's just a matter of leaving room in the
framing of the master shot to allow for a PIP. No other keying
is involved, but the simple PIP wouldn't work in the example
of figure 1, because of the antenna and hand that are in shot.
The presenter and props need to be in foreground, the fill-in
as background, and a simple PIP won't do that - the inserted
picture will obliterate the antenna.
Building up to the result
Figure 2
shows a schematic form of a composite layout that I've used often.
The general rule in FCP compositing is that the topmost video
track is what you see, except where it has areas of transparency
( or, in FCP terminology, 0% opacity). So I'm going to cut a
rectangular hole in the top picture, through which it'll be possible
to see the background graphic, with the aerial laid on top of
(that is, in front of) it. So this background is itself a composite,
of a) the presenter/aerial shot, and b) the screen shot with
the product name on it. It's by no means the only method of getting
the end composite - but it works most often when I need something
good in a hurry.
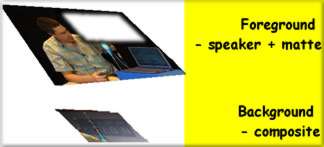
Figure 2. Schematic form
of a composite |
Figure 3 shows the fuller schematic. I've expanded the
middle picture into the three layers that FCP uses to produce
it. You can see that track 2 is a black and white signal. It's
going to act as a control over the two tracks (1 and 3) that
lie above and below it: the black areas select one track for
display, the white areas select the other track. All three of
them make up, as I've said, a 'composite' and track 2 acts as
a key (or matte - the terms are pretty well interchangable).
It's generated using the luma key filter (this term is explained
later on). Remember this is a movie, there are 25 (30 in NTSC)
frames a second. We could draw the keying signal as a black and
white graphic (using, for instance, Commotion DV) but at 25 frames
a second this can take a lot of time. It's preferable to have
the image (that is, the presenter who's in track 4) generate
its own matte where possible, and that's what we'll do here.
Key extraction is the most delicate and crucial part of this
process, and is almost certainly where you will spend most time
when adjusting composites.
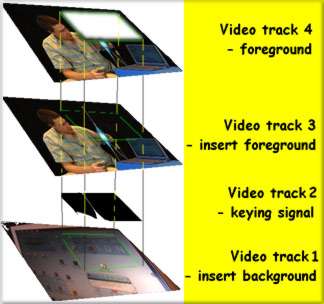
Figure 3. Fuller schematic |
What we want is called a 'luma key'- extracting the key signal
from the luminance (brightness) of the image. That's why shooting
against black is helpful - essential actually. We'll need to
treat the image in an extreme way to reach a black/white frame
that will key (or switch) cleanly. You may well find that there's
a good enough contrast between the black of the drape and the
rest of the picture to be able to use the whole frame as a luma
key - just relying on the black of the drape within the entire
picture to do the keying. The problem with luma keying is that
there are often areas within the picture (not the drape) whose
brightness level lies too close to the keying level, and you
can spend a long long time adjusting them out, or removing them
with other matte levels. That's why I've confined the keyed area
on this material.
On the timeline
Figure 4
shows the FCP timeline for this composite. The video tracks match
the layers of figure 2. The vital detail is that tracks 2 to
4 contain precisely the same picture material, and that you don't
nudge any of them out of sync. Before I got this far, I'll have
finalised the main picture and sound cut, working with just one
video track: I'll always save a duplicate of the sequence at
that point, as a safety reference.
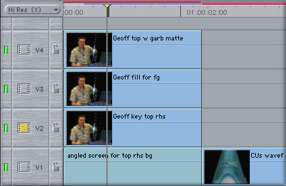
Figure 4. FCP timeline |
So, with the main cut for content agreed, I'll shift the presenter
video clips to track 2. (Dragging with the shift key depressed
stops material moving any direction but upwards). Then I edit
the background shot into track 1.
Before I generate the other tracks, I
make the 'cutout' on the presenter shot. That's done with a 'garbage
matte'. That's a video filter, dragged onto the viewer. I've
used the 4-point garbage matte - what it does is create a hole
in the picture, through which the lower video layers will be
visible. Adjusting the position of these mattes takes a bit of
getting used to in FCP. You need to position the playhead over
the shot in the timeline, so the CANVAS will give you a feed
of the composite result. Then highlight the clip on the top track.
The garbage matte filter has four position
controls (accessible in the Viewer, under the Filter Controls
tab). With View Mode in 'Wireframe', click on the cross-hairs
to set the positions for points 1 through 4 in turn and adjust
to give the right size and position of matte (don't worry about
the missing hand at this stage).
Figure 5
shows you the clip in the viewer, Figure 6 shows you the
filter controls I've used to generate this picture. Note the
check in the 'invert' box: it's vital you get this the right
way round to select which part of the image you lose. You'll
see the three adjustments for 'smooth', 'choke' and 'feather
edge' - adjust these to taste to get the best blend when you've
finished the compositing. Make sure that you leave the 'View
Mode' set to Final when you've finished, or your timeline preview
won't show the composite.
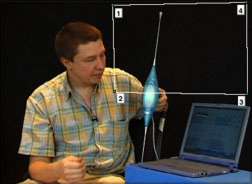
Figure 5. clip in the viewer |
|
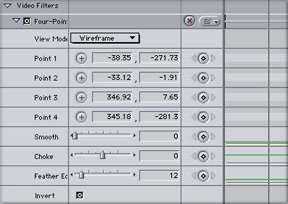
Figure 6. Filter controls |
I now copy and paste this clip into two tracks above. Select
the clip by clicking on it. Apple C (to copy), then target the
new video track, and Apple V (to paste). Alternatively, Shift
+ Option (Alt) and drag will place a copy of a clip rather than
moving it - but I find this doesn't always work (I think I lack
the co-ordination rather than the Mac). I do the copy and paste
AFTER I've put the garbage matte on, to give a guide as to which
area of the clip I am working on, when setting key levels. As
you can see from the diagram, I've renamed the clips (control
click on the clip, select 'properties' and type into the title
box) to make it obvious what each one is for - if you do nothing,
they'll all have the same name which can get confusing should
you re-visit the project after a while. (I only rename the first
clips in the timeline though)
Building the composite background
Now we need to set up the composite of
tracks 1 to 3. Select the clip on track 3 and Modify>Composite
Mode>Travel matte - luma. This composite means that FCP will
use the material in the next track down - so it's video track
2 here - as a key: I think of it as a sandwich, with the key
signal the filling in the middle.
Select the clip in track 2 and apply
the 'luma key' filter. You use this filter to generate an extreme
black and white version of the clip, which is your key. First
off, get a rough adjustment by dragging the video tab in the
viewer out to the right: you now have access to the filter controls,
at the same time as seeing the result.
Figure 7
shows the picture, Figure 8 the filter controls I used
to get it. I've chosen View Final, Key Out Darker, and Copy to
RGB (explained below). Finding the right combination of Threshold
and Tolerance is usually a delicate operation - and it's why
I suggested keeping the garbage filter in, so that you concentrate
your efforts on the area you need to. You will also need to uncheck
the 'invert' box on the garbage mattes in tracks 2 and 3, so
that the opposite areas of the frame are matted out, compared
to track 4.
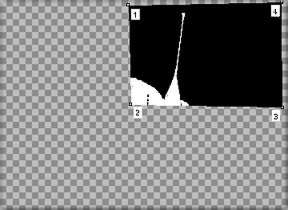
Figure 7. Shows the picture |
|
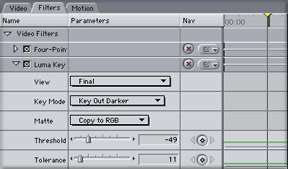
Figure 8. Filter controls |
An aside on Alpha channels
One of the dropdowns in the filter controls
sets the extracted key to 'RGB'or 'Alpha'. In this context, it's
just a matter of choice of routing - we'll use RGB (here, it
means the same as luma) to match the choice we made when we set
the travel matte on Track 3. You can think of the 'alpha'channel
as a fourth signal in a picture, with RGB. Alpha sets the transparency
of the shot. The good news is that you can save the alpha channel
on stills or uncompressed quicktime (that is, using the 'animation'codec
- saving with millions of colours, +, the + being the alpha channel).
What you can't do is save alpha in a DV compressed video, there
being no bandwidth to spare!
Final Adjustments
Once you've got a halfway decent key
on Track 2, drag the viewer video tab back to the viewer window,
and have a look at the final composite in the Canvas window.
Make sure the playhead is positioned over the correct part of
the timeline.
By now you'll have noticed the render
bar - step through a second at a time to check the keying through
the length of the clip - note that the luma key filter controls
CAN be keyframed. But you shouldn't really need to do this unless
there's been a big change in the lighting.
The final adjustment is to soften the
edges of the matte in layer 4 to blend in (to taste). Then you
can delete the garbage filter from tracks 2 and 3 to save unnecessary
rendering time. As I said, it's useful in preview, but is not
needed in the end result - the top level garbage filter has set
the areas up. I'm not too sure, by the way, whether this does
speed up the final render - it's one filter fewer for FCP to
work through, but FCP has to do more work creating the luma key:
I suspect this is a content-dependant step.
If, as is more than likely, you have
a sequence with several similar setups, there's an important
shortcut when it comes to applying filters and mattes. For each
video track, firstly select the clip you have adjusted, and Apple
C to copy it. Then select the other clips you want to treat and
Alt (Option) V. This really useful key combination pastes filters
(and any other clip 'attributes'such as motion, repositioning)
from the selected clip. Do this for each track separately. You
then need to check each of the composite shots for keying, to
see if you need to adjust anything for different content or lighting,
but most of the time only minor adjustments should be needed.
Render and read on
By now, it's time to hit 'render'and
while you're waiting, read a resume of the effects we've used
and the general principles:
FCP looks on video tracks from the top
downwards: so the topmost layer is the foreground visual.
Usually the upper layer controls the
visibility of layers underneath, EXCEPT when a travel matte is
applied. When it is, the matte layer switches between the layers
above and below it, in a 'sandwich' mode.
The garbage matte is used to create an
area of transparency in a clip, through which lower tracks can
be seen The luma key matte treats a clip to produce an extreme
keying signal.
I've only scratched the surface of the
effects, filters and compositing methods that FCP offers, and
as I said, this method is by no means the only way to get to
the desired effect. Although it may seem I've been rather generous
in using so many layers, I've found with experience that having
the key in a clearly separate video track saves a great deal
of time and trouble when re-adjusting a week later.
Phil
Ashby is producer / editor for
production company Bright Filament, who specialise in science/technology
and education based programmes in all electronic formats known
to man and woman. His biggest fears for the future are that one
day Apple will perfect FCP and there will be no problems left
to solve, the accumulated weight of manuals will overstress the
structure of his house and that render times will shrink to negative
numbers, thus increasing the working day.
copyright © Phil Ashby 2001
This article first appeared on www.kenstone.net and is reprinted here
with permission.
All screen captures and
textual references are the property and trademark of their creators/owners/publishers.
|