|
   
| Tutorial: Keyframing
in Final Cut Pro |
July, 2001
Keyframing
in Final Cut Pro
-Green
is the Color of Keyframe
By Ken
Stone
What is a Keyframe?
When we set a 'Keyframe' in FCP,
which we set on a specific video frame either on the TL (Timeline),
in the Viewer, or Canvas windows, we are 'marking' that video
frame as the starting place for something to begin changing.
When we set a second Keyframe, further down the line, we are
marking that video frame as the place were we want the change
to be complete. FCP will interpolate or generate all the frames
needed between the 2 Keyframes so that the change will happen
smoothly, over time.
What can be Keyframed?
Well, in FCP almost everything
can be Keyframed. Some of the effects that we can Keyframe are:
filters - color, size, opacity, rotate, mattes, masks, blurs,
composites and change from color to Black and White. The only
filter that can not be Keyframed is the,' de-interlace' filter.
We can place any number of Keyframed filters on a clip and have
them all running at the same time, all changing independently
of each other. Very powerful stuff.
Keyframing
There are almost as many ways to
apply Keyframes and work with them as there are things that can
be Keyframed. We will start by doing our work in the Viewer window.
We are going to change a video clip from color to black and white
and then back to color again, over time.
I like to use the 'Sepia' filter
which is found in the Image Control folder in the Effects browser.
Drag and drop the Sepia filter from the Effects browser onto
the clip in the TL. Double click on the clip in the TL to load
the filter into the Viewer window and click on the Filters tab.
The first thing you will notice
is that the Sepia filter default setting is set to 100 in the
Amount box (Red Arrow). The Amount box controls the amount of
filter that is applied to the clip. 100 being full filter effect,
0 being no filter effect. To the right of the Amount box you
will first see the Keyframe button. Further to the right is the
TL. In the TL you will see a horizontal green line. This is what
I call the Keyframe line. You will notice that it is all the
way at the top of the space as the filter amount is still set
to 100. You can click on this Keyframe line and drag up or down
to change the amount of the filter that is applied but this will
effect the entire clip. The 'Red X' button under the word 'Nav'
is the reset button and will return the filter to it's default
settings.
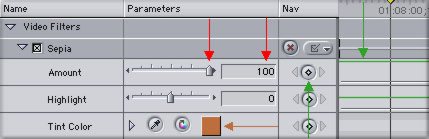
Hey, it's Sepia, well okay double click
on the 'Color' box to get the color wheel (Sepia arrow above).
Move the slider all the way to the left to 0. Now it's Black,
hit okay. The image in your Canvas window should now be B and
W. Our image is B and W because the Sepia filter defaults to
100 filter applied.
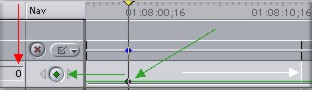
What we'll be doing is running our filter from 0 (no effect)
to 100 (full effect) over time. The start time and end time will
be determined by where we place our Keyframes on the TL. As I
want my clip to start off in color, zero filter applied, I will
enter 0 into the Amount box (Red arrow) and hit enter. You will
notice that the green Keyframe line has dropped to the bottom
of the space in the TL. The White arrow points to a thin white
vertical line which denotes the end of the clip. I want the clip
to run in color for awhile before I start the filter, so I have
moved the Playhead down the TL to my start point. My filter has
been set to Black, the Playhead is in position and Amount is
0. Now I am ready to set my first Keyframe. Click on the Keyframe
button and two things happen; first the button turns green showing
that a Keyframe has been set, second, the Keyframe itself has
been set on the TL (Green arrows below).
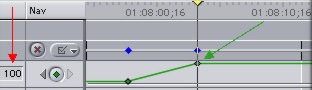
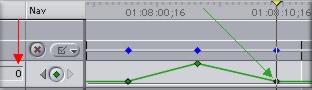
I now move my Playhead further down the TL to the point that
I want my filter to be full on, amount of 100. I enter the amount
of 100 in the Amount box and hit enter. FCP detects the change
and automatically sets a new, second Keyframe on the TL. You
can see that the green Keyframe line now runs up to the second
Keyframe. FCP will interpolate all the frames between the two
Keyframes and the clip will change from full color to B &
W over the amount of time between the two Keyframes.
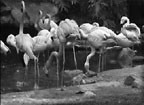
At this point my clip is now B & W (amount 100) and I want
it to become full color again. As I want the clip to run in full
color for a short time before the clip ends I now move my Playhead
further down the TL but not to the end of the clip. With my Playhead
in position, I enter 0 into the Amount box and FCP sets my third
Keyframe. The green Keyframe line runs back down to the to the
third Keyframe which has a value of 0.
Now that my Keyframes have been set I want to preview the work.
I make the TL active, turn off snapping, hold down the option
key and scrub through the clip by dragging the Playhead.

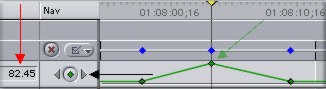
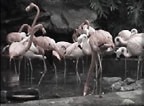
While scrubbing through the clip I discovered that I don't like
the full on B & W, too harsh. Moving my Playhead off the
second Keyframe, filter amount of 100, I found a frame that has
a hint of color and is less harsh. Back in the Viewer, Filter
tab, with the Playhead on my good frame, I look at the Amount
box and see that the amount is 82.45. This the amount that I
want to use. I move my Playhead back to the second Keyframe and
enter 82.45 into the box and enter. The second Key now moves
down to the new setting. If you will look to the left and right
of the Keyframe button (Black arrow) you will see to triangle
buttons. Clicking on these will move the Playhead either to the
previous Keyframe or next Keyframe.
We have been working our Keyframes using the Amount box and the
Playhead, but FCP is much more flexible. If you place your Cursor
on top of a Keyframe you will see that it turns into a + or move
tool. You can click on the Keyframe and drag it up or down, increasing
or decreasing the amount of filter applied, or forward or backward
on the Keyframe line changing the position in time, sooner or
later. You can add a Keyframe at any point on the green Keyframe
line by selecting the 'Pen' tool and clicking on the line. You
can delete a Keyframe by holding down the Option key, the Pen
tool will turn into a - (minus) sign, click on a Keyframe to
remove.
Keyframes can cause abrupt changes in
velocity at the Keyframe points (below left). Control click on
a Keyframe and select 'smooth'. This will apply a set of 'Bezier'
handles to the Keyframe which you can drag to smooth the Keyframe
point and change the velocity (below right). While using 'smooth'
will even out the Keyframe change, it in no way changes the timing
of Keyframes. The amount of time between the Keyframes will remain
the same.
Keyframing in the Canvas window
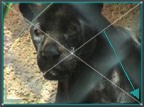
I want my image to start small and grow
large 'over time' until the end of the clip where it will be
full sized. In the Canvas window, set to 'image + wireframe'
and click inside the Canvas to make it active. I place my Playhead
at the beginning of the clip making sure that I am on the first
frame by looking for the 'first frame marker'.
Clicking on a corner of the Turquoise Bounding box, below left,
I drag into the center to reduce the size of the picture until
it's the size I want. With the Playhead at the first frame and
my image sized, I set a Keyframe by clicking on the Keyframe
button at the bottom of the Canvas window, below center. After
I have set my Keyframe the wireframe 'X' has turned green denoting
a Keyframe, pictured on right. Only certain motion properties
can be Keyframed from the Canvas window. If you Control click
on the Keyframe button at the bottom of the Canvas window you
will see a drop down list of those items are are available for
Keyframing. You can select any number of these items from the
drop down menu. The Keyframable properties from the Canvas window
are: Scale, Rotation, Center, Anchor Point, Aspect Ratio, Crop,
and Distort.


Now I need to move to the end of the clip to set my second Keyframe.
Again I must stress that you need to check to see that you are
actually on the last frame of the clip and NOT on the Edit point.
Use your arrow keys to move to the last frame if you are not
already on it.

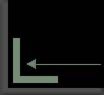
Last frame marker |

Edit point |
My Playhead is now in place, I need to enlarge the image by clicking
on a corner of the Bounding box and dragging out. I then set
a Keyframe (wireframe turns green). Option scrub to preview.

The Motion Tab
Of course all this can be done in the
Viewer's Motion tab. While there are times that you will want
to work Keyframes in the Canvas, the Motions tab offers a lot
of advantages. The Motions window consolidates a number of effects
that are often used in combination: Scale, Rotation, Center,
Crop, Distort, Opacity, Drop Shadows, and Motion Blur. All of
these effects sit one below the other in the Motions window.
This makes it much easier to coordinate Keyframing as the TL
and Keyframes for all effects are right there together. In addition
the Motion window can be separated from the Viewer by clicking
on the tab and dragging out of the Viewer. The Motion window's
TL can be extended out to the right by clicking on the lower
right hand corner of the window and dragging. The Motion window
can be returned to the Viewer window by simply closing it.
Keyframing on the TL
In the TL I have a clip that I want to
modify the volume in different places, decrease and then increase
the volume. At the end of the clip I want to fade the audio out.
I also want the opacity of the clip to fade down at the end of
the clip to match the fade of the audio.
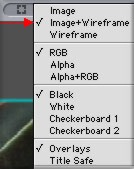
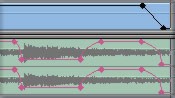
 Enlarge the
TL so that you have some room to work. Turn on 'clip overlays'
from the lower left hand side of the TL (Pink arrow at right).
You will now have horizontal lines running the length of your
clip in both the video track, in black and audio tracks are pink
. These 'clip overlays' are what we will work on to achieve the
desired results. Enlarge the
TL so that you have some room to work. Turn on 'clip overlays'
from the lower left hand side of the TL (Pink arrow at right).
You will now have horizontal lines running the length of your
clip in both the video track, in black and audio tracks are pink
. These 'clip overlays' are what we will work on to achieve the
desired results.
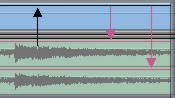
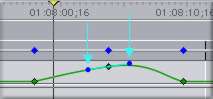
Select the 'pen' tool from the tool palette or hit 'p' on the
keyboard. With the pen tool selected find the location on the
TL where you want to lower your audio, you will set 2 Keyframes
just before the part of the audio you want to change and 2 Keyframes
just after this point. So far we have set Keyframes but have
not made any changes. Place your cursor on the overlay line between
the two sets of Keyframes and click and drag down. As you do
this you will get a small yellow box that notes the amount of
audio change in dBs. -2, -6, -12. To raise the volume back up
later in the TL set another Keyframe at the desired point and
pull the overlay back up.
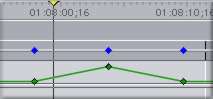
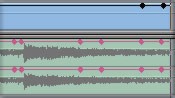
We will click on the video overlay line
and set a Keyframe where we want our opacity to start fading
down to match the fade down in the audio. At the end of the clip
we will set another Keyframe on the video overlay where we want
our fade to end and then pull it down. We now have video and
audio fading down to black at the end of the clip. It should
be noted that the only two effects that can be Keyframed in the
TL are audio and video. These TL overlay lines are often referred
to as 'rubberbands'.
As I said at the top of this article there are many ways to use
Keyframes. Keyframes are all about video changing over time.
While it may seem a bit complicated at first, Keyframes are very
straight forward and you soon will be able to accomplish the
effects that you want. Hey, these are moving pictures, make them
move.
Enjoy,
--ken
copyright © Ken Stone 2001
This article first appeared on www.kenstone.net and is reprinted here
with permission.
All screen captures and
textual references are the property and trademark of their creators/owners/publishers.
|