|
|
   
| Tutorial: Aerial Videography for Beginners, Part 2 |
October, 2012
Aerial Videography for Beginners, Part 2
Learning to Fly A Multi Copter
Sims, Micros and the DJI Phantom With GoPro Camera Mount
by David A. Saraceno
Find Part 1 here.
The Challenge. Learning to fly is, in all respects, the most important initial task for the aspiring aerial videographer. Some novices develop flying skills rather quickly, while others struggle. Basically, multi copters are controlled by a wireless transmitter equipped with two toggle/joysticks to move it forward and back (elevator), left and right (aileron), up and down (throttle), and give it speed. A “rudder” control rotates the device. Things remain fairly simple until the multi copter rotates left or right from its original starting orientation. That’s when it gets confusing.
In this second in a series of articles, we identify two software programs that offer a new flyer a way to simulate actual flight characteristics using a computer. In addition, we suggest two inexpensive, but durable, micro rotors that provide real world flight experience, but on less expensive scale than a full multi copter.
Finally, we introduce DJI-Innovations’ Phantom quad copter. The Phantom is a ready-to-fly aerial videography package that provides a nice out-of-the-box flight experience if properly set up and configured. We point out both the positive characteristics of the Phantom and identify a few key concerns you should be aware of in the set up process.
Flight Simulators. Most new users are eager to fly immediately, but the fact remains that inexperience will inevitably lead to one or more crashes. Not all crashes are easily repaired, and some require replacement parts, and long wait times as parts ship. This means lost time, money, and the ability to continue learning.
A flight simulator is good choice because it mimics on a computer the actual flight characteristics of a multi rotor. Most simulators are PC-based, run in the $100-200.00 range, and provide solid training without risking damage to an actual multi copter. Two popular flight simulators are RealFlight Basic which retails for $100.00 and includes a proprietary controller, and Phoenix RC4 Flight Simulator ($175.00). Both install on a PC and provide a surprisingly realistic experience.
Micro Copters. A second approach involves purchasing a micro copter and basic transmitter, and learning to fly a real device on a smaller scale indoors or outdoors. The two micro copters mentioned here are small, relatively safe, and respond similarly in flight to a larger multi copter. A micro copter complete with transmitter and other essentials can be purchased for less than $150.00. Two are recommended. The Blade mQX from Horizon Hobby ($149.99), and the Hubsan X4 H107 ($60.00). Make certain you confirm what the package includes.

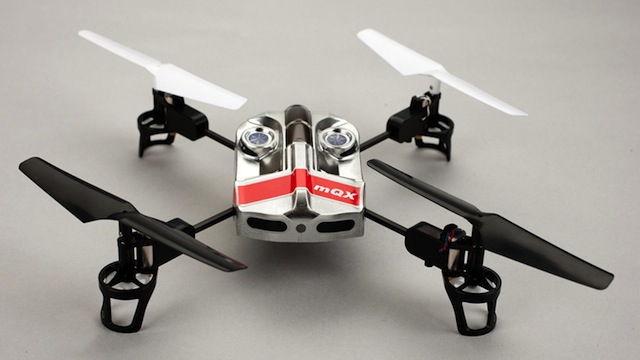
The mQX and Hubsan X4 are good training tools, and exhibit near identical flight characteristics to full scale multi copters. They can be operated virtually anywhere, are easily repaired, and provide better visual and tactile feedback in training than flight simulators. Combine practice on each, and your training will accelerate.
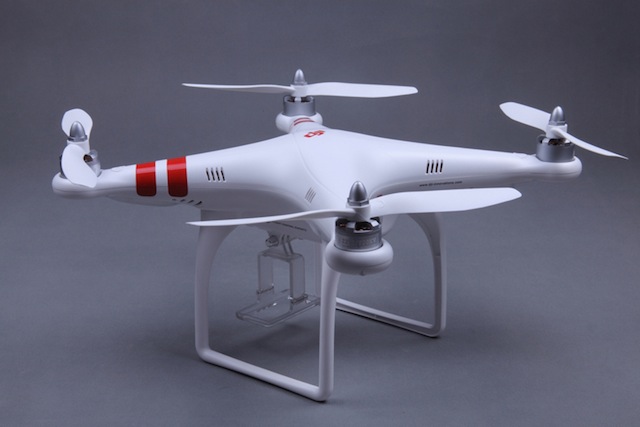
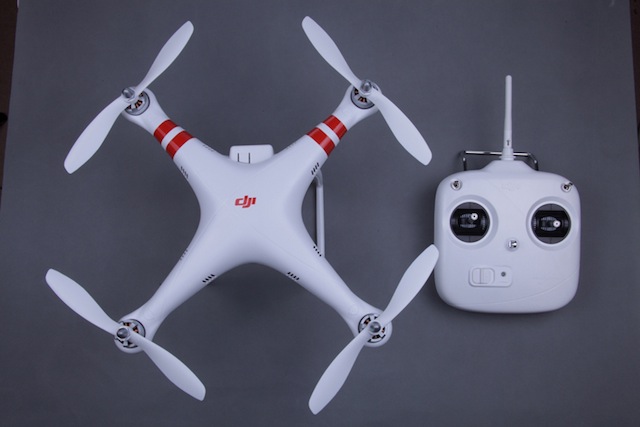
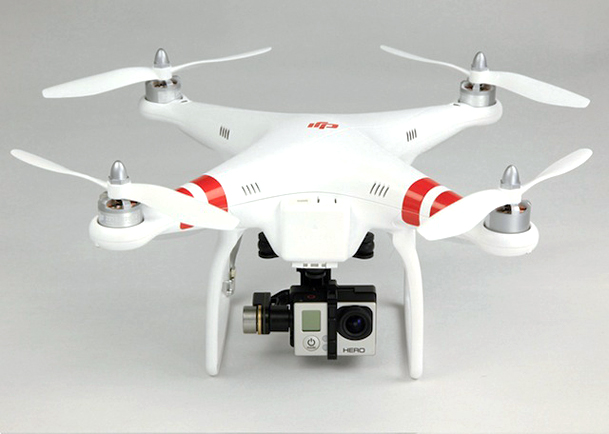
Lights, Action, Camera - the DJI Phantom in Ready to Fly (RTF) Package. Released to considerable fanfare, DJI-Innovations’ all-in-one quad copter represents a paradigm shift in multi rotor flying for the masses. The company touts the Phantom as easy-to-fly experience for new users, and it comes close. The sub-$700.00 bundle includes transmitter, mostly assembled multi rotor, battery and charger, landing gear, GoPro camera mount, balanced propellers, flight controller, LED orientation lights, GPS sensor and more.
The Phantom features attention to detail and durable construction, and is propelled forward by aggressive marketing to novices. Once assembled and properly configured, the craft is surprisingly stable due to a well implemented, sophisticated GPS/Flight Controller combination. Attach a GoPro Hero 3 camera using the supplied mount, charge your battery, work through a preflight checklist, and you can record aerial video in less than an hour.
The Fine Print. The Phantom represents an impressive value for novices and intermediate flyers. However, recommending it as an initial training device doesn’t come without some concerns, some which are explored here. That being said, a careful, informed, and conscientious approach to configuring and flying the Phantom will reward the novice with learned skills and impressive video.
Assembly of Frame. Assembling the Phantom is straightforward. All necessary bolts, screws and other assembly items are supplied. Written instructions can be downloaded at DJI’s website, and assembly videos viewed at the company’s YouTube channel. Feed the compass and receiver cables through the holes in the landing struts, and then connect the struts to the body using the supplied screws. Attach the compass cable to the compass on the appropriate landing strut, and secure the receiver to the other strut using the supplied white tape.
Assembly Caveats. There are two basic concerns when assembling the frame. First, do not use a magnetic head screwdriver in assembly. In addition, separate the Phantom generally, and the compass specifically, from any magnetic source in assembly, storage, and use. Magnets wreak havoc with the Phantom’s compass, and may cause erratic flying or worse. Don’t store the Phantom near any magnetic source, such as the speakers on the back shelf of an automobile.
Second, make certain that the compass cable is securely connected to the compass module on the landing strut. Secure it with the supplied tape, or wrap it with shrinking silicone tape or Sugru, a self-setting rubber compound. If the compass comes loose, it could lead to erratic flying.
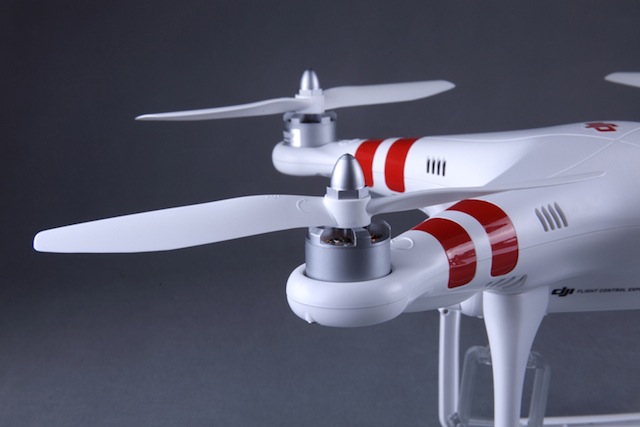
Propellor/Motor Assembly. The Phantom ships with eight balanced props and spares, which enable them to spin mostly free of vibration. Vibration causes “jello” to appear in video recorded by CMOS cameras.
Most multi copters use props that spin in different directions using differently configured propellors. The correctly spinning prop must be attached to the correct motor in order to provide lift for the multi copter. To minimize confusion, DJI molded identifying arrows into each prop to designate which motor to use. Just match propellor with motor, and you should be fine.
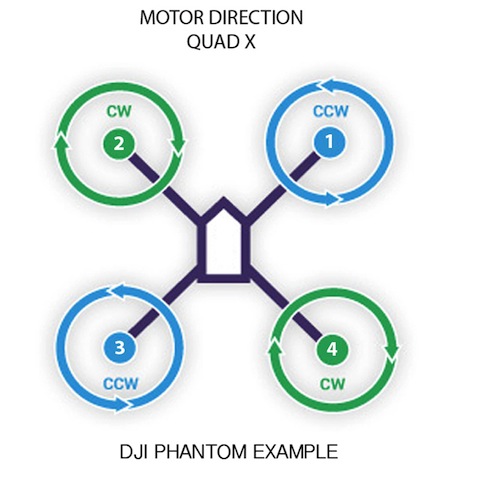
Propellor/Motor Caveats. First, make certain the correct prop is connected to the correct motor that’s spinning in the correct direction. An incorrectly attached prop will cause the Phantom to immediately tip over on takeoff, damaging the prop or the quad. Carefully follow the install directions and pay attention to the molded markings on each prop and corresponding identifiers on the motors when installing.
Furthermore, do not over tighten the prop fasteners/nuts when attaching the props with the supplied wrench. An overtightened prop can crack, or the motor shafts may break or bend. Hold on to the motor when tightening the prop, not the prop.
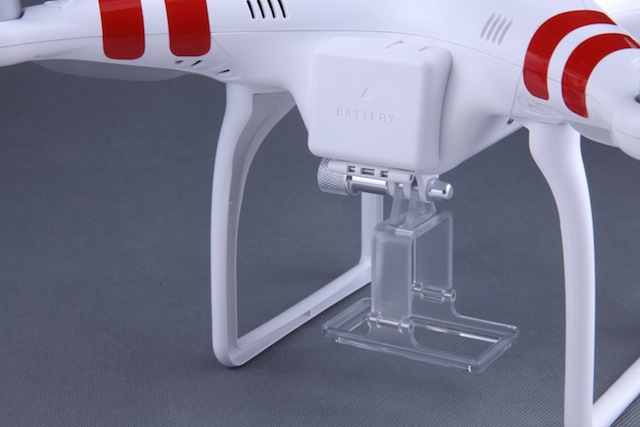
Charging and Using LiPo Batteries. The Phantom ships with one lithium polymer (LiPo) battery and charger for use with the Phantom. It will power a stock Phantom with mounted GoPro for 8 to 10 minutes of moderate flying. Attach the battery leads to the charger and the balance leads to the 3S balance lead plug on the charger while observing correct polarity. When fully charged, carefully remove both plugs, and turn off the charger.
Charging and Using LiPo Battery Caveats. All LiPo batteries should be handled, charged, used, and stored using extreme care. If handled improperly, or damaged in a crash, they can catch fire and explode. Do not charge the battery except with the supplied charger. Make certain that the battery is properly attached to the charger lead, and the balance lead to the 3S balance plug on the charger. When fully charged, the charge light will turn green, and the battery is ready for use. Never charge a battery unattended, and if possible, place the battery in a fire proof container or LiPo bag while charging.
Proper storage of LiPo batteries is a second concern. Store the batteries in a cool, dark place, out of the elements and preferably in a LiPo storage bag, or metal ammo container. LiPo storage bags are available on line. In addition, do not discharge your batteries below the recommended storage level. Always inspect your batteries carefully to determine if they are damaged in any way. Discard damaged batteries safely. Do not just throw them away. There are numerous YouTube videos on how to safely dispose of a LiPo battery.
In addition, do not use batteries not intended or certified for use with the Phantom. A higher voltage or amp battery may be inconsistent with the Phantom’s electronics, or too heavy for the quad. Finally, always carefully attach the battery to the charger or to the Phantom. Insure that the polarity is correct, or the battery or charger can short circuit.
Proper Calibration of Compass and Software. Although the Phantom is marketed as a ready-to-fly package for aerial videography, it occasionally requires some software programming. The DJI “Driver Installer” and “Phantom Assistant” software are available from DJI’s website. Make certain to download the Phantom software assistant and driver, and not the software intended for generic Naza M flight controllers other than the Phantom.
DJI provides a pdf manual and several YouTube videos to guide to teach proper programming and calibrating the Phantom. It also supplies a USB cable to connect your computer to the Phantom.
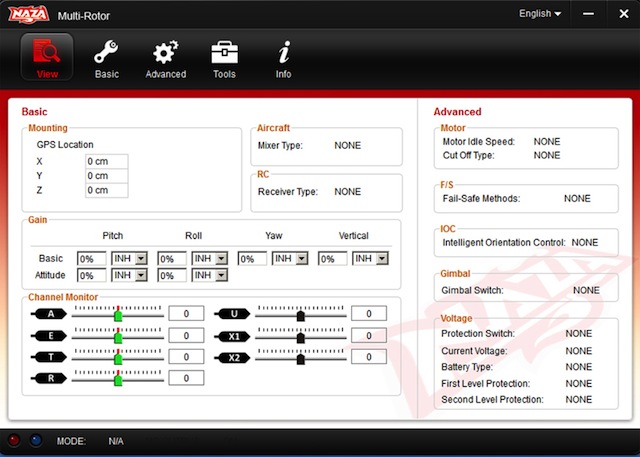
Calibration Caveats. Unfortunately, the software assistant in PC-only. Macintosh users must use Bootcamp, Parallels, or VMWare Fusion to run the software, which requires, in most cases, additional purchases. All three work without issue. The assistant is intended to change settings, enable functions, and recalibrate the Phantom to maintain the multi copter or when problems surface.
Certain safety procedures should be observed when using the software. First, and foremost, always remove the propellors before connecting the battery to the Phantom and launching the software. Removing the props prevents the quad’s props from accidentally spinning up and causing damage or injury. Second, always turn on the transmitter before plugging in the Phantom’s battery, and always unplug the battery before turning off the transmitter. In other words, the transmitter turns on first and turns off last.
The Phantom uses a sophisticated positioning system comprised of an Inertial Measurement Unit (IMU) with gyroscope, accelerometer, and barometric sensors, and a compass unit with GPS and magnetic sensors. To work properly, it must gauge its location and orientation before it lifts off. Improper calibration of the IMU (which is done using the software assistant) or compass/GPS may result in erratic flying or a lost Phantom. Compass and IMU calibrations are critical tasks for any flyer, and should be performed carefully, correctly, and often.
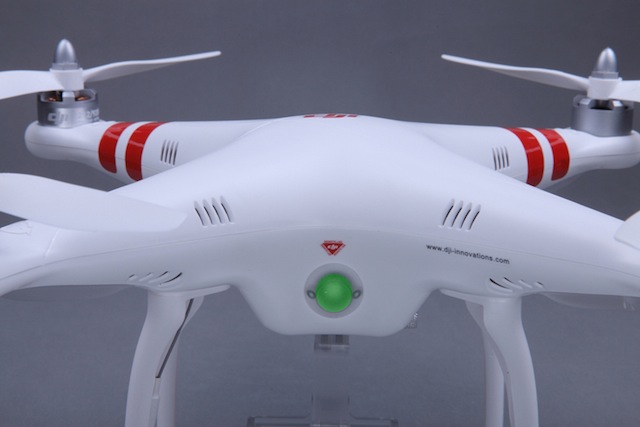
Learning the Lights - The Importance of the LED Sequences. Once the IMU and compass are properly calibrated, one important task remains before actually flying the Phantom - understanding the LED lighting sequences. Thorough knowledge of the meaning of these sequences will minimize flying issues.
Once the transmitter (TX) is powered on, the Phantom is positioned in the direction you wish it to travel (usually away from you as you face it). The battery is connected, and the Phantom remains stationary as the LED indicator light starts blinking.
Different blinks of red, orange, or green provide critical flight information at start up. They communicate if the Phantom has warmed sufficiently in order to fly, determined its home position (point of origin), what flight mode it will use (ATTI and GPS), how many GPS satellites have been located (more than six required to fly in GPS mode), transmitter or battery errors, and other important flight data.
The blinking light sequences also indicate whether course/home lock orientation has been established. This is important if the Phantom is to return to its point of origin if orientation is lost. The light sequencing also identifies problems with the quad or TX, such as low battery, loss of TX signal, problems with the compass, lack of stabilization, and other errors. Knowing these sequences, and which ones present issues, is critically important to safely flying the Phantom.
DJI explains the significance of LED indicator sequencing at its wiki web site, and in printed material available for download. Other internet resources are available to further assist. Many people print, and laminate these aids for use at the flying field.
Other Suggestions. Do not fly over traffic, people, houses, or around tall buildings. Respect the privacy of others. A large open field free of trees and other obstructions is preferred. Do not fly where there is radio interference. Minimize use in highly saturated wi-fi areas or near cell towers. Stay away from magnetic interference. Check all connections, and make certain compass, and props are secure. Fly with a full battery charge. Do not approach the Phantom until the props have stopped spinning. Join a local flying club and learn from others.
The Phantom As A Training Aid. The Phantom is significantly differentiated from competing “packaged” multi copter bundles. DJI has taken a page from Apple in providing an integrated proprietary system where everything works together, is durably built, and little is left to user intervention. Nevertheless, it is incumbent that users learn the necessary steps to make it perform safely and reliably.
Pluses. Near complete ready to fly system, factory configured, integrated GPS positioning, altitude hold, self leveling, and numerous “easy to fly” capabilities not previously available in prebuilt, full configured package. Includes transmitter, flight controller, motors, speed controls, landing gear, and camera mount that are factory installed and set up.
When properly configured and calibrated, GPS system provides significantly stable flight characteristics. This allows the novice quickly learn how to control the quad copter without risking a destructive and expensive crash. Three flight modes are included: a GPS mode which enables the Phantom to lock its position in space within a one meter radius; an ATTI mode, which incorporates a Gyro/Acc/Baro system to self level the copter; and a manual mode for experienced flyers. Both ATTI and GPS modes produce solid video footage.
The Phantom incorporates several “safety nets” to aid in controlling the multi rotor if orientation is lost, the user becomes confused, or the TX signal is lost. All assist the new user in controlling the quad. Intelligent Orientation Control (IOC) “course lock” records the orientation of the quad’s nose just before it takes off. If that orientation changes, or the user becomes confused, invoking IOC enables the quad to come straight back along its recorded vector position. A “home lock” IOC function operates similarly, but with some different advantages. In addition, the Phantom incorporates a “return to home” safety feature if transmitter is turned off, or signal is lost. The Phantom will automatically return to its point of origin so long as the GPS position was established at take off.
The Phantom ships with its own GoPro mount for recording video and taking photographs. Factory balanced propellors are provided to eliminate “jello” in video that results from CMOS sensors. A large third party market has emerged offering various modifications to the original Phantom.
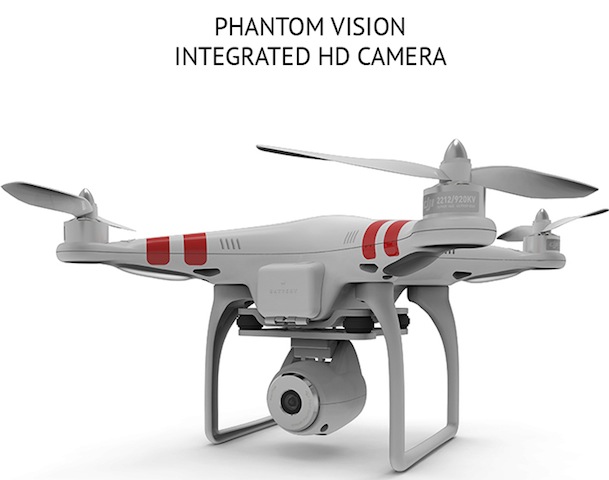
DJI continues to innovate with the release a new model - the Phantom Vision - which includes an integrated high definition camera. A new Zenmuse GoPro gimbal is being released that provides vibration free video along the tilt axis.
Negatives. The blinking LED sequence indicator. The sequencing of red, orange, and green lights is the only communication pathway between the user and the Phantom. Users are forced to memorize a full page of communication code to understand the significance of the light sequences, all of which have an impact on the safety and success of the flight.
A simple LED read out that displays the start up process is recommended to replace the LED sequencing. Descriptive terms such as “warming up,” “acquiring home position,” “acquiring satellites,” and “ready to fly,” are more descriptive than memorizing blinking light sequences.
Next Installment
Aerial Videography for Beginners, Part 3
How To Take Good Video From A Multi Rotor
copyright ©2012 David A. Saraceno
Find Part 1 here
David A. Saraceno is a motion graphics artist located in Spokane, Washington. He runs a video blog and review site called secondchairvideo that provides up to date information on most things Final Cut Pro and video related. He has written for DV Magazine, AV Video, MacHome Journal, and several state and national legal technology magazines. David moderates several forums on 2-pop.com, is active on the Apple Support Discussions forum for their Pro Applications, ranked as among the highest contributor as a Level IV in the pro apps forums, and contributes at dvxuser.com.
|