|
   
| Tutorial: -Exporting
Audio for Post-Production Sweetening |
Febuary, 2005
[This article was first published
in the December, 2004, issue of Larry's Final Cut Pro HD Newsletter]
Click HERE to Subscribe
Exporting
Audio for Post-Production Sweetening
by Larry
Jordan
www.larryjordan.biz
Many Final
Cut projects can be mixed directly in Final Cut, especially using
the new audio mixer that appeared in version 4. However, projects
with more complex audio demands are more easily mixed using audio
software like ProTools, Logic or Deck. As
I am a big ProTools fan, this technique describes what you need
to know to move audio out of, then back into, Final Cut Pro.
If you
expect to do your final audio mix outside of Final Cut Pro, plan
your project accordingly:

1) Change
the starting timecode on your sequence to 00:58:30 to give you
room to work
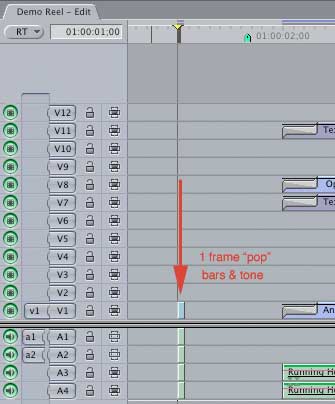
2) Add
a 1 frame "pop" of audio exactly 2 seconds BEFORE start
of first picture on all audio tracks to act as a sync point "just
in case"
3) Add
a 1 frame "pop" of audio exactly 2 seconds AFTER end
of last picture on all audio tracks to act as a sync point "just
in case"
4) Checkerboard
your audio -- put audio from different scenes on different tracks
5) Don't
worry about the mix in Final Cut
6) Give
yourself handles where possible
7) Don't
export audio until you've locked picture.
Once you
have locked picture, that is, you are sure your video timings
won't change, you are ready to export your audio.
You can
do this one of two ways:
1) Export
each pair of tracks as a stereo AIF file
2) Export
the entire project audio as an OMF file
AIFFs can
be read by any audio editing package. OMFs, which are far more
flexible, are generally only readable by audio workstation software;
for instance, DigiDesign's
ProTools (if you are using ProTools LE you'll also need to
purchase the DV Toolkit option ), Bias'
Deck, or Apple's Logic.
The benefit
to using OMF files is that all clips remain individual clips,
so you can move them between tracks, each with separate volume
and pan controls, as well as adjusting their in and out points
and adding customized fades.

When you
export an AIF, all clips on a track get consolidated into one
large clip.
To export
your audio as a Stereo AIFF
Export
all your audio into separate audio pair files, then combine them
in your audio editing application.
To do this:
1) Turn
off the visibility lights on all but TWO adjacent tracks
2) Select
File -> Export -> Audio to AIFFs

3) Name
the export file (i.e. "Tracks"). QuickTime will automatically
append the actual track numbers to the end of the file name.

4) Specify
whether you want the audio exported as a stereo pair (where the
odd number channel is panned left and the even number channel
is panned right) or as a channel grouped (where both channels
are panned center)
5) Repeat
this process for all tracks in your project
6) Load
the tracks into your audio editing software
7) Make
sure the one frame audio pop exactly lines up vertically between
all tracks.
8) Mix
your audio
To export
your audio as an OMF file
1) Make
sure all tracks you want to export have their visibility light
turned on
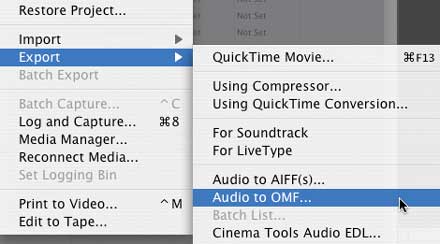
2) Select
File -> Export -> Audio to OMF
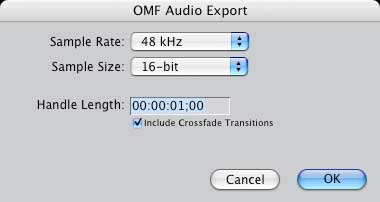
3) Select
the sample rate, bit depth and handles (48 kHz, 16 bit are fine,
you might give yourself an extra second or two on the handles)
4) Open
the OMF audio file in your editing application.
Note that
OMF files contain all the audio from your selected sequence,
so the files can get fairly large. (There is a 2 GB limit on
OMF files, so, if you are doing lots of tracks for a long program,
you'll probably want to break you sequences up into individual
acts for mixing.
Getting
your audio back into Final Cut
Regardless
of whether you are exporting as AIF or OMF, you'll need to get
your finished audio back to Final Cut. When you are ready, export
your final mix as a stereo AIF file.
Then, inside
Final Cut, import that final AIF mix into your Browser.
From there,
1) Move
the new mix down to two new tracks on your timeline
2) Line
up the audio pop just before start of picture on the new mix
with the pops that you put into your original audio tracks. I've
never had sync drift when I kept files fully digital. However,
you can reassure yourself by checking the audio pops at the tail
of the project and make sure they still line up.
3) Once
everything is sync'd, turn off the visibility of all audio layers
EXCEPT your mix and you are ready to output.
This article
is from the March 04 issue of "Larry's
FCP Newsletter," a FREE, very cool, monthly Final Cut
Pro newsletter -- click
here to subscribe. Or, visit his website at: www.larryjordan.biz.
Larry Jordan
is a post-production consultant, and an Apple-Certified Trainer
in Digital Media, with over 25 years experience as producer,
director and editor with network, local and corporate credits.
Based in Los Angeles, he's a member of both the Directors Guild
and Producers Guild.
Text
copyright 2004 by Larry Jordan. All rights reserved.
|