|
   
| Tutorial: Basic Archiving in Final Cut Pro X |
June, 2013
Basic Archiving in Final Cut Pro X
by Tom Wolsky
Basic Archiving
Basic archiving of a project and its media is pretty straightforward in FCPX. You select the project in the Project Library and use File>Duplicate Project or Command-D. You have the option to duplicate the project by itself, or with all its referenced events or just the clips used in the project. This all works well for a simple project with one event, but for more complex projects it’s a problem. Before we get into more complex projects let’s look at the basic steps so you know the basic archiving procedures.
Though normally the best way to handle projects and events is to do it within FCP, for this type of archive, we will do it partially in FCP and partially in the Finder. We’ll do the duplication in FCP, and the cleanup in the Finder.
The first step you want to take, if you’re working with proxy media, is to switch your playback preferences back from proxy media to original/optimized media. FCP automatically will switch between original and optimized, whichever is available, giving preference to optimized media. It will not however automatically switch between proxy media and original/optimized. Once you’re done editing the project the first media you want to dump are the Transcoded Media folders, so you need to switch to original/optimized otherwise all your events and projects will go offline. Don’t bother re-rendering because we’re going to do is dump the render files.
Organizing the Media
Before you archive, you need organize. When you import media into FCP it’s generally best practice to copy all the media into your events. That way everything is in the same place ready to go, but sometimes you don’t. Sometimes the media isn’t copied into the event, or only some of it is. When that happens what’s currently in event project folders are aliases.

Alias Files
This saves duplicated media, but it means that when I backup up the events, I’m only saving the aliases. If I move or delete the original media, the event is useless. For people working on SANs this is great, because you can duplicate events without duplicating media. For archiving however it creates a problem. So your first step is to make sure your material is organized.
1) Select all the events for the production in the Event Library
2) Use File>Organize Event Files
3) In the dialog sheet that drops down, click Continue.
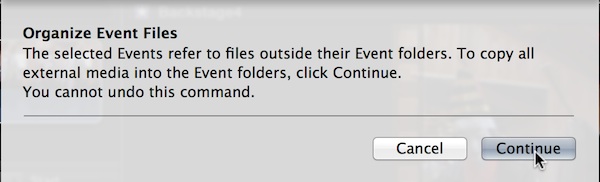
Organize Dialog
This will copy all the media into the events, replacing the aliases, making the events ready to archive. Make sure you have plenty of drive space as this can take big chunks of hard drive memory, depending on the format of your original media. When it’s done quickly check through the Original Media folder for each event to make sure the media is there.
Clean-up & Duplication
The next step is clean-up. Basically you just want to keep the bare minimum that you need for the archive. It’s easiest to do this at the Finder level with FCP closed. But before you close the application make sure in playback preferences that background rendering is switched off. Why? So that when you next open FCP it doesn’t start generating more render files, which we are about to dump.
With FCP closed go first into each event and dump the Transcoded Media folders. You can also dump the entire Render Files folder. This folder contains the thumbnails and peak data for the video and audio display. FCP will build a new, clean event Render Files folder when you open the application for just the clips that are there.
Then go into each project folder in the Finder and throw away any Render Files folder as well as any Shared Items folder. Shared Items contains any exported media sent to YouTube or Vimeo or the Apple media browser. Don’t bother archiving these.
Once you’ve emptied the trash after cleanup, you are ready to do the actual archive of the project and its media from inside FCP.
1) From the File menu select Duplicate Project to bring up the options dialog.
2) Select the name and the drive to which you want to archive the project.
3) Make sure Include Render Files in the lower left is unchecked. We don’t need render files.
4) Then select either Duplicate Project and Referenced Events or Duplicate Project + Used Clips.
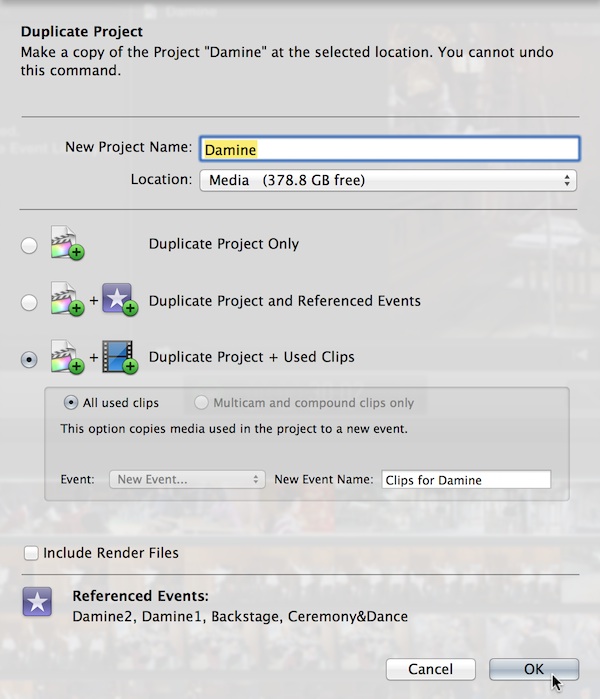
Duplicate Dialog
That’s the basic procedure.
Complex Projects
What do you do when you have multiple events used in multiple projects that are all part of the same production? You’ve imported media into different events for organizational purposes. You’ve created different versions of your project as you go along, and now you want to back up everything, all the media and all the projects.
The first thing to do is to use the excellent Event Manager X from Intelligent Assistance to move your events and projects around so that only the events and projects related to the one production you want to archive appear inside FCP.
Here’s the situation I’ve set up. I have multiple projects that use multiple events.
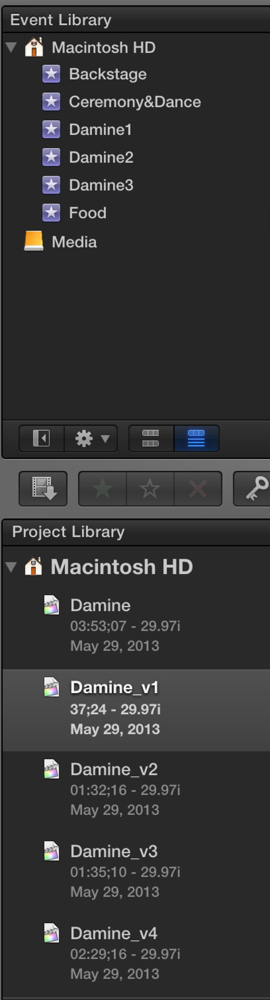
Event and Project Libraries
Damine_v1 is the oldest version, short and only uses one event. Damine is the last version produced, the latest version and uses media from most of the events, but not all. To archive the production I would like to back up the media and all the projects and versions, not just the final version. But I wanted to backup just the clips used, not all the media.
If you want to back up everything, all the events, and all the media, and all the projects, it’s easiest to do in the Finder. Just copy all the events and all the projects to the archive drive and you’re done. Because the relationship between projects and events remains the same, on the same drive, the projects link to the events seamlessly.
If I wanted to keep just the final version, that would be simple too, I would just archive it by duplicating the project and its referenced events or used clips. But if I want all the used clips, and only the used clips, from all the projects, then there are certain problems inherent here because FCP can only duplicate one project at a time. So let’s see how to do this.
Building a Master Clip Project
Because it would be really laborious to see which clips in which events are used in every project of the production. The trick is to create a master clip project that has all the clips used in any project. Because FCP doesn’t care how long a project is, or how many times a clip is used in a project, it will not duplicate the media, which is what we’re trying to avoid. I want to have all the projects, but just the clips used in those projects, from whatever event they come from.
Take the longest project you have and duplicate it, just the project no clips or events. Name the duplicate Master Clips. Open the project and in clips appearances set it to Clip Display Option or Control-Option-6. Doing this means that the application does not have to build thumbnails and waveforms for the whole project, and will be a very big project.
Next open each project for the production, copy everything in it, and paste it into the Master Clips project. Once that’s done you have a project with every shot and every piece of audio used in the production.
Now we begin to archive.
1)Select Master Clips and duplicate it.
2)Set the project to copy to the archive drive and use Duplicate Project + Used Clips. Even if the clips are used 20 times in this project, FCP will only make one copy of the clip.
3)Once the master event is created with all the clips, delete the Master Clips project from both the original drive and the archive drive. These are no longer needed.
The next step is to point each of the projects to the new master event that has all the used clips and only the used clips. Select each project, one at a time, and open the Properties inspector (Cmd-4). At the bottom of the Properties inspector is a display that shows which events are referenced. You want to point all the projects to the duplicated event.
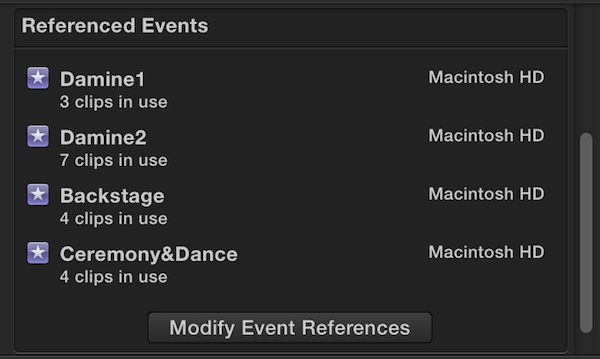
Referenced Events
To change the referenced events, click the Modify Event References button. A dialog appears that shows you where all the media used by the project is located, including duplicate media in duplicate events. In the dialog drag the master event you want the media to reference to the top of the list.
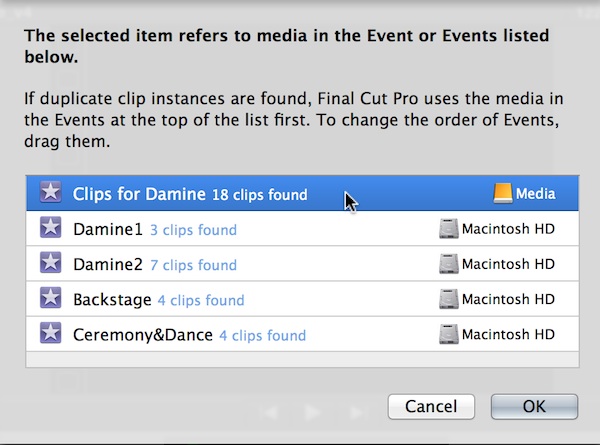
Modifying Referenced Events
The Properties inspector should now show you only one referenced event, the new master duplicate on the archive. Repeat for each project you want to archive.
Once this is done, you can duplicate each project to the archive drive duplicating the project only because you have all ready archived the media needed for the project.
You’re down to final clean up before you archive. Because you’ve been opening and closing FCP it’s been generating thumbnail files and other things which you don’t really need to store. So with the application closed go to the archive drive and inside each project folder dump the Render Files folder and empty the trash.
Zipping and Bundling
The last step is to consolidate the events and projects into a container. There are a number of ways to do this. One of the simplest is the select the Final Cut Events folder and the Final Cut Projects folder, right-click on them and select Compress two items, which will zip the folders into an archive. Another popular method is to create a sparse image, as the sparse image can be mounted and can operate just like a hard drive. You can create a sparse image using the Disk Utility. First check to see how big the two folders are. Select them in Finder and press Option-Command-I. This gives you a single information window for both folders showing a combined file size for all the media.
1) In Disk Utility use File>New>Blank Disk Image
2) Set the name at the top and ALSO set the name for the disk image below.
3) Change Size popup to custom and make it something with plenty of space. The sparse image will only be as large as the media in it, but it will have space to expand.
4) Change Image Format to Sparse disk image or Sparse bundle disk image. The latter has some advantages including resizing.
5) Create the disk image on the archive drive, which mounts as a separate drive.
6) Drag to copy or move the events and projects folders into the disk image.
A great utility for making sparse bundles and for keeping track of media and events and projects is Andreas Kiel’s X-Files Pro. It lets you see where every piece of media is for every project. It also lets you create and compress and expand sparse bundles.
That’s it. Everything you need to know about archiving events and projects when your productions are completed. Or completed until the next time you need them.
Every book and online tutorial, including my own from Focal Press and Class on Demand, will give you the basics of archiving your project after it is complete. Most will however give you only the basic understand of how to do this, dumping render files, duplicating the project and events and so on, for more complex archiving such as we’ve seen here you have to proceed more carefully.
Copyright © 2013 South Coast Productions
 Tom Wolsky is the Senior Instructor for the Digital Media Academy. He is a certified instructor in Final Cut Pro, which he teaches at DMA. Tom is the author of several Final Cut and video production instructional books as well as DVDs for FCP, Final Cut Studio, and Mac OS X for Class on Demand. His Class On Demand training has won multiple Telly and Horizon Interactive awards. He trains and consults with teachers, students, and companies around the country, for the Platypus Workshops and Maine Media Workshops. He is an active presence on a number of online forums. Before teaching he worked in the film and television industry for more than 40 years. He worked in London as a writer, producer, and technician before joining ABC News, where he was an operations manager and producer. He later moved to ABC News in New York for Good Morning America and World News Now. Tom Wolsky is the Senior Instructor for the Digital Media Academy. He is a certified instructor in Final Cut Pro, which he teaches at DMA. Tom is the author of several Final Cut and video production instructional books as well as DVDs for FCP, Final Cut Studio, and Mac OS X for Class on Demand. His Class On Demand training has won multiple Telly and Horizon Interactive awards. He trains and consults with teachers, students, and companies around the country, for the Platypus Workshops and Maine Media Workshops. He is an active presence on a number of online forums. Before teaching he worked in the film and television industry for more than 40 years. He worked in London as a writer, producer, and technician before joining ABC News, where he was an operations manager and producer. He later moved to ABC News in New York for Good Morning America and World News Now.
|