|
   
Tutorial: Final Cut Pro X & ProRes
|
November, 2012
Final Cut Pro X & ProRes
Transcode, Optimize, Render, Share
by Richard Taylor
Final Cut Pro X (10.0.6) gives us choices to transcode, optimize, render and share our media using a version of ProRes, Apple's professional 10 bit full I-frame codec. With all of these choices it sometimes can be a bit confusing why, when and where to use what version of ProRes. In this tutorial I'll explain the options.
Transcoding and optimizing in Final Cut Pro X creates a new edit-friendly version of a media file either as ProRes 422 or ProRes Proxy. Transcode and optimize are available when importing media from your camera or hard drive, or if you choose to transcode after import. Share is exporting and rendering is the process that creates a new file when you color correct a clip, add an effect to it, change the timing of it, etc with all of your changes baked in to the new clip.
TRANSCODING AND OPTIMIZING
Let's start with importing. When you import media into Final Cut Pro X you have the option to transcode it. You have two Transcoding choices - "Create optimized media", if the media is not already optimal for use in FCPX or "Create proxy media".
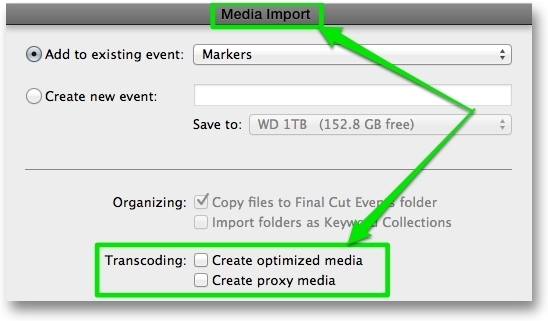
These are the same two Transcoding choices that are in Final Cut Pro X's Import preference.

When you drag media from the Finder into an event or timeline in Final Cut Pro, it will obey Final Cut Pro's import preference setting. So if you have "Create optimized media" selected in your import preference, Final Cut Pro X will transcode your media.
One optimizing caveat: If you import REDCODE RAW media, deselect the “Create optimized media” and “Create proxy media” options because any transcoding work done during import will be discarded if you adjust the RAW settings. More information on RED workflows with Final Cut Pro X can be found here.
Optimized media is almost always ProRes 422. The exception being when transcoding RED RAW which is ProRes 4444. Proxy media is always ProRes proxy.
Final Cut Pro transcodes and optimizes your files after the import of the source media is complete. If you want to monitor the progress of your transcode, you can do so in the Background Tasks window.

When transcoding files, Final Cut Pro always retains the original media files in the Event > Original Media folder. Transcoded media is kept in the Event > Transcoded Media folder.
If your media is already in a format that can be edited with good performance, "Create optimized media" will not be selectable. These optimal formats include HDV, DV, DVCPRO HD, XDCAMHD/EX/HD422.
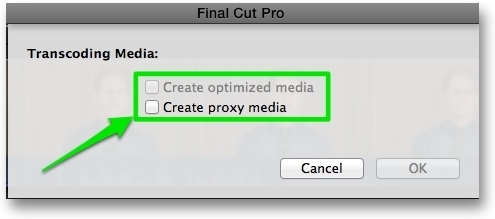
You can also transcode your media after importing. To do so, control-click one or more clips in the Event Browser and choose "Transcode Media" from the dropdown menu. You'll be greeted with the same two transcoding choices as above - Create optimized media or Create proxy media.
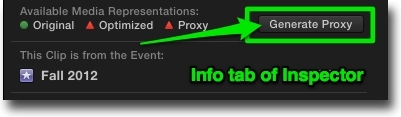
You can also create a proxy file for a clip using the Info Inspector.
When working on a project with a lot of compositing, a multicam project with lots of angles or on an older machine or laptop, you will get better performance if you use proxy playback by selecting “Use proxy media” in Playback preferences. To use proxy playback you must have proxy versions of your media available.

Transcoding to the ProRes 422 codec provides better performance during editing and faster render times but it does not increase the quality of the original source files. The downside of ProRes is the file size - it can be about four times the size of the original file format, typically a version of H.264.
RENDERING
When it comes to rendering, you can choose your render format in your project settings. Select your project in the project library then go to the settings tab at the bottom right corner of the inspector. The settings tab has a little wrench icon.

The project settings window will pop up and there you can choose your render format.
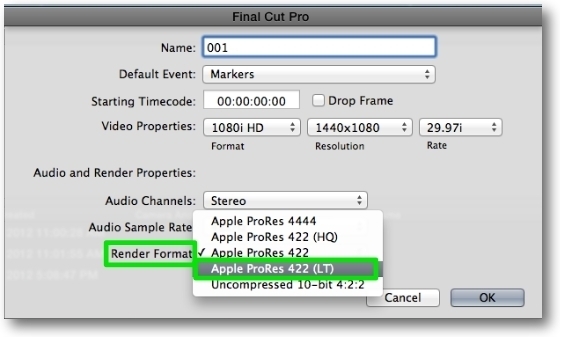
You can choose one of four versions of ProRes - 4444, 422 (HQ), 422 or 422 (LT). If you transcoded your media to ProRes 422, it would make sense to render as ProRes 422 or higher. Info on Apple's ProRes codec is available here.
For some reason ProRes 4444, 422 (HQ) and 422 (LT) are available for exporting and rendering but not available for transcoding and optimizing.
EXPORT/SHARE
Next comes exporting. When you export your timeline as a Master File via the timeline Share menu ...
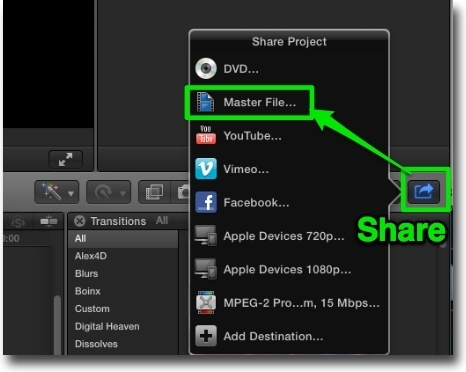
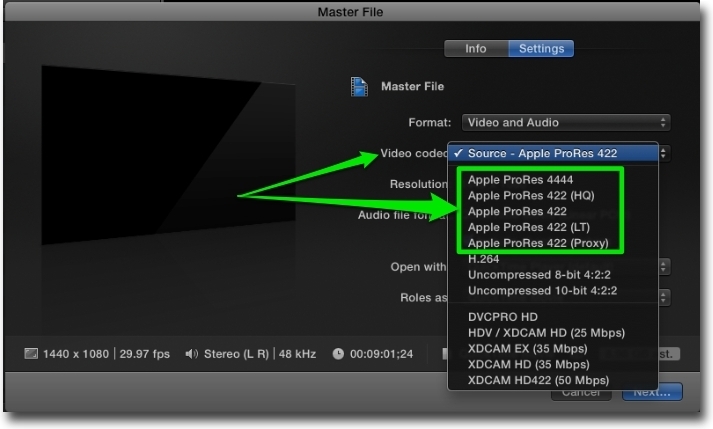
...you will get the most options for a video codec including all five versions of ProRes.
So what's the determining factor on whether you transcode your media or not? If you're getting good performance while editing your original source files, transcoding might not be necessary. I edit with native H.264 media quite often. But if you are going to do a lot of compositing, color correcting or adding lots of titles or effects, you will be rendering quite a bit of your timeline to ProRes. In that case transcoding all of your media to ProRes is a good idea. You can always try a sample project with and without transcoding to see which you'd prefer.
So to recap, two versions of ProRes are available when transcoding and optimizing - ProRes 422 and ProRes Proxy. When rendering, four versions of ProRes are available and when exporting all five versions of ProRes are available.
Richard Taylor is a Level 2 Apple Certified Trainer for Final Cut Pro X, 5, 6 & 7 and a
Video Editor/Producer in the Baltimore/Washington DC area. You can follow him on Twitter @RichardTaylorTV or via his website dedicated to Final Cut Pro X - FCPX.TV
|