|
   
| Tutorial: - Reinstall OS X & Final Cut Studio The Right Way |
Feb, 2010
Reinstall OS X & Final Cut Studio The Right Way
Part 1 - How To Create A Bootable OS X Firewire/USB Install HDD
By David A. Saraceno
WARNING: PLEASE BE COMPLETELY FAMILIAR WITH THE PROCEDURE FOR FULLY BACKING UP CRITICAL FILES AND DATA BEFORE ATTEMPTING THIS PROCEDURE. AUTHOR AND PUBLISHING SITES ASSUME NO RESPONSIBILITY FOR LOSS OF DATA IF USER DOES NOT PROPERLY BACK UP FILES. BOTH Carbon Copy Cloner AND COMMERCIALLY AVAILABLE SuperDuper WILL CREATE A MIRROR IMAGE OF YOUR BOOT DRIVE.
Introduction. A common concern of Mac video users is how to quickly reinstall Mac OS X and associated applications while preserving settings, documents, and other important data. If a boot drive is failing, or the OS or applications don’t work reliably, many users understandably resist a clean install.
The approach is perceived as taking too much time, and there are fears that data will be lost. Instead, many users elect a Time Machine backup, Migration Assistant transfer, Archive and Install, or Finder copy to correct the problem. None of these reinstall strategies are “best practices” in a professional environment.
Too often these strategies compound rather than correct the problem. If, however, if you have prepared in advance, the task is significantly easier for the initial reinstall and any other time you need to get things working again.
This multi-part tutorial suggests a long term strategy designed to produce a problem-free install, and a quick reinstall if problems should arise again — with the proviso that you spend a one time spare afternoon preparing the necessary files and materials. The strategy is intended to produce long term results and far less down time.
What you’ll need:
1. OS X install DVD – Tiger, Leopard, or Snow Leopard retail disc.
2. USB2 or FW drive large enough to hold disc images for all applications, and important data on your boot drive. Note USB drives are only bootable on Intel Macs.
3. DVD drive.
This tutorial will take about two hours.
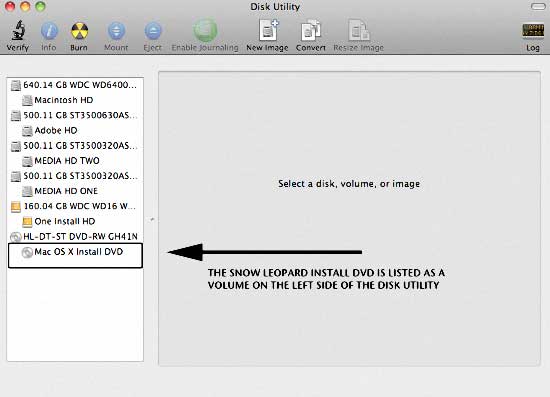
Locate your retail install disc for Leopard or Snow Leopard and mount it on your desktop. Then open Disc Utility, which is located in Applications/Utilities and launch it. You will be presented with the following screen.
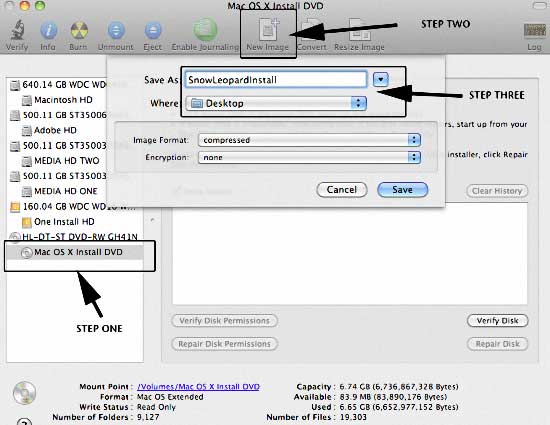
Click on the MacOS X Install DVD listing on the left side of the Disk Utility, and then click on the New Image icon on the top of the box. In the Save As box, name the image you are saving as “SnowLeopardInstall,” or something similar, and keep all the settings the same as you see here. Save it to your desktop.
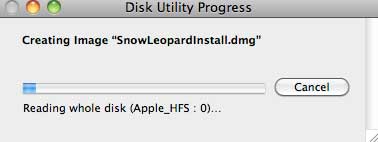
A progress bar will appear as the image is being copied as a dmg image file to your desktop. It should take 10 to 15 minutes.
Once that image is created, eject the retail install DVD. There should be a volume icon on your desktop called “SnowLeopardInstall.dmg.”
The next step is mount your USB2 or Firewire hard disk drive on your desktop. One consideration that is critical here is the size of this drive, because it will hold not only the OS X install DVD image, but disc images of all your application installs, and any critical files that you use daily including iTunes, photos, address book backups, Mail, etc. In my case, I feel a 150GB drive is minimal, and 250GB or more is optimal. A bus powered Firewire 500GB drive runs about $100.00 or so, and is the best bargain out there for our purposes, but a USB2 drive bus or externally powered will work as well. And remember that only an Intel Mac will boot from a USB2 created install HDD.
In Disk Utility, locate the drive on the left, and click on the partition button at the top. In the Volume Scheme drop down menu, choose, 1 Partition, Format: Mac OS Extended (Journaled). The screen should like like this:

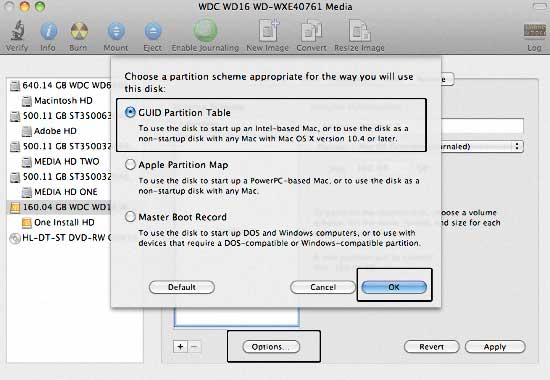
Click on the Options Button, and elect GUID Partition Table, and then click on the Okay Button. Then click on Apply and allow the drive to be formatted.
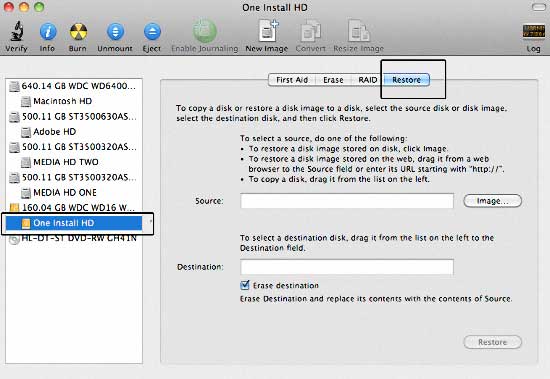
Next, select the HDD drive name on the left and elect the Restore Tab on the upper right size of the Disk Utility. All the remaining settings should look like this:
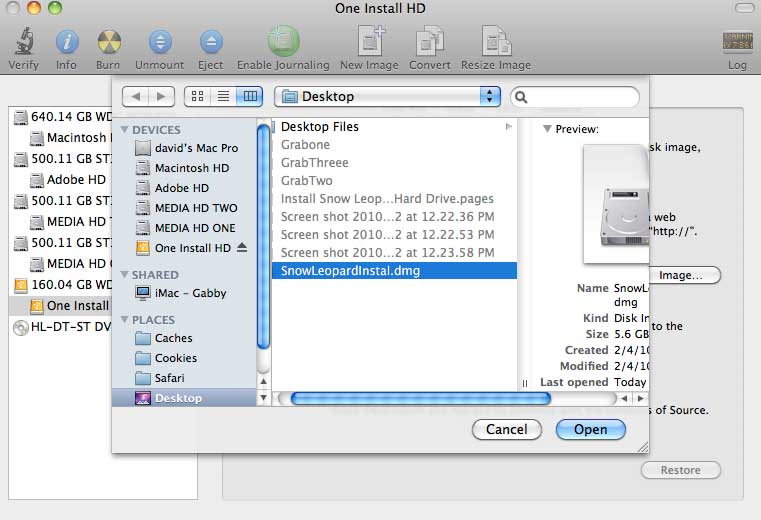
Then click in Image Button below the Restore Tab and select the “SnowLeopardInstall.dmg.” on your desktop.
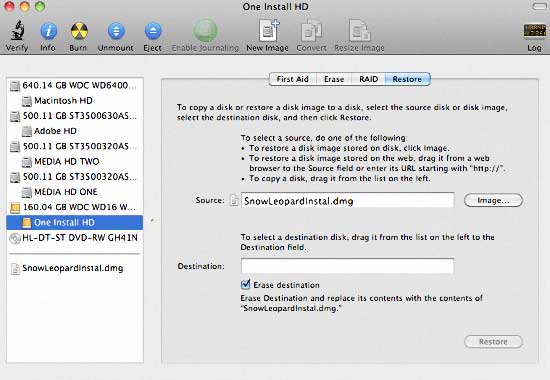
Click on the Okay button and this is what you should see.
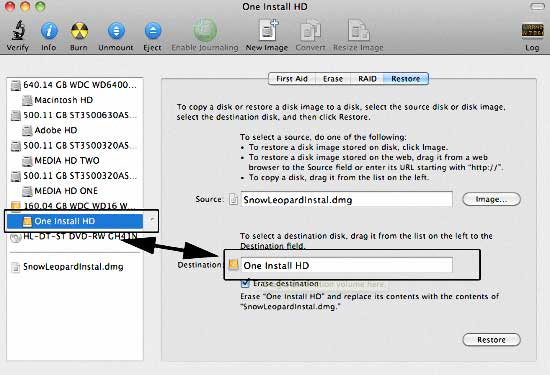
Next select the HDD drive icon on the left side of the Disk Utility and drag it into the long box to the right of the word Destination. Everything should look like this:
Click on the Restore Button, and the HDD will be transformed into a bootable HDD external HDD. It should take about 10 to fifteen minutes.
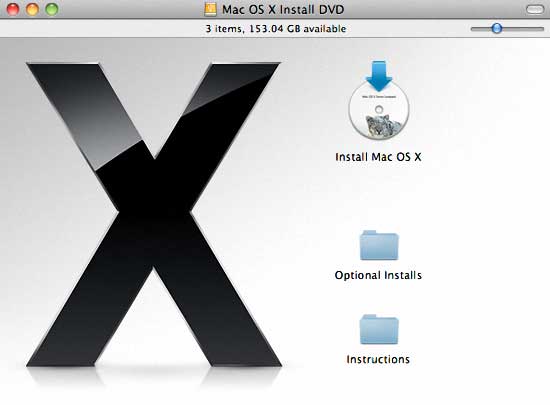
Once completed, a new volume will appear on your desktop and the following screen will be presented — exactly like your Leopard or Snow Leopard Install DVD.
Test what you have created by going to your System Preferences/Startup Options to see if your Firewire or USB2 drive is an option. It should appear there, and you can test it further to see if it boots. Then quit out of the installer, reboot to your normal drive, and Part 2 is coming soon.
Copyright ©2010 David A. Saraceno
David A. Saraceno is a motion graphics artist located in Spokane, Washington. He runs a video blog and review site called secondchairvideo that provides up to date information on most things Final Cut Pro and video related. He has written for DV Magazine, AV Video, MacHome Journal, and several state and national legal technology magazines. David moderates several forums on 2-pop.com, is active on the Apple Support Discussions forum for their Pro Applications, ranked as among the highest contributor as a Level IV in the pro apps forums, and contributes at dvxuser.com.
|