|
   
| Tutorial: Working
with Keyframes in Motion, Part 1 |
February, 2005
Working
with Keyframes in Motion, Part 1
Creating and Manipulating Keyframes
By:
Mark Spencer
With
all the hulabaloo about Behaviors, it's easy to forget that you
can use traditional keyframing techniques to create animation
in Motion. You can create keyframes for just about any parameter
of any object, mask, or effect, and you can manipulate the keyframes
in Motion's full-featured Keyframe Editor. However, there are
a few quirks in the way Motion handles keyframes that can trip
you up - especially if you are used to keyframing in other applications
- so let's take a look at how to create and adjust keyframes
in Motion while avoiding these pitfalls. This article assumes
basic familiarity with the Motion interface and the concept of
keyframes. For an overview of navigating the interface with keyboard
shortcuts, see my article here.
Creating
Keyframes with Record Animation
The
quickest and easiest way to set keyframes in Motion is by using
the handy Record Animation feature. You enable recording of keyframes
by clicking the red Record button, or pressing the keyboard shortcut
A. Then, with the object you want to animate selected and the
playhead positioned where you want to add a keyframe, you simply
change the value of any parameter - that new value is automatically
recorded at that frame.
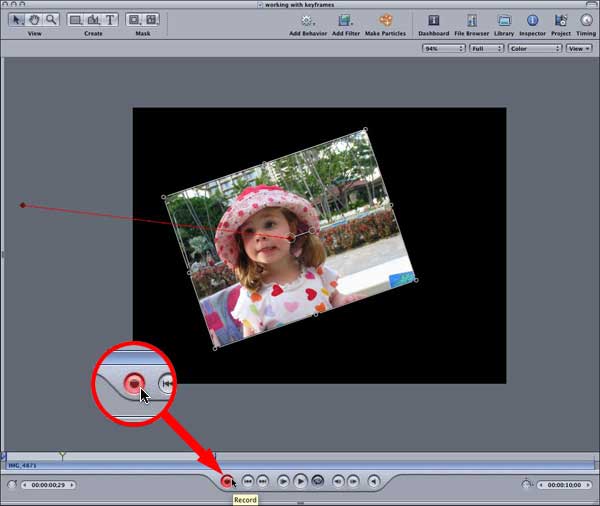
To
change transform parameters, such as position, scale, rotation,
or anchor point, you can manipulate the object directly in the
Canvas (control-click on the object to change to the appropriate
tool if needed). For other parameters you can use the Dashboard
(press D to reveal it) or go to the appropriate tab of the Inspector
for a complete list of all available parameters.
Move
the playhead, change a parameter value, and repeat as needed.
Easy and intuitive. You can even change parameter values while
the project is playing, and your changes will be recorded in
real time - this method is called "on the fly" recording.
A few things to watch out for when using Record Animation: first,
remember to turn off recording so you don't accidentally create
keyframes where you don't want any! Click the Record button or
press A again to turn it off (it glows red when it's active).
If you find that you are accidentally leaving it on, you can
tell Motion to ignore it during playback by selecting Recording
Options under the Mark menu, and checking the "Don't record
keyframes during playback" checkbox.

Second, it's important to understand that when you turn on Record
Animation, a keyframe is automatically set at the first frame
of the selected object.
For
example, if you turn on Record Animation, move the playhead to
5 seconds into the duration of an object, and set a Scale keyframe
for 150%, then the object will grow from the previous value to
150% over the first 5 seconds that it's visible. Sometimes, this
is not the behavior you want. Maybe you want the object to remain
at 100% for the first 3 seconds, then grow to 150% between 3
seconds and 5 seconds. To acheive this, you could "trick"
the Record Animation feature to set a keyframe at the 3 second
mark by changing the scale value to any new value and then back
to 100%, but in cases like this, I prefer to set keyframes the
old-fashioned way: manually.
Creating
Keyframes Manually
Although
Record Animation is the fastest way to set keyframes, for the
most control you'll want to set keyframes manually. To do this,
you use the Animation Menu - an easily ignored little dash next
to each keyframeable parameter in each tab of the Inspector (It's
also available in the Keyframe Editor, but we'll get to that
a little later).

Simply
select your object or effect, position the playhead at the location
for the keyframe, then select Add Keyframe from the Animation
Menu.
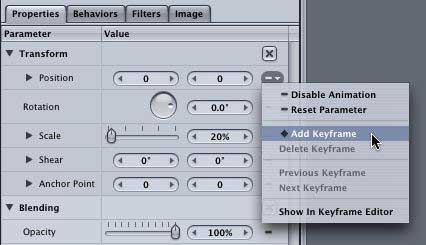
Once
you set a keyframe, the dash changes to a solid diamond. If the
playhead is not parked directly on a keyframe, the diamond becomes
hollow.
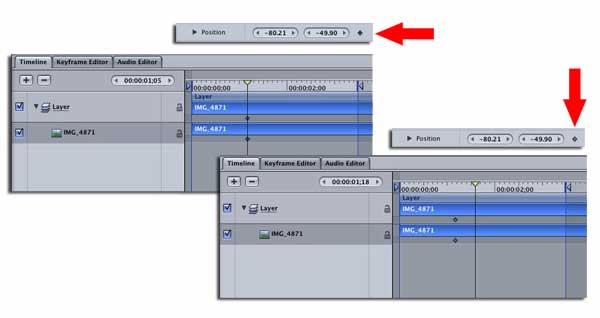
After
setting your first keyframe, just repeat the process. But here's
the quirk: you must add the keyframe before you set the
new value for that keyframe. If you change the value
before you add the keyframe, you are changing the value at all
points in time. This process is different from both Final Cut
Pro and After Effects, and if you are used to setting keyframes
in those applications, it's sure to trip you up. So remember:
add the keyframe first, then set the new value.
The
Animation menu in the Inspector is also useful for jumping from
one keyframe to the next, for disabling the animation (which
retains the keyframes but just ignores them), or for resetting
the parameter (which deletes all the keyframes and restores the
parameter to its default value). But if you want to get deep
into tweaking keyframes, the Keyframe Editor is the place to
do it.
Oh,
you may be wondering - what are the keyboard shortcuts for adding
a keyframe? Or for moving from one keyframe to another? That
brings us to another quirk of Motion: no keyboard shortcuts for
adding or moving between keyframes. As opposed to After Effects
(e.g., option-p to set a position keyframe) or Final Cut Pro
(control-K sets a keyframe for most of the Motion tab parameters),
you must click and drag in the Animation menu every time you
want to set a keyframe or jump to a keyframe. So try to remember
to use Record Animation whenever possible because it's just plain
faster.
Manipulating
Keyframes with the Keyframe Editor
Once
you have set a few keyframes, you usually need to make adjustments:
move the keyframe in time, align it to another keyframe, change
its value, add or delete keyframes, or change how Motion animates,
or interpolates, between keyframes. For all this detail
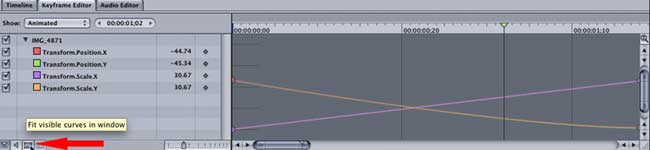
work, head over to the Keyframe Editor in the Timing pane. If
you select your keyframed object, by default you will be presented
with just those parameters that you have animated. Clicking the
"Fit visible curves into window" button at the bottom
left will quickly resize your keyframes and curves quite nicely,
although I like to drag the zoom slider in so that the end keyframes
aren't pressed up against the edge of the window.
One
way to work with individual keyframes in the Keyframe Editor
is to click directly on them. Sliding up and down changes the
keyframe value; sliding left or right changes the keyframe's
location in time. To avoid changing both the location and the
value of the keyframe at the same time, hold down the Shift key
to constrain the motion to just vertically or just horizontally.
If
you have a precise location in mind for your keyframe, like the
current playhead location or another keyframe, turn on snapping
by clicking the tiny button in the very bottom left corner. Note
that this snapping is different than the Snap feature under the
View menu, which turns on snapping in the Canvas.
If
you want a precise value for a keyframe, you are better off entering
it directly in the Inspector rather than trying to drag the keyframe
up and down.
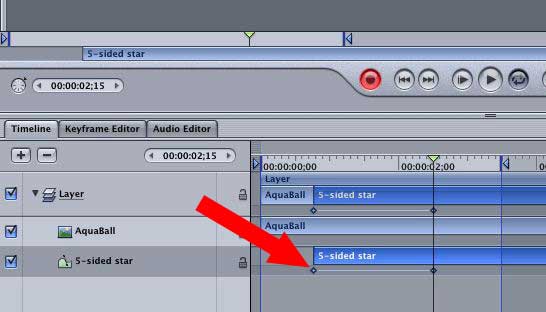
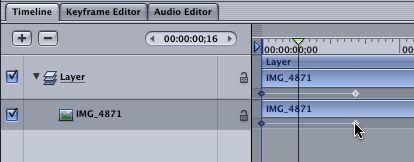
If
you want to move multiple keyframes that are applied to an object
all at the same frame to a different frame, it's easier to use
the Timeline instead of the Keyframe Editor - all keyframes
at a given frame are represented by just one keyframe icon -
drag it left or right to move them all.
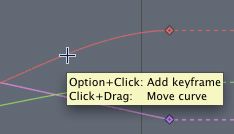
To
add a keyframe directly in the Keyframe Editor, either double-click
or option-click on a curve. I prefer option-clicking because
the cursor changes into a crosshair to confirm that your mouse
is directly over the curve.
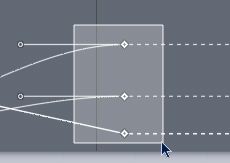
To
delete a keyframe, select it and hit the delete key. You can
drag a marquee to select multiple keyframes.
The
Keyframe Editor has its own Animation menu, similar to the one
found in the the various tabs of the Inspector, so you can use
it to set and move between keyframes. But it contains several
other options as well, including the ability to choose the interpolation
method.
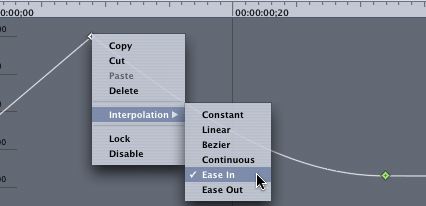
Changing
Keyframe Interpolation
Motion
offers six different types of keyframe interpolation - that is,
determining how the animation changes over time as it approaches
and leaves each keyframe. To change the interpolation method
for all keyframes, use the animation menu.

To
change the interpolation for specific keyframe(s), select them,
control-click, and choose the method.
The
quirk here is that Motion considers the interpolation to be applied
to the curve between the keyframes, which is technically accurate,
but different from how other applications behave. For example,
if you click on a keyframe and choose Ease In, you would expect
the animation to slow down as it approaches the selected keyframe.
But no! Instead, it's the next keyframe that gets affected.
When you select a keyframe and change its interpolation, you
are affecting to curve between the selected keyframe and the
next keyframe in time. Once you get the concept, it will
become second-hand nature.
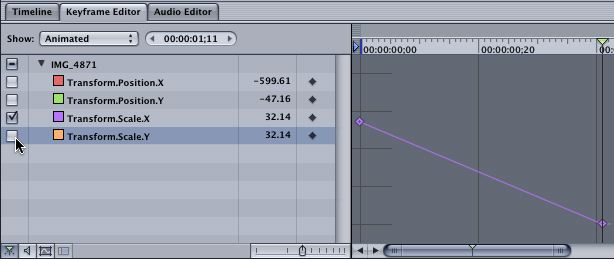
Another
quirk: depending on the type of parameter, Motion applies a different
default keyframe interpolation. For example, if you set keyframes
to animate the Scale of an object (using either Record Animation
or Add Keyframe), the default interpolation is linear - the object
has an instantaneous acceleration and deceleration at the keyframes.
However, keyframes for Position are interpolated by default as
Bezier - the object speeds up as it leaves one keyframe, and
slows down as it approaches the next.
If
you happen to be keyframing both position and scale at the same
frames, for example panning across and zooming in on photograph,
the mismatch in default interpolations will result in a less
than ideal animation as the move starts and stops. The fix is
to change the interpolation for the Scale parameter to Bezier
as well - which brings us to our last quirk: separate x and y
keyframes.
Parameters
that have spatial components - such as postion, scale, and anchor
point - have two keyframes: one for the horizontal value, and
one for the vertical value. After Effects and Final Cut Pro both
bundle (x,y) coordinate parameters into one keyframe. It's not
a problem, it's just a difference you need to be aware of and
it can make for some extra work - when changing keyframe interpolation
for Position, for example, you need to change it for both the
x and y parameters. Sometimes it can be difficult to select one
of the values because the curves may lay directly on top of each
other - in these cases, click the visibility checkbox to turn
off the one that's in the way.
Summary
While
behaviors are incredibly powerful and a lot of fun, the fact
is that when you need to set precise, specific values for an
animation, keyframes are they way to go. Motion has a powerful
keyframe toolkit, and once you understand the differences between
how Motion works with keyframes and other programs you may be
used to, you can begin to work faster and with greater confidence.
There's much more to keyframing in Motion that we didn't cover
here, and there are more quirks along the way - we'll cover some
more territory in Part 2. In the meantime, feel free to send
Apple feedback
as you get deeper into this surprisingly powerful application.
Copyright © 2005 Day Street
Productions, Inc.
Mark
Spencer
is a freelance producer/editor, Apple-certified instructor for
Final Cut Pro, Final Cut Pro Advanced, and Motion, and the author
of the Motion
Visual Quickstart Guide from Peachpit Press.
This article first appeared on www.kenstone.net and is reprinted here with permission.
All screen captures and textual references
are the property and trademark of their creators/owners/publishers.
|