Anyone who has seen the makeover program Queer
Eye For The Straight Guy knows the signature Pop-art
move used to introduce each of the presenters. This tutorial
will explain how to reproduce and adapt that effect for your
own projects.
You will need a basic working knowledge
of Photoshop
for this tutorial.
For this example I am going to demonstrate
using the Queer Eye effect as a sort of video highlighter,
where a part of the frame can be isolated to be made more clear.
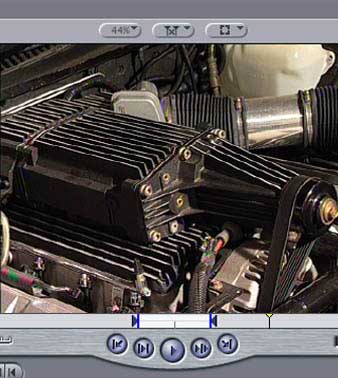
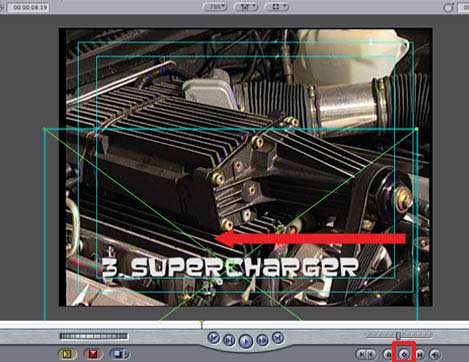
Let's say that I want to discuss the
supercharger in this picture. If you know what a supercharger
is then you'd have no trouble identifying it, but if you don't
know, then it's a little less clear. So, let's point it out.
NOTE: Of course, you can use any clip
you want to do this tutorial. It doesn't have to be the one that
I am using. You just need a bit of video with an object in it
that you would like to highlight.
First, find the frame in your clip that
you want to work with. Park the playhead on this frame, make
a cut and then under the Modify menu, select Make Freeze
Frame. The cut is important because it will be used later
to guide us to the exact point to re-insert the freeze frame.

Now export this frame via File >
Export > Using Quicktime Conversion > Format : Still Image.
The default settings are fine for this exercise.
Open this picture in Photoshop.
Since we want to keep the background
in the picture, we first need to make a copy of the background
to work with by dragging the layer down to the new layers button,
or selecting Duplicate Layer in the Layer
menu.

Once you have a copy, turn off the visibility
on the original background layer to make it easier to see what
you are doing.
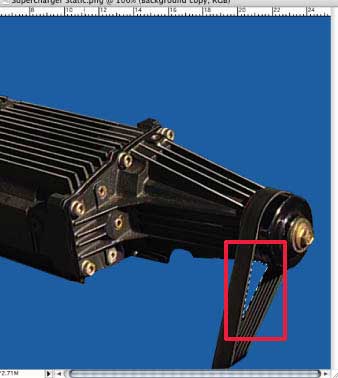
On the new second layer, use the polygonal
lasso tool to outline the part of the picture you want to highlight.
Then, in the Select menu choose Inverse. This will
make it possible to delete the background and leave your selection
intact. Press delete, and you should be left with a rough cut-out
of your selection.
Now make a third layer that sits between
your two layers and use the paint bucket to fill this layer with
a solid colour. This makes it very clear which areas of the object
need tidying up.
Once you have cleaned up the picture
using the lasso or eraser, it's time to start applying some of
the funk.
Turn on your original background layer.
You won't be able to see it just yet as the colour layer is on
top, so you need to reduce the opacity of the colour layer. The
result should be a tinted version of the background underneath
your object.
This is the basic set-up for the effect.
From this point on you can do whatever you like to the image
to suit your needs, but here is a nice simple recipe to get you
started.
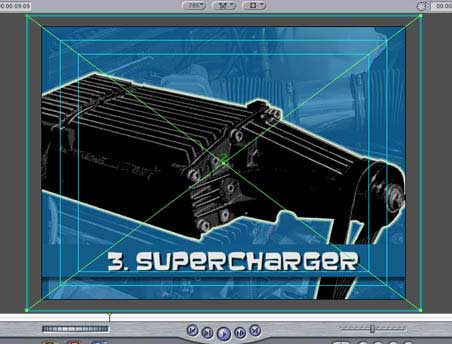
Select the top (object) layer. Under
Image select Adjustments > Desaturate. Under
Image again, select Adjustments > Posterize.
In the popup box select a level of posterization - for this project
I chose 4.
Select Layer > Layer Style >
Outer Glow to open the layer styles box. Add some outer glow.
While you're there, add a Colour Overlay if you like.
In this picture I used a grey overlay just to knock back the
whites a little.
Now it's time to go back to FCP. To make
things easier once you get there, it's a good idea to save a
couple of files out independently.
First, we want a copy of the blue background
without the highlighted object on top of it.
To do this, turn off the 'object' layer
and select Merge Visible from the Layer menu. Save
this picture, but make sure to do it as a Save As, which
makes a copy of the picture, instead of saving over your master
composition. Call it something fresh and original like "Blue
Background.psd". In this version you can delete the layer
with the object on it.
Now back in your master composition you
need to do the same thing again, but this time you need to leave
only the object layer with a transparent background. This can
be slightly more tricky, depending on your version of Photoshop.
Without getting into the whys and wherefores
of this, which is covered well in other tutorials here, what
you basically need to do is insert an empty layer below the object
layer and merge the layers together.
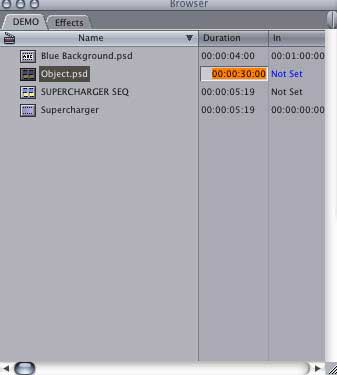
So, do a Save As and call the
document "object.psd". Delete the blue layer and the
original background layer, leaving only the object on a transparent
background. Now add a new layer underneath the object layer,
select the object layer and choose Layer > Merge Down.
You should have a document that has only one layer, containing
the object on a transparent background. Save this to include
your changes.
Quit Photoshop. Get a nice cold drink.
Take a deep breath. Open FCP.
Now what you're going to do in FCP is
basically create a frozen moment where the normal motion comes
to a sudden halt, the picture changes to the pop-art look and
some of the objects drift slowly inside the frame.
First import the two image files that
you just made. By default FCP will make your stills four seconds
long, which is fine for this project. However, if you need to
change this, an easy way is to select the duration in the browser
and type in how long you would like it to be.
Once you've got both your stills ready
to go, you need to insert them in the timeline at the point where
you want the freeze to happen. Finding this should be easy because
this is the point where we previously made a guide cut.
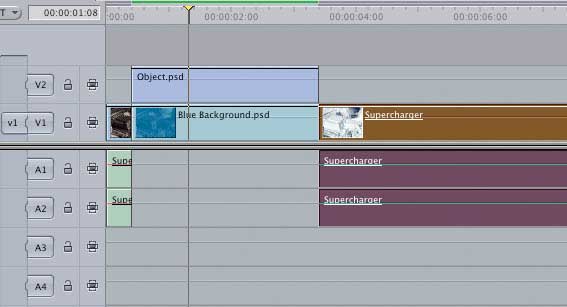
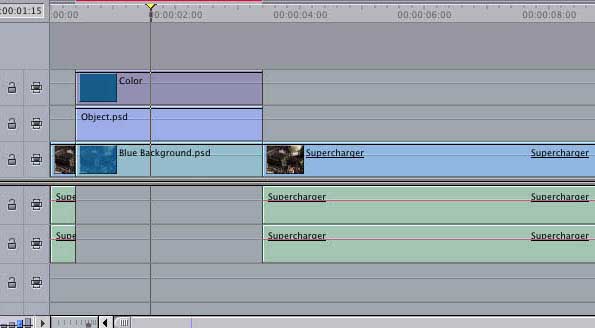
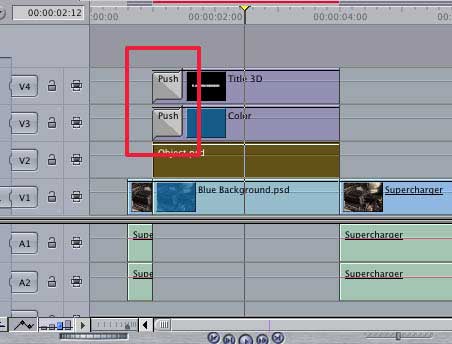
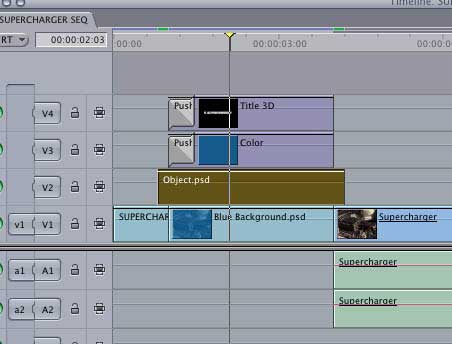
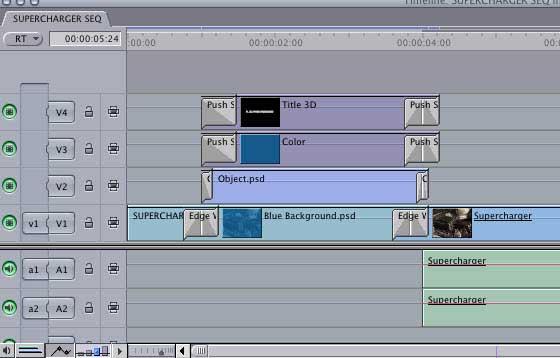
Insert
(don't overlay) the background picture on V1 and the object picture
on V2 between the two halves of the original clip. When you play
this clip now you should have the basic look starting to emerge.
Bit boring though. Needs more funk, Cap'n!
OK. First a lower third bar. I got quite
a few requests after the last tutorial to explain how to make
these out of colour mattes, so I'm going to take the time in
this already pretty long one to do so. If you know how to make
them, you can skip ahead and collect two hundre.. oh wait, that's
another game.. Just make a bar and meet me at the other end.
________________________________________________________________
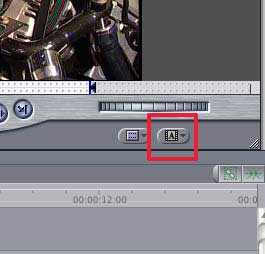
Anyway. To make a simple lower third
bar, you first make a colour matte. You'll find one of these
under the little 'A' on the lower right hand side of your viewer
when you have a video clip loaded. Select Matte > Color
from the drop down menu.
Drag this clip to the timeline and put
it on V3 above your other pictures. You will now have a completely
grey screen.
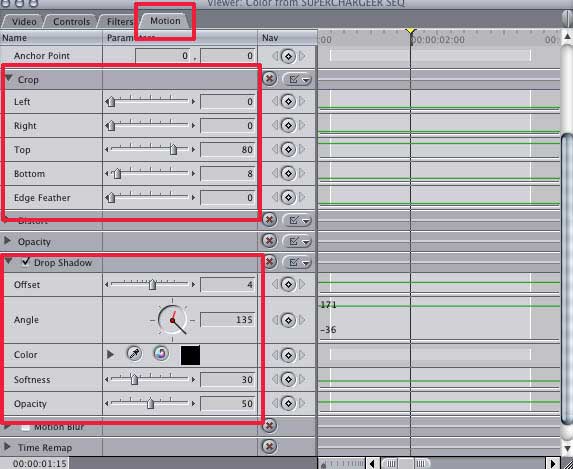
To adjust this, double click the clip
in the timeline to load it into the viewer. Under the Motion
tab of the viewer click the twirl down arrow next to the word
Crop. This will expose the controls to crop the matte
to the size you need.
For this example I have adjusted the
Top slider to 80 and the Bottom slider to 8. Further
down in the same tab I have also added some drop shadow via the
Drop Shadow controls.
Remember here that you need to be careful
of title safe with this bar, so turn on your Show Overlays
in the canvas to Show Title Safe, and make sure your bar
stays close to the edges of the center blue box.
Now go to the Controls tab of
the viewer, where you will see a small set of controls.
If you click on the small eyedropper
you can then use your cursor to select a colour from your canvas.
This is a nice simple way to choose a colour, because it will
match the work you have already done. If you prefer to use a
contrasting colour, choose one from the menu that pops up after
clicking the small grey square instead.
________________________________________________________________
You should now have a floating lower
third bar over the top of your composition.
Right. Text. Add some text. Remember
to keep it inside the title safe area, to guarantee that all
viewers will be able to see it.
In this example I wanted to make the
text and the title bar fly in together by using the push slide
method, but then have the words continue to drift to the left
for the duration of the freeze.
This can look very jerky if done incorrectly,
so here's a simple trick I use to avoid the 'jump start' feel
to drifting.
First extend the clip you want to drift
by at least five frames in both directions. park your playhead
at the head of the clip and (with Image and Wireframe,
and Show Title Safe selected in the canvas) drag the text
to your chosen start position, then press the Add Motion Keyframe
button on the lower right of the Canvas window. The white cross
on the canvas will turn green to indicate that a keyframe has
been set.
Now put your playhead at the end of the
clip and, holding the shift key to help you drag in a perfectly
straight line, drag the text to the end position of the drift.
The key here is not to go too far in too short a period. If the
movement is too fast it not only looks daft, but it becomes difficult
to read. Once again click the Add Motion Keyframe button
which should be verified by the green cross.
Great. Keyframing done. Now, go back
to the head and tail of your clip and shorten it back to its
correct position. In my example this is easy to figure out because
its the same duration as the colour bar on the layer below.
This is the important part of the tip
to take away. When you shorten the clips this does not affect
where the keyframes are set, so what you get is a clip that is
already moving by the time it comes on screen. That means no
jerky start and no awkward sudden stop.
Still, this will look a bit weird until
we apply the rest of the bits. So add a Push Slide to
the head of both the colour bar and the text, adjusted to suit
your needs. If this is confusing, see my previous tutorial, 'Keyframes,
We Don't Need No Stinkin' Keyframes."
Almost done!
The last thing we need to make this complete
is to add a bit of interest to the highlighted object. After
all, we went to a lot of trouble to separate it out, so we may
as well make it do something.
Probably the best motion to employ here
is a zoom. There are two reasons for this. One - the whole point
of the exercise is to make this single part of the engine stand
out, and two - a zoom is going to obscure the layer below, so
you won't be able to see that the part is actually still there
on the lower layer.
We want the zoom to come forward and
then retreat back to normal size like a very slow motion head
butt. Head butts always get people's attention.
So, using the same trick as before extend
the object layer by five frames in both directions. If you are
using a photoshop file (as compared to a jpeg or png for example)
you may need to physically shift the picture back in the timeline
and then extend the end by ten frames, as .psds don't allow you
to pull them back beyond their first frame.
For complete accuracy you would need
to add five keyframes to this picture - one at the new head of
the clip, one at the point at which the clip becomes visible,
one in the middle of the clip, one at the point that the clip
ends, and one at the new end of the clip, but since we are only
talking about five frames of vision you can easily get away with
just three keyframes. If you really want to do five please feel
free to do so. I won't lose any sleep.
For the first of our three keyframes
put the playhead at the new head of the object picture and, without
changing anything, add a keyframe. Now go to the new end of the
picture and again change nothing and add a keyframe. The point
of this is to ensure that the object will be in the correct position
on the screen to match the moving video at either end.
Now move the playhead to the middle of
the clip. Make sure you have the correct clip selected in the
timeline. In your canvas select Fit All from the drop
down window and make sure your Image and Wireframe is
on.
Grab one of the corners of the wireframe
when you see the thin cross (not the rotation tool) and drag
outwards until the picture becomes as large as you want it to
be at its peak. Set a new keyframe. Don't go too wild. We just
want a nice smooth civilised head butt here. Save the big fast
scary ones for screaming warehouse sales commercials.
Now pull the ends of the clip back to
the correct start and end points on the timeline.
If you want to go a step further, you
could now do some entry and exit finessing. For this example
I have added a four frame cross dissolve to the head and tail
of the object layer, and a twelve frame edge wipe at both ends
of the blue background, offset from the other transitions by
about six frames. I've also added twelve frame exit push slides
to the top two layers.
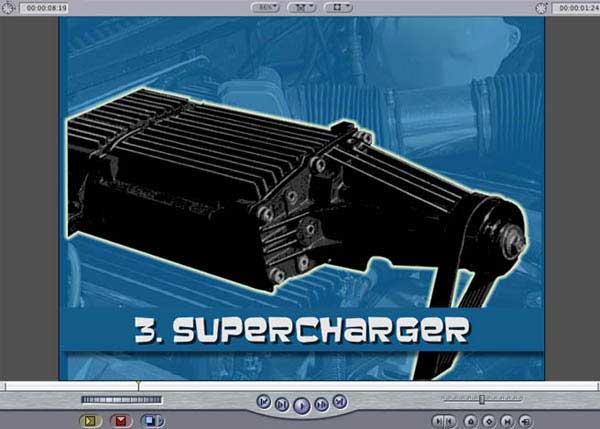
So now all that's left to do is render
and, if all has gone according to plan, your composition should
now look something like this.
Click HERE to view movie (647K)
And that's it. Of course this example
is only one of the many uses of this concept. Imagine transitioning
into a newspaper article, or a superhero comic, or a blood red
world where the character suddenly has fangs... the subtext possibilities
are almost endless. And that's what makes this a great tool to
have in your kit. Hope it comes in useful for you.
Copyright ©2005 Jude
Cotter
Jude
Cotter lives and works in Australia as a freelance broadcast
editor, as well as FCP trainer and troubleshooter.
All screen captures and textual
references are the property and trademark of their creators/owners/publishers.