More Feature Articles
|
   
| SO
YOU WANT TO GET YOUR FEET WET BUT NOT YOUR CAMCORDER |
June, 2005
SO
YOU WANT TO GET YOUR FEET WET
BUT NOT YOUR CAMCORDER
By Steve
Douglas
You're a scuba diver and you want
to start shooting underwater video to entertain your friends
and associates, enter film festivals and competitions or simply
to extend the diversity of your shooting skills.
I would venture to guess that 98%
of all my video work is done under water where a whole new set
of rules and guidelines wait for me, and now you. The basics
are all the same, steady shot, watch your composition, check
your white balance, and adjust the lighting, but all the things
we take for granted topside are major obstacles to shooting underwater.
What you easily accomplish on land is thrice as inconvenient
and difficult down below.
First, lets take a look at equipment.
You will need a camcorder. I will not get into the merits of
using a 3-chip cam like the Sony DCR VX 2000, which is my current
camcorder, or a single chip or even the new Sony or JVC HD cams.
The important thing before purchasing a camcorder is to MAKE
SURE A HOUSING IS MADE FOR IT BEFORE BUYING. Housings can
easily cost, and usually do, more than the camcorders themselves.
I prefer a mechanical housing like Gates Underwater Products
produces, while many prefer the electronically sophisticated
housings such as Light and Motion, Amphibico or Sea & Sea.
There are several other companies producing quality housings
but these listed are the ones most often recommended.
A less expensive, but quality housing is the mechanical Ikelite
housing.
The advantage of the mechanical
housing is that of reliability, durability and ruggedness. The
electronic housings are known for their ease of use, fingertip
button press controls and attractive appearance. When they work,
they work wonderfully. When they don't, and you are on a boat
4,000 miles away from home, you are probably out of luck. Your
shooting is done until you get back to home and can send the
parts away. Getting those parts replaced and the housing repaired
can take a month or more in many cases. I'm not the handyman
type; I pat myself on the back for being able to put the chain
back on the toilet float. Therefore, I need equipment that will
not demand a whole heck of a lot of maintenance. In all my years
of using a mechanical housing, I have never had a problem I couldn't
take care of no matter where in the world I was shooting at the
time. At this point I will own up to my strong bias favoring
mechanical housings. However, keep in mind that there are a great
many excellent underwater shooters whom I know and respect and
who love and swear by their electronic housings. One must make
that choice for themselves. Try both types out if you can, as
well as educating yourself and trying out housings from different
manufacturers when possible.
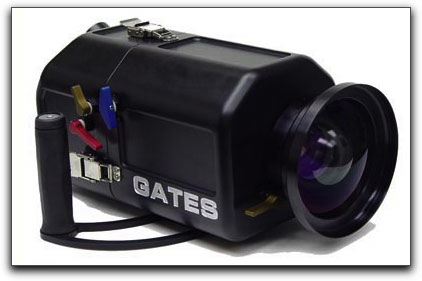
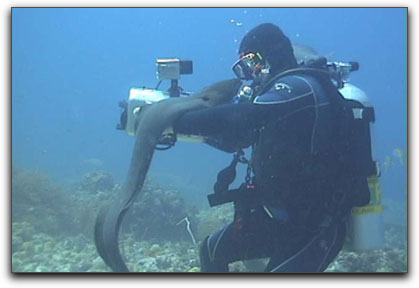
Manual
housing and lever controls
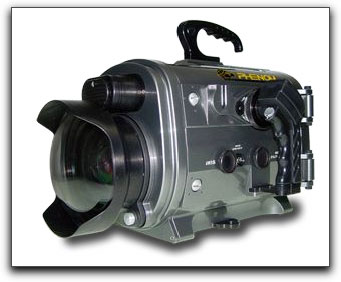
Electronic controls on handles
The most important skill all shooters learn is that it is of
paramount importance to keep the camera still. Unless you are
shooting an underwater version of the Blair Witch Project, an
unsteady hand creates a shaky and unusable clip. We have learned
how difficult it is to keep a shot steady while simply breathing
in and out, hard to do while walking, and impossible while running.
I guess this is the reason why so many of us buy and use a good
tripod or steady cam. With a tripod and wheels we can pan, dolly
and tilt to our hearts content trusting in our equipment's ability
to keep that focus rock steady.
Now try and do that without the
tripod, in fact, imagine yourself in a 3 knot current at 85 feet
below the surface; you're trying to film a hammerhead shark while
avoiding being knocked into the venomous urchin clinging to that
large boulder just beyond that ridge where, you remember from
the last dive, there was a treacherous down drafting current.
That hammer is a large one but is afraid of your bubbles and
is in danger of fleeing forcing you to miss the shot. Bottom
line is that filming underwater has its own bevy of challenges,
each succumbing to the particular conditions that one is diving
in and the equipment you are using. The currents underwater constantly
buffet a diver; sometimes they are strong and at other times
the surge is almost non-existent. These conditions will certainly
affect the way you approach the shot in order to keep the camcorder
housing rock steady.
Since eliminating camcorder/housing
movement is of maximum importance the underwater shooter must
practice holding the housing still. I accomplish this by holding
onto the housing handles with a light touch, sometimes, depending
on the conditions, with only one hand. At other times, I find
that I will hold the handle with one hand while cradling the
housing from underneath with the other. This creates a 'tripod'
posture which helps to maintain a static shot. Practice holding
the camcorder housing when in different underwater positions
to find a touch and feel that is right for you. Practicing this
will also help you master knowing where your finger controls
are at all times. When using either a mechanical housing or electronic
housing you are not going to be touching the controls on the
camcorder itself. With an electronic housing a wired link is
internally connected from the camcorder to the electronic controls
within the housing. Most of your buttons controlling zoom, white
balance, auto and manual focus, exposure and more, depending
upon the type of housing, will be placed somewhere on the two
handles to the left and right. With a mechanical housing you
will be using a variety of controls which extend from the outside
of your housing to the camcorder tucked nice and dry within.
The mechanical levers come into physical contact with the controls
on the camcorder. With a mechanical housing, such as the Gates,
Ikelite and others, most of these controls are spread out along
either the left or right body of the housing itself. Therefore,
it is very important to know where these controls are by touch
and familiarity. If, while shooting, you remove your eyes from
the monitor or backplate, where the eyepiece is, you stand an
excellent chance of moving the entire housing and ruining the
shot. It is critical that you be able to go to any control simply
by touch while still in the record mode.
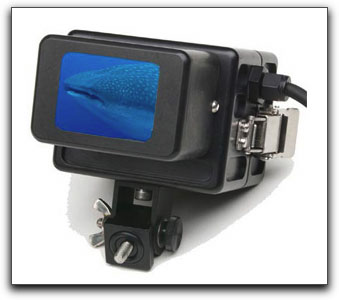
Viewing monitor attaches
to top of housing
Creating an underwater film is no different
than writing a story or filming a sitcom for T.V. Each story
must have a beginning, middle and end. When watching a movie
in the theater we would get considerably bored if every character
did the same thing over and over again, or repeated their dialogue
incessantly. The metaphor here is that, when shooting underwater
creatures, it is necessary to film from a variety of perspectives.
If I am shooting a silver tip shark passing from left to right,
what makes that any different than the shot of a Napoleon Wrasse
also swimming from left to right. If I film a wide angle clip
of the reef in Papua New Guinea, what makes that any different
than the wide angle shot of a reef in Fiji? Not a whole lot,
and certainly not enough to make it interesting to a viewer.
Even a serious documentary must entertain, must capture and retain
the viewers interest. A serious error that many novice underwater
shooters make when editing is to repeatedly use the same type
of shot over and over. As in topside filming, the focal point
of the shot is imperatively important. Many new underwater shooters
aim that camcorder at everything that moves making almost every
shot a long, wide-angled clip. If you are going to tell a story
documenting the life of the giant cuttlefish in Thailand than
mix those shots up. Film the divers suiting up, pan slowly over
the islands blanketing the horizon. This will serve as a fine
master shot to your location leading the viewer to where you
want to take them. Catch the divers going into the water and
then use another wide-angle master shot of the reef before cutting
away to the cuttlefish themselves.
Establishing wide
angle shots certainly have an important function
If one cuddle fish swims by and
you caught the clip just right, will the next shot of it going
by again serve any purpose? Not in the editing bay. Get that
medium shot of the male coveting the female and threatening the
other males with high held tentacles before guiding the female
to the crack in the rock where it will lay its eggs. Now get
that close up of the female thrusting its tentacles into the
crevice to deposit its eggs and then back to the medium shot
of it turning to swim off. Each sequence within a film should
be filled of a variety of shots, angles and action.
A good mix of perspectives keeps it interesting
Wide-angle shots are great when used
as establishing shots but when used exclusively, they create
a serious lack of diversity when redundantly repeated within
the story line. I remember proudly showing off, to a dive club,
one of my earliest films of an expedition to the Galapagos Islands.
I had sold this short film to several people and it had also
won me my first underwater film competition. One of the older
and more experienced members of the club brought me aside after
my showing and told me he liked the film but suggested I change
my focal points more frequently. What a shock! This is the film
I had worked so hard on and was so proud of, it had won a competition
and yet he was able to find a way to improve it. After I got
home I played the film for myself and, darn it if he wasn't right.
Most of my shots were either wide angle or medium shots. There
were hardly any real close-ups. Thus, when filming, remember
to mix up the type of shots you are taking. Get those wide-angle
shots but don't forget the close-up and extreme close-up if your
system is capable of using a macro or super macro lens. Now,
when I can, I will always attempt to shoot my subject's behavior
from all three positions. Sometimes that is impossible, as not
all turtles want to hang around as I change position and adjust
focus but, when I can shoot a diversity of shots, I always do.
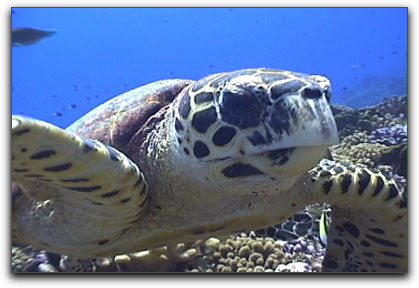
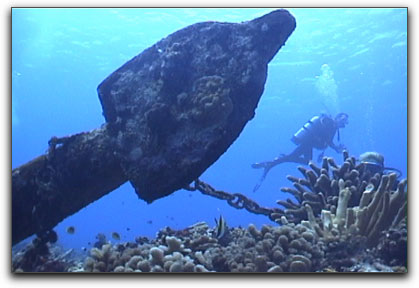
While
you can't always get this close, when you can,
it will provide an interesting angle to your finished
film
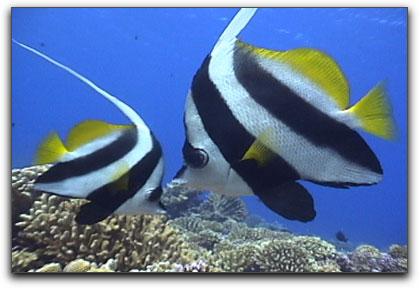
Attention to composition is as
important underwater as it is topside. The rule of thirds within
the frame still applies, however, underwater, the angle that
one shoots at is another important consideration. It is always
best to try to shoot marine creatures, whether they be clownfish,
barracuda or shark from slightly underneath. This provides both
size and depth to the creature. When one shoots downward on a
fish the entire picture tends to flatten out.
 |
|
 |
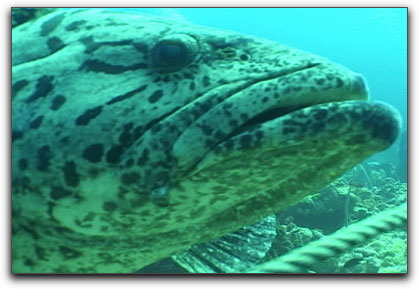
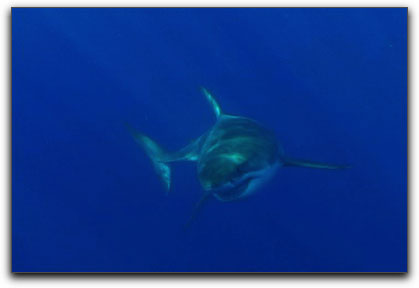
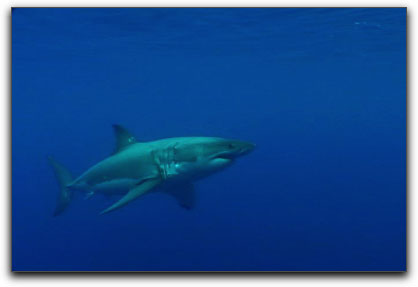
| Notice how, when shooting down, the Great
white appears less massive? The whole shot is less dynamic with
a flattened appearance. |
|
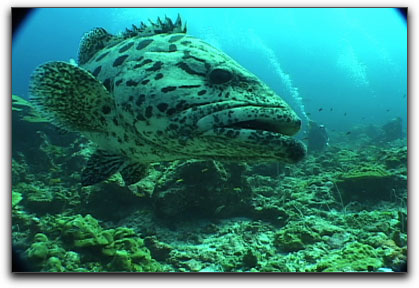
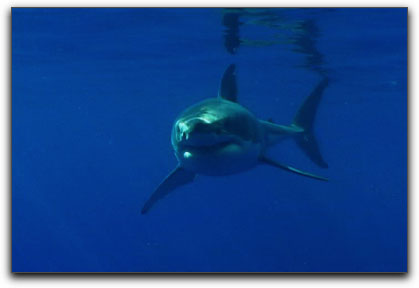
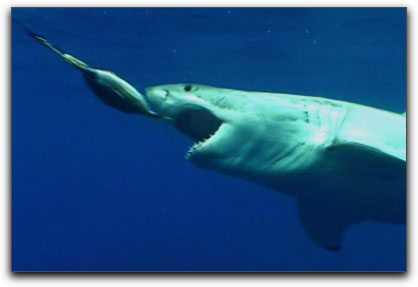
Shot from slightly below, this Great White
comes at you with a toothy grin
guaranteed to hold your audience's attention |
In addition, a fish is not very
wide, unless you happen to be shooting a whale shark, and, thus,
your fish will not take up as much of the frame as you perhaps
hoped. When shooting from underneath you will not only get a
clear shot of the vibrant colors of many species but also, as
in the case of filming sharks, an excellent view of their mouths,
teeth and eyes giving character to your subject. Shooting from
the side is also fine but, even then, I try to stay a bit low
with the housing aimed slightly up.
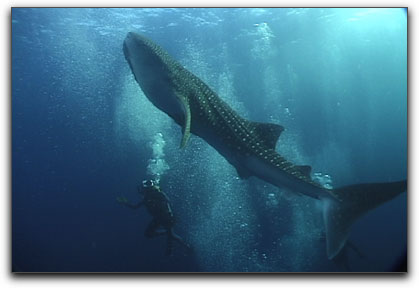
Composition and placement
of the filming diver in relationship to this
whale shark, along with background bubbles, creates a sense of
wonder
Fish do not take direction very well.
They could care less about the demands of your storyboard. Because
of this, many new shooters tend to follow the movements of the
fish with their camcorder. They are either panning after the
fish or tracking alongside of it. Both of these shooting methods
may produce some great results, however, the novice will often
do this in hopes that the creature will turn their way. However,
they are frequently creating pans and tilts going in all directions
as well as adding additional shake and disturbance to footage.
Now following a creature from one direction to another is often
just fine but the new shooter should keep it in mind to sometimes
simply keep the camcorder static and allow that shark to pass
from one side of the image to and through the other. It creates
a fine shot and avoids the multiple pans that can bring about
seasickness in anyone trying to follow along.
Zooming underwater is, more often than
not, a no-no. It can be an annoying distraction from the subject
and ruin the mood you are attempting to create. In addition,
zooming in underwater makes it that much harder to keep the camcorder
housing steady. This is especially true when attempting full
zooms on macro subjects like the pygmy seahorse, which is about
the size of the cuticle on your pinky finger. What I will frequently
do is, with the record button turned off, zoom into my subject,
properly focus and then start recording. I find that a slow zoom
out from an extreme close-up to medium or wide-angle shot may
be a very effective way to highlight my subject. It creates initial
intimacy and wonder with my subject and then allows the viewer
to see it in a larger scope in relation to its' environment.
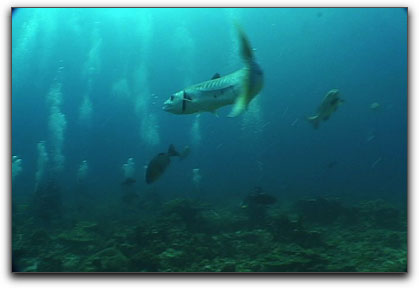
Often the reason a new underwater videographer attempts a zoom
is because they were concerned why, following their last dive,
and after viewing their footage, the video appeared cloudy and
not as sharply focused. On this dive they figured that if they
zoomed in and filled the frame they would avoid that milky appearance.
The ocean, or even a lake or river, is filled with minute particulates
and debris. These objects, though infinitesimal, tend to cloud
the image. A considerably better solution than zooming in is
to simply get closer to the subject. With less water between
you and your subject you will find yourself producing a sharper
and more attention-grabbing piece of marine footage.
 |
|
 |
| Notice the milky appearance? Not a very
good shot at all |
|
Less particulate between the shooter and
the subject creates
a far sharper and more dynamic clip |
Another tip is to avoid shooting
a fish, shark or any creature with its' back end facing you.
Shoot the action coming towards you and rarely going away. While
it might be fine to shoot from behind a creature in order to
make a personal identification for yourself, to use that clip
in a film would probably be a mistake. Bottom line, it is an
uninteresting shot made up primarily of the back of the fish,
its' dorsal fin waving goodbye. An exception might be if a fish
were coming right at you and you followed its' path as it travels
overhead. Even then, you would keep the end of the clip as it
passes by, very brief.
 |
|
 |
Shooting the rear end of a fish is something
to avoid.
It adds little or nothing to your production. |
|
Much better to see those teeth and eyes,
it got my
interest as it came to check me out |
When filming marine life it is
always more important and impressive to film a behavior than
to simply film the fish itself. Filming the fish doing nothing
but swimming creates a dull moving snapshot. It is better to
film that clownfish territorially swimming among the anemone's
poisonous tentacles guarding its young, or a hammerhead hovering
over a cleaning station allowing butterfly fish to clean parasites
off its skin; perhaps a moray eel with a cleaner shrimp in its
mouth, both getting something out of the deal. A 15 ft manta
ray doing back rolls in the water is exponentially more interesting
than one swimming by you. Yes, filming a colorful nudibranch
is nice but shooting that same nudibranch mating or eating another
nudibranch is the behavior that will sell.
 |
|
 |
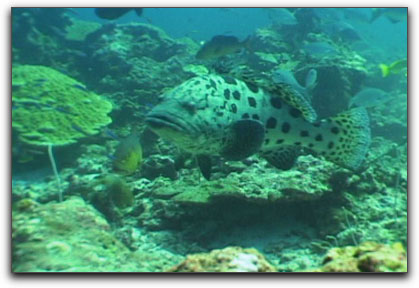
| Not much going on in this shot |
|
Action makes it a bit more interesting,
wouldn't you say? |
Since we never can predict these behaviors
it is always best to start the cam while approaching and setting
up underwater. Be ready for anything to occur. Hopefully, your
camcorder and yourself will be positioned properly before the
action starts. Keep in mind to always start shooting early and
keep the camcorder recording for several seconds after the action
has ended. Even if you love the shot, if you don't capture it
from the beginning of the action it might very well be useless.
This will help you tremendously when you get to your postproduction
editing.
A curious moray eel
came out to say hello to me up close and personal.
When filming be prepared for anything
As we dive deeper into the ocean,
colors quickly dissipate. First go the reds and yellows, next
the blues until all we have left at 60 ft below the surface is
a vague bluish tinge on most everything. Most underwater housings
have an internal UR Pro filter for blue water, while some utilize
an external UR filter. The UR filter is for use at depths below
30 feet or one atmosphere below the surface. The use of this
filter above 30 feet will produce a shot that looks as if you
put a red screen over your lens; the entire shot will now be
a pinkish red. Thus, activating the UR filter above 30ft is something
to avoid. When used properly this filter is excellent for bringing
back many of the lost colors but fails to bring back the full
luminance I need for critical shooting. Therefore, the use of
lights while shooting is extremely important whether shooting
during the day or night. Lights will bring up all those magnificent
colors scattered over the breadth of the coral reef and will
highlight the iridescent hues of the slumbering parrotfish.
For underwater use there are primarily
two types of lights to choose from. Halogen lights, which burn
at about 3400 degrees Kelvin, bring, at least to my tastes, certain
warmth to the shot. I especially like the use of halogens for
nighttime shooting. A halogen lamp does not need any warm up
time to get to its designated brightness so the instant you turn
it on you are in business. However, because of their color temperature
you should never use both the housing's UR filter at the same
time you are using the lights. If you do, a strong reddish tinge
will permeate your entire clip. The HID lights burn at almost
daylight temperatures of 5800 Kelvin. To my mind they are absolutely
wonderful for daylight shooting but add a somewhat bluish tinge
to my nighttime shots. An HID light also needs between 12 and
20 seconds to get up to full brightness and if the action starts
before the brightness levels have been reached you may be out
of luck. On a positive note, an HID light may be used with or
without the UR filter.
Keep in mind that your lights will
have a very restricted throw. Therefore, for any subjects beyond
4 1/2 ft the lights will be almost useless. For medium and close
up shots proper lighting is essential. Lights are kept on arms
extended from the housing and can be positioned in the way most
advantageous to the shot. Flexible, rather than set or stiff
arms, are ideal, as you may need to rearrange the position of
these lights underwater as you seek to film that nurse shark
hiding back underneath a ledge.
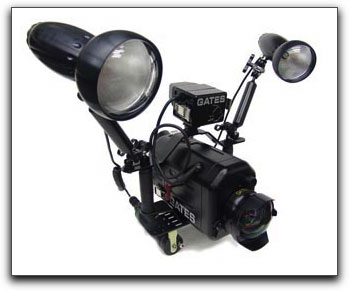
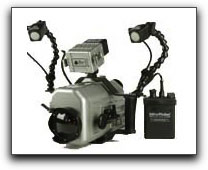
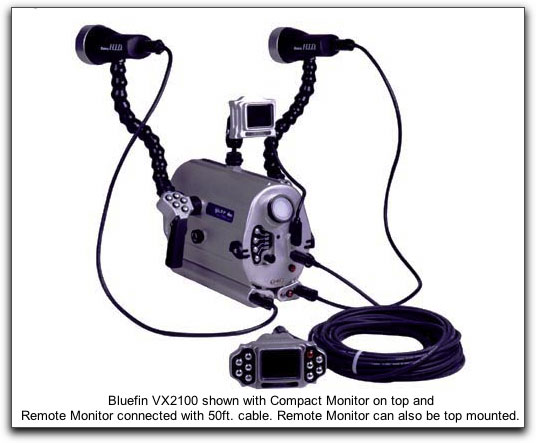
Examples of different lighting setups for mechanical and electronic
housings
Most new underwater shooters tend to
film with their camcorders in automatic focus. This practice
works well when shooting macro or stagnant objects like the pygmy
seahorse, frogfish, and a medium shot of a reef. When there is
little movement by the subject the auto focus of your camcorder
will work just fine. A problem arises, however, when you are
shooting a wide-angle shot in open water. A shark swimming by
is not a static subject and as it changes its distance from you
the camcorder lens will be frequently confused as to whether
to focus upon the open sea or the shark or fish. This will create
a momentary lose of focus, a sudden blur if you will, which can
absolutely ruin what might have been an excellent shot. I always
zoom in on an object underwater, manually focus and then zoom
out. Then anytime I do need to zoom into something, everything
between my zoom out and original zoom in points will be properly
focused. Experienced underwater shooters have their own methods
of focusing underwater but I find that this simple method works
best for me. The important thing is to avoid filming while in
auto focus for most shots. Manual focus might take a bit more
set up time underwater but will produce the best and most consistent
results. Should you wear glasses and have a difficult time focusing
underwater without them, there are several businesses who will
place the correct lens' for your eyes onto your mask. I have
been using just such a mask with good results.
Depending upon the camcorder and housing
you are using, white balancing for underwater use is just as
essential as it is for topside. Underwater, as you change your
depth you are also changing your lighting. While I have found
that most camcorders auto white balance works well, there is
a significant improvement in manually white balancing. I always
carry a white plastic slate with me underwater so that I may
re-white balance as the conditions of my shooting change. Some
have told me that they will sometimes white balance against the
sand. I have never tried this but they swear that it produces
good results.
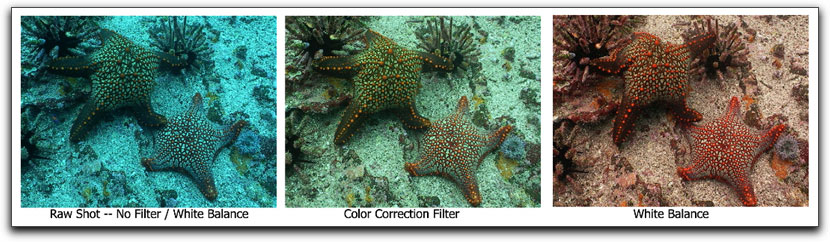
Photos by John Ellerbrock
The effect of color loss underwater. Note the raw shot is very
blue and 'washed out'. A color correction filter can compensate,
but only to the extent of the light frequencies being filtered,
which also reduces available light by 1-2 f stops.
White balancing accurately compensates for color loss with not
effect on available light
The last thing any one wants is a housing to flood. It takes
but one drop of salt water to fry a very expensive camcorder.
I have seen many underwater shooters accidentally flood their
housing. In all these years I never thought it would happen to
me. I was too careful, too anal about properly maintaining my
Gates housing. Then, in the summer of 2004 I was leading a diving
and filming expedition to beautiful Tahiti and the proverbial
'It" hit the fan. Not the housings fault, completely mine.
I had a small piece of elastic wrist strap get caught in-between
the housing backing as I closed it after a battery switch. I
simply had not checked it as thoroughly as I should have. As
soon as the housing dropped 2 inches below the water I was the
proud owner of a $2600 Sony VX2000 doorstop. However, my housing
just needed to be properly rinsed out and, with the purchase
of a new camcorder, I was ready to go.
Proper maintenance of your underwater
housing is not a difficult task, yet it is of vital importance
as this piece of equipment is what allows you to capture those
wonderful underwater scenes while protecting your camcorder in
the process. Most housings, be they electronic or mechanical,
have front and back plates that mesh together to form a watertight
seal. This seal is accomplished by the use of a specific o-ring
for that housing. Depending upon the manufacturer's recommendations,
this housing will need to be periodically cleaned and lubricated
with silicon grease. O-Rings are somewhat fragile and care must
be taken so as not to unnecessarily stretch the o-ring or accidently
cut or tear it. Once carefully removed from its groove, use a
Q-tip to clean any stray hairs or dust from out of the o-ring
groove.
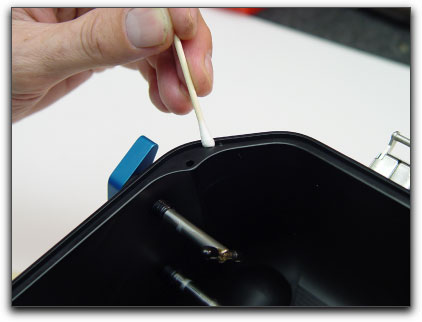
Photo by John Ellerbrock
Q-tips should always be on hand to clean out any dust or debris
On mechanical housings the controls are
often rods that penetrate the housing to make contact with the
controls of the camcorder. These rods also will need to be periodically
lubricated, a job that usually takes only a few minutes. The
only other maintenance necessary is to always rinse your housing
whenever you can with fresh water so as to rid it of the remaining
salt, which may have a corroding effect. Charge or discharge
your camcorder and light batteries as needed and you will be
always good to go.
Many new underwater shooters make the
grave mistake of falling in love with their footage. This is
no different than the home hobbyist who keeps everyone captive
with the full 20 minutes of the cutting of the cake for their
2 year old's birthday. It is best to look at your underwater
clips with a very critical eye. You just might have a full 35
minutes of a giant green turtle feeding upon the coral but that
doesn't mean that you need to use all of it no matter how great
the shots are. For underwater, documentary style films it is
best to keep your clips very short. Generally, in postproduction
I keep most of my clips limited from 3 to 6 seconds before changing
angles, actions or subjects. I know that sometimes this process
of cutting just kills you to have to do, but in the end, if you
can be objective, you will find that the whole of your film has
been improved tremendously.
There are many things to consider before
venturing into the world of underwater videography. The first,
and possibly the most important consideration is to evaluate
honestly how prepared you are as a diver. If you are new to diving
or haven't been in the water in a few years, than, for now, it
is highly possible that getting into underwater videography or
photography is not for you at this time. The new diver's time
is much better spent mastering the diving skills that will make
him/her a great videographer and diver. It is imperative that
the budding diving videographer be completely comfortable in
the water, and has a full and objective knowledge of his own
skills and limitations. Ego under the water can lead to injury
or a death sentence later on, maybe not now or tomorrow but eventually.
Buoyancy control, the ability to hover over, under or by an object
in the water, regardless of a specific depth in relationship
to your subject might just be the most important skill that all
divers, videographers, photographers or not, must learn. The
mastering of this skill cannot be overly emphasized. While filming,
poor buoyancy will not only create a shaky and unusable shot
but also can also stir up the sand bottom and cause major damage
to the delicate reefs and the ecology of the area. If you are
a brand new diver you are probably still trying to practice maintaining
buoyancy control, which can easily be affected by personal weighting,
tank type, aluminum or steel, equipment being used, and dive
conditions. That is a lot to deal with for a new or inexperienced
scuba diver. Now imagine also trying to focus your attention
on that $3,600 camcorder stuffed into that $3900.00 housing with
those $2,000 HID lights attached by the $400 light arms. If you
accidentally drop the system while reaching for your high-pressure
inflator hose, you can very likely kiss the entire system goodbye
and hope your home owners insurance will cover it. I maintain
a special floater policy on my housing and camera just to cover
this possibility. If you recognize in yourself that you are still
at the stage where you frequently go to your inflator hose to
change depth, if you have trouble maintaining a horizontal posture
in the water and if you haven't yet learned to use breath control
as a means to affect buoyancy than play it safe. Practice and
master these skills until you and they become second nature before
risking your hard earned money and equipment.
That said, underwater filming is an exciting
and creative endeavor. Like most anything done well, it requires
a great deal of time, patience and practice but there is nothing
like it in the world when you hear the appreciative applause
of your audience.
All pictures underwater pictures were
taken from a single video frame shot by the author unless otherwise
credited.
Steve Douglas,
is an underwater videographer and contributor to numerous film
festivals around the world. A winner of the 1999 Pacific Coast
Underwater Film Competition, 2003 IVIE competition, 2004 Los
Angeles Underwater Photographic competition, and the prestigious
2005 International Beneath the Sea Film Competition, Steve has
also worked on the feature film "The Deep Blue Sea",
contributed footage to the Seaworld parks for their Atlantis
production, and is one of the principal organizers of the San
Diego UnderSea Film Exhibition. Steve leads both underwater filming
expeditions and African safaris with upcoming filming excursions
to Kenya, Bali and the Red Sea. Feel free to contact him if you
are interested in joining Steve on any of these trips. www.worldfilmsandtravel.com
copyright © Steve Douglas 2005
This article
first appeared on www.kenstone.net and is reprinted here
with permission.
All screen captures and
textual references are the property and trademark of their creators/owners/publishers.
|