|
   
| What's new in Final Cut Pro 3 |
2001
What's new in Final Cut Pro 3
-A first "Hands On" look-
COMPANY:
Apple Computer
CONTACT: apple/finalcutpro
PRICE: $999.00 ($299.00, upgrade)
REQUIREMENTS:Macintosh computer with an optical drive
supporting CD-ROM format and minimum 300-MHz or faster PowerPC
G3 or G4 processor and built-in FireWire.
(Note: 500-MHz or faster single or dual processor Power Mac G4
or PowerBook G4 required for G4 real-time effects. 667-MHz PowerBook
G4 required for mobile G4 real-time effects in DV format)
* Mac OS 9.2.2 or Mac OS X v10.1.1
* QuickTime (included)
* 256MB of RAM (384MB recommended for G4 real-time effects).
* 40MB of available disk space required for installation
by Philip Hodgetts
NOTE: Unless you hve a high speed connection, this page will take awhile to load
New Features
From the discussions on various
email groups and conversations among users, you would think Apple
only released one new feature: G4 FX otherwise known as real-time
preview or more accurately, real-time editing. Although real-time
editing is one of the 'headline' features, this latest release
is full of great new productive features:
Contents
Any one of these features alone would
make this a valuable upgrade, combined they add an awesome amount
of extra power to Final Cut Pro 3. Writing a tour of the new
features is difficult, because if I focus on the 'big ticket'
items it's very easy to miss the dozens of small enhancements
that make everyday editing more productive. Final Cut Pro 3 should
put to rest, once and for all, any questions about how 'serious'
Apple is in building Final Cut Pro as a professional editing
and finishing tool. The features in this release are clearly
aimed at the 'high end' of the market as well as providing features
every working editor will value.
Because the release is so new, it's still
too early to comment on stability (although I haven't crashed
it ever on either Operating System) or what "bugs"
have been fixed. Luckily for me I've had none of the 'broken
Timecode', 'limited capture time' or any of the other problems
that have been reported. Since I never experienced the problem
on my system I cannot verify or even comment on the likelihood
of any 'fix'. Although I can say, in general terms, if a software
manufacturer is aware of what the cause of an issue is, they
fix it in the next available release.
G4 real-time
Effects
Of all the new features in Final
Cut Pro 3, this is the one that has caused the greatest confusion
and is probably the least well understood. Let's see if we can
cut through the confusion and see the advantages, limitations
and practical use of G4 real-time Effects.
G4 only
The first point to note is that
they are G4 real-time effects. I won't be using them on my otherwise
very serviceable iBook, nor on any G3 powered iMac or PowerBook.
I won't even be using them on my 9-month-old G4/466 because the
minimum single processor requirement is a G4/500. Unless FCP
sees that processor speed, the real-time effects are disabled.
All dual processor G4s (including the 450s) will do some level
of real-time G4 FX, and if you're on a G4 Titanium PowerBook
you can do real-time offline on the 500 MHz models. Real time
DV effect requirements are less clear - but reading between the
different specification sheets and FAQs it seems if you had a
top of the range 500 MHz from the last series or the current
667 you can do real time DV but may not be able to if you have
a 550 MHz G4 Titanium PowerBook in the current generation.
G4 real-time should not be confused with
the OfflineRT, which is covered later. G4 real-time effects will
work with the OfflineRT footage or DV. It will not work with
any other format such as Igniter, CinéWave, Digital Voodoo
or source footage.
Preview only
G4 real-time effects are previews
and playback only to the desktop and only in preview resolution,
although the preview resolution improves with processor power
and generally wouldn't be an issue for general editing. There
is insufficient power to add a real-time encode to DV on top
of the effects. When working in G4 real-time mode, the FireWire
output is disabled and nothing goes out the FireWire to a hardware
DV device.
This is just a fact of life at the moment - encoding to DV takes processing power and when you're doing two DV software decodes and processing the effect, it's not yet possible to add the extra step of an encode. That's where an RTMac has the advantage of having hardware DV Codecs to take load off the processor.
So, if they're only preview and only
on the desktop, what good are they? "Heaps good" as
my younger associates would say. It is on the desktop and quality
is depending on processor, but for timing decisions the use of
G4 real-time is a major benefit. And timing decisions are the
basic stuff of video editing and effects application.
Timing decision like: exactly how fast
the title fades up or moves across the screen; the speed of a
dissolve and when it starts or stops relative to the image; the
speed and direction of a transition relative to the video and
so much more. These decisions do not necessarily need to see
video in its true colorspace or at full quality to make decisions
and speed productivity. While Apple don't particularly like the
term, this is real-time editing because there is NO waiting while
you make effect timing decisions. There is a one-off render to
DV at the end but there are not 5, 10 or 20 renders while you
experiment to get the timing right.
Monitoring on a video monitor
But, I hear you say, you do need to see it on a video monitor for color correction, and that is certainly true. The gamma of a computer monitor is different to that of a video monitor and for accurate color correction you need to work on a video monitor. Real-time G4 effects can be monitored on a video monitor by taking the output from a graphics card. G4 PowerBooks have an Svideo output, a Radeon graphics card has S-video output and using either you can monitor, in real-time with no delay, what you're seeing on the computer monitor on the video monitor. Simply set the video out preference to "Desktop 2 (720x480) and all playback goes directly to the second desktop. Both monitors stay in sync while editing. Move the Canvas window so it displays on the Radeon card's monitor, scale it up to full size and it's mirrored.
It is not as good a solution as true
video out and if you want that, then RTMac remains a great solution
for more real-time effects than G4 real-time. The only limitation
being that you work with Color Correction on still images but
I'm happy with that. (I'd work on a still anyway.) The video-out-graphics-card
is most certainly good enough to accurately judge color correction.
Note:
It's either G4 real-time effects OR an RTMac. Final Cut Pro 3
disables real-time effects if it detects the presence of an RTMac
card. Since you only need one real time output, that's practical,
not a limitation.
What's available for G4 real-time?
- Cross Dissolve
- Iris transitions: Cross Iris, Diamond
Iris, Oval Iris, Point Iris, Rectangle Iris, Star Iris
- Wipe transitions: Center Wipe, Clock
Wipe, Edge Wipe, Inset Wipe, V Wipe
- 3 Way Color Corrector filter
- real-time motion effects: Opacity, Scale,
Center (Position), Offset, Crop and Aspect ratio
- real-time Still Frames from Video stills
or imported graphics play in real-time at preview resolution.
There is no restriction on the number of stills in the Sequence,
although more stills require a larger RT Still Cache to be set
in General Preferences.
You get what you pay for
While we all would have been
ecstatic if Apple had managed to include real-time effects for
every Macintosh that runs Final Cut Pro with no extra hardware,
such magic is not possible here in the real world where real
limitations require engineering and 'public relations' compromises.
That we have the level of real-time effects we do now, included
as just one feature in a feature packed upgrade for a very reasonable
upgrade price, is as far as the engineering can be pushed, right
now. More importantly the effects are totally scalable - throw
more processor power at it, more effects become real-time, so
as processor power increases the capabilities of real-time G4
Effects so they will automatically get more powerful with faster
and more processors.
What about the RTMac
Since I don't have a qualified
G4 I will be using my RTMac for a while and it still has some
advantages - full quality, full frame rate real time effects
on video monitor, analog to DV digitize, preview single frames
of Color Correction to the RTMac with Shift+F12, second monitor
support and some extra effects not yet supported in the software
G4 real time effects. It's going to be paying for itself for
a while yet.
Summary
- Real-time G4 Effects work with both
Offline RT (PhotoJPEG) media and with DV Media
- Requires G4/500 or dual G4 processor
before it becomes available at all
- Previews real-time to the desktop for
real-time edit decisions
- Monitor the preview video on an NTSC/PAL
monitor via any graphics card with a video output for preview
in video gamma
- Swap back to FireWire/DV output with
Easy Setup for full video quality
- Only one render before mastering, not
multiple renders while making edit/effect decisions
back to contents
OS X Support
Final Cut Pro 3 is the first
release that will run in OS X. Final Cut Pro 3 has identical
features on OS X as it does on OS 9; it runs at the same speed
on either operating system (more or less) and looks almost exactly
the same. Apple has gone to a lot of effort not to exclude OS
9 users who are not ready, or able, to transition to OS X just
yet.
When you're ready to make the transition
to OS X Final Cut Pro 3 will be there and will integrate into
an all OS X workflow. The look is still mostly the same Final
Cut Pro appearance we've loved for nearly 3 years with only basic
compliance with the Aqua interface guidelines.
Personally, having seen what at least one other NLE has done with OS X conversion I was hoping for an Aqua remake. And sometimes the Aqua elements in the original interface look out of place. Having seen what was done with QuickTime Player and iTunes in the OS X conversions, I think it would be possible to retain most of the familiar look and yet give it an Aqua look and feel, but no doubt there will be future OS revision for more OS X Aqua compliance. From a purely personal business motivation, I'm pleased the interface is substantially the same as it will make an OS X compatible version of the DV Companion - The Intelligent Assistant for Final Cut Pro 3 much less work than remaking all 3 hours of sprite movies.
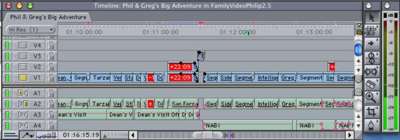
Click to view larger image
For now, running in OS X provides no
specific benefits for the operation of Final Cut Pro. Running
in OS X is a benefit because there is no need to assign RAM,
you can work in the background while rendering and in theory
it's more stable, but in practice Final Cut Pro so rarely crashes
in OS 9 or X that's almost irrelevant. If it does crash you can
just restart the application in OS X. The good news is that there
are absolutely no disadvantages to working with Final Cut Pro
3 in OS X.
As other applications become available
for OS X, it will make migration easier. Projects are completely
cross platform compatible - you can start a project in OS 9,
open it in OS X and work on it, then open it again in OS 9 with
no penalty.
Although OS X is a true multi-tasking
Operating System, don't expect to gain too much benefit from
it right now. Perhaps future versions will allow render-in-the-background
like iMovie but for now, rendering in Final Cut Pro stops all
editing functions. The redeeming feature is, of course, while
rendering in Final Cut Pro 3 you can work productively with other
applications on the same Macintosh.
OS X support is there; it seems solid and reliable so when you're ready to go, you can make a seamless transition. However, you might be waiting for a while for RTMac, Cinéwave and Digital Voodoo support on OS X. According to reliable sources first out of the gate with OS X hardware support will probably be from the AJA/Blackmagic combination, although it's not yet an officially supported configuration.
back to contents
Color
Correction & Color Correction Workflow
Color Correction was the feature
that caught my attention at first look, particularly the 3-way
Color Corrector filter, which is one of the G4 real-time effects
on a suitable G4. On lesser Macintoshes it is a render effect
that previews on a still image out the FireWire through a DV
device like all other filters.
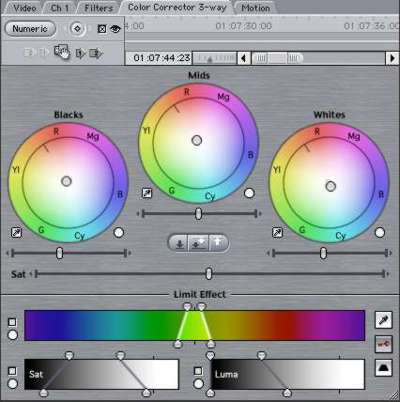
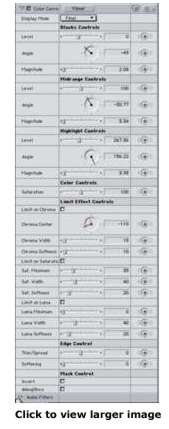 These new Color Correction filters have their
visual interface in their own tab in the Viewer window. Controls
are duplicated between the visual interface and the numeric controls
for the same filter in the Filters Tab. Each Color Correction
filter you apply adds another tab for the new visual interface
controls for primary and secondary color correction. These new Color Correction filters have their
visual interface in their own tab in the Viewer window. Controls
are duplicated between the visual interface and the numeric controls
for the same filter in the Filters Tab. Each Color Correction
filter you apply adds another tab for the new visual interface
controls for primary and secondary color correction.
Primary Color Correction
The 3 Circular controls parallel the joystick controls on high
end color correction tools - one each for Blacks, Mids and Whites.
(In fact, if you have a suitable trackball there's a trick that
lets you use the trackball for color correction control.) You
can push each of the three tonal group controls to manually correct
the color, or click the appropriate color picker button. Clicking
on a buttons lets you select a color from within the tonal group
that is used to auto-correct that color. For example, click the
Whites picker, and then click on a pixel in the image you want
to be displayed as truly white. The whites are adjusted accordingly.
Fine tune the result to taste
Black balance is equally simple, with auto-correct or manual
intervention and ditto the mid tones of the image. Use the automatic
adjustment as a starting point and fine-tune manually, but you'll
find the auto correction consistent, particularly if you have
a consistent reference object.
Beneath each color wheel are individual controls for brightness
for each tonal group and an overall saturation control. In the
center are 3 buttons for Auto-black, auto-white and Auto contrast
adjustment.
Secondary Color Correction
The Color Correction can
be applied to a selected color or colors within the scene using
the Limit Effect controls below the main controls. Use it to
adjust the color of a wall, piece of furniture, sky, shirt, etc
without affecting the color of any other part of the image.
The controls for selecting where the
Color Correction is applied are very comprehensive and give great
separation. In fact, they also form the basis of an all-new and
greatly improved chroma keyer.
Color Correction Workflow
Right at the top of the Color
Correction interface is a truly great workflow enhancement when
color correcting: the ability to copy the filter(s) from the
shot before or after - for Clips from continuous takes - or from
two Clips forward or back - for where two shots are intercut.
From within the Color Corrector you can force the Filter onto
the Clip one or two forward.
In other words, once you get the color correction right for a
setup you can copy it forward to the next Clip or you can pick
up the correction from the Clip before or after.
Make your color correction once, then
copy it forward, check and correct, copy forward, check and correct
and so on. Whether you're working with real-time playback of
the Color Correction with G4 Real-time FX, or on a frame preview
basis, I think it's great that as much thought went into the
workflow as went into the color corrector itself.
Summary
I was amused to read on one list,
that the color correction in Final Cut Pro 3 was "not up
to the standard of an Avid Symphony" but that's alright by
me - I don't have the budget for an Avid Symphony and I think
it's a testament to the work that's gone into this feature that
it was compared at all! In fact, that same author went on the
say "but it is better than the Color Correction on any other
Avid".
As well as the 3 Way Color Corrector
there are 3 other new Color Correction filters.
- Single Color corrector with Hue and
Balance controls, and the Limit Effect controls - best used for
changing the color of a single item in the shot;
- Broadcast Safe with no fancy interface
but 5 preset level settings from 'Custom' - you're on your own
- to Extremely Conservative. Broadcast Safe is used in conjunction
with the new Range Check feature. Range Check a Green
(getting close) or Red (out of range) Zebra pattern for excess
Luma Levels or Chroma Levels (or both at once). With Range check
you can be sure, no matter what the input source, that the output
is within broadcast safe. Range Check is independent of the Broadcast
Safe Filter.

- Desaturate Highlights is a special purpose
color correction filter that, well, desaturates highlights and/or
Lows without affecting any other levels in the image to bring
Chroma Levels within Broadcast safe. (Saturated colors near white
or black are generally 'illegal' colors.)
back to contents
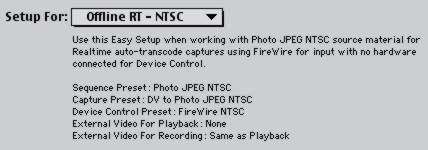
OfflineRT
OfflineRT is both a revised codec
and a new workflow. Long time readers of LAFCPUG.org will recognize it as a formal,
and improved, method similar to the How2 Capture to PhotoJPEG
offline technique that's been there for some months.
And that is exactly what it is. A new
version of the PhotoJPEG codec that is accelerated by the G4
Velocity Engine and an Easy Setup for NTSC and PAL that captures
DV directly to the PhotoJPEG codec at 320 x 240 and 35% compression.
Net result - 9 times the offline storage capacity - an impressive
45 minutes per Gigabyte! The data rate is sufficiently comfortable
to work from an internal drive in iBook or PowerBook. A 45 GB
FireWire drive, powered from the FireWire bus, holds more than
30 hours of offline-quality storage, vastly superior than the
Avid AVRs of days gone by.
320 x 240 PhotoJPEG quality is plenty
good enough for edit decisions and at least the initial stages
of color correction. On a G4 Titanium PowerBook OfflineRT is
real-time even on the 500 MHz models.
Once your project is edited, the much
improved (and more reliable) Media Manger is available
to prepare the Sequence(s) for recapture at DV quality, without
necessarily creating a new project - another productivity improvement.
Throughout the OfflineRT process, Timecode is maintained at every
step, so when it's time to recapture at finished quality, batch
capture happens seamlessly (as long as your Timecode was good
in the first place).
back to contents
Record
Voice Over to the Timeline
One of my favorite features,
the Voice Over tool, appears in the one new window in Final Cut
Pro 3 - the Tool Bench - also used for the Video Scopes
and QuickView features yet to be covered.
Voice Over allows you to play the Sequence
and simultaneously record a matching voice over to RAM. A documentary
filmmaker's dream, Voice Over is RAM dependent but you can limit
the duration to be recorded (and thus the RAM requirement) by
setting an In and Out marker in the Sequence.
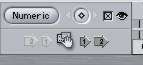
Voice Over is simple to use - set the
input from the available inputs - and click on the record button.
Inputs can be from the RTMac card with a line level feed from
a mixer which is what I use; USB microphones or microphone adapters
; multi-channel FireWire input, or at a pinch, the microphone
of a DV Camcorder. As long as Final Cut Pro recognizes it as
a valid QuickTime audio digitizer, you can use it for Voice Over.
Voice Over gives visual (and optionally
audible) lead in queues and a warning 15 seconds from the end
of recording range. Once recorded to RAM it's is processed and
saved to the drive and automatically added to free tracks in
the Timeline. It just works, although I found I preferred the
audible warnings off unless the microphone was removed from the
headset used to monitor.

One less well known feature is that the Voice over tool actually
captures a few seconds before the In point and a couple after
the Out point - useful if your talent started a little early
or won't stop at the end.
Use the shortcut keys to mute and/or
solo tracks for easy comparison between multiple VO takes in
combination with other (locked) audio tracks.
back to contents
QuickView
- RAM preview
Even those of us not fully equipped
with the latest in G4s with fast processors are not without the
ability to preview in real time! QuickView is another reason
to allocate more RAM to Final Cut Pro because it generates a
RAM preview of composited effects, or even transitions, at full,
half or quarter resolution. (On OS X Final Cut Pro 3 will use
whatever RAM is available on the system.)
The RAM preview does have to be 'rendered'
but working in half or quarter resolution renders exponentially
faster: half resolution is 4 times faster, quarter is 16 times
faster and quite good enough to get a feel for the way the effect
is timed.
You can set QuickView to play around
the current Playhead position with adjustable duration; play
In to Out, or play from the In point forward. It will preview
Viewer or Canvas or automatically select depending which one
is active.
The new 'Three Up' layout sets Viewer,
Canvas and Tool Bench 3 across the screen, but you can set (and
save) your own layouts for later reuse.
back to contents
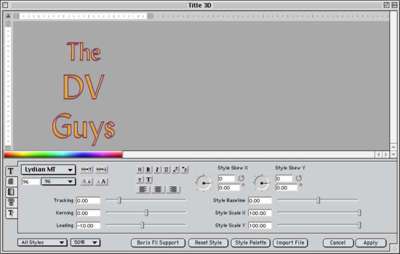
Boris
Calligraphy Filters
These two new Generators should finally
dispel the criticisms of Final Cut Pro's Title capabilities.
Two brand new Generators from the makers of the Industry Standard
in title generation - Boris
- ship with Final Cut Pro 3. The two Boris Calligraphy Generators
are in the standard Generators pop-out menu and work with real
time previews (and RTMac) as long as there is no animation within
the title.
Title 3D is completely vector based,
for high quality totally scalable text and text animation. 5
Shadow effects per title, 5 edge effects, full Tracking, Kerning
and Leading control - Kerning can be applied to any letter pair
- along with Text effects like Style Scale X and Scale Y, and
the most comprehensive Character based Transformation controls
you could want. With character Transforms animating, you must
render, even for a preview (but QuickView is perfect for this).
In Final Cut Pro 2 we got Script Ltd - a very limited version
of Graffiti. Between Title 3D and the Crawl/Roll
Generator we have a very comprehensive slice of a $400 title
application - for nothing extra! The cost of the upgrade price
could be totally justified in the value of these two generators
(without even taking into account the value of the CGM filters
and transitions included).
Calligraphy works on both OS 9 and OS
X and provides the most professional title tools short of the
full version of Graffiti 2 or Boris RED 2.1. Of course, there
are none of the 3D Compositing shapes of the Boris interface
and 3D Extrusions are not part of Calligraphy (both good reasons
to upgrade) but I believe we can now put to death, once and for
all, any criticisms of Final Cut Pro's text/title capabilities.
Calligraphy and the ability to build
complex titles as a single Sequence, I believe, puts Final Cut
Pro near the head of the pack for Title creation, animation and
control.
back to contents
click to view larger image
Video
Scopes
There would be little point in
having Broadcast Safe and Color Correction filters without the
ability to accurately monitor and measure levels from Clips or
Sequences. Fortunately Final Cut Pro steps up to the plate with
greatly enhanced capability. The Video Scopes Tab on the Work
Bench lets you set the display so any one of the 4 measurement
tools fills the window, or you can any combination or display
all 4 Scopes simultaneously.

Provides is a Vectorscope for
color measurement; Waveform monitor displays levels, RGB Parade
for levels in each color channel independently and the Histogram
parallels the histogram in Adobe Photoshop. (Sadly, you still
need Joe Maller's Levels filter to make optimal
use of the Histogram).
Hopefully the newly certified Final Cut
Pro training classes will feature full explanations of how these
important video level tools are used in the video production
process to control and maintain consistent quality.
The Video Scopes displays do not update
in real time. They are designed to be used on a representative
frame, but they will advance frame-by-frame by pressing Option+P
on the keyboard. The update rate is very appropriate for monitoring
levels. I believe it's a more useful rate than full speed playback.
back to contents
CGM Filters
and Transitions
These 35 Transition and Filter
plug-ins fully support YUV rendering as well as Velocity Engine
and multiprocessing. Furthermore, they are written in such a
way as to support rendering at the subpixel level for smooth
movement within the rendered clip. They apply as transitions
or filters and are, to all intents and purposes, native Final
Cut Pro effects because they are written in Final Cut Pro's FXScript
language.
Although many appear to duplicate earlier
Final Cut Pro Transitions and Filters, they render in higher
quality and with more control than the original Final Cut Pro
versions. Very highly regarded in reviews this package of plug-ins
- CGM Transitions and Filters Volume 1 for Final Cut Pro - originally
sold for $175 and is now included free.
More on CGM Vol1 HERE
back to contents
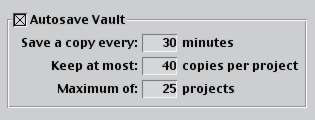
Autosave
Vault
The name might have been changed
but this parallels Avid's Attic. A new section in the General
Preferences Tab sets the frequency of Auto-saved copies and how
many versions of a project will be saved.
Should you want or need to go
back to an earlier version of the project, you can. Simply choose
the Restore Projects window and find the version you want to
go back to. Final Cut Pro 3 never erases a Project setting, even
when you exceed the number of backups you want in the vault.
The oldest are sent to the Trash for you to manually delete should
you want to.
Backing up the vault for each Project
would give maximum protection against disaster.
back to contents
External
Editors
You can now set what applications
will be used when you select Open in Editor from the Contextual
menu or Clip in Editor form the View menu.
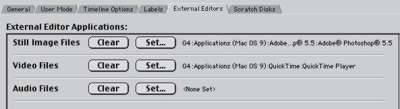
Nice enough feature made more useful
because, once you have made those important modifications in
the external editor and saved them, Final Cut Pro knows of the
changes and updates immediately to the changed files.
back to contents
Compression
and Chapter Markers for DVD Studio Pro
Improved integration with DVD
Studio Pro will happen with DVD Studio Pro 2, which was previewed
at DV Expo (I'd be watching around MacWorld). From inside Final
Cut Pro you can set a QuickTime marker that will be interpreted
in DVD Studio Pro 2 as a Chapter marker - already named as you've
named it in Final Cut Pro - when the file is opened into DVD
Studio Pro.
Compression markers are set automatically at each shot change
but you can force a new I frame (keyframe) at a specific frame
by setting a Compression Marker.

These markers do appear in QuickTime
Player as Text and are editable there (or convertible to Chapter
Markers in the QuickTime Player) but they are primarily included
for tighter integration and improved workflow between Final Cut
Pro and DVD Studio Pro - an important consideration when the
'whole world' is moving to DVD delivery.
back to contents
And the
rest
At nearly 5000 words, I've only
covered 11 or 12 of Final Cut Pro's major new features, but there
are literally dozens more:
- The ability to solo an item - particularly
useful when comparing multiple Voice Over takes recorded directly
to the Timeline (but not limited to that)
- New function to move the entire motion
path in the Viewer or Canvas without setting new keyframes, i.e.
offset the path but retain the relativity of all existing keyframes;
- New Flicker reduction filter
- Composite mode and Speed item shortcuts
in Timeline contextual menus;
- Save you Screen and Bin layouts to files
to restore them later - or transfer them to another workstation
(take you screen layout with you).
- Long name Tooltip in Bin List Views
when the column is too narrow for full display;

- New Large Icon view - the old Large
Icon is now Medium icon - great for previewing storyboards;
- Auto Start record on Print to Video
with presetable time before video plays;
- Analyze Video Clips for 'long frames'
(non-standard durations) places Markers in the Clip so you can
avoid editing them into a Sequence;
- Analyze video clips for Audio Peaks
(over acceptable) places a Marker in the Clip where the audio
is likely distorted;
- Range Check - although mentioned before
it's worth mentioning this new feature that displays zebra stripes
on excess chroma or luma levels.
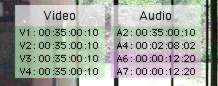
- Timecode Overlays that show the Timecode
for all Audio and Video Clips under the Playhead. Synchronized
Clips are shown with the same color
- Improved Timeline Audio resampling to
eliminate those pops and clicks that occur on mixed sample rates;
- New audio options in the Paste Attributes
window;
- Remove Attributes function - no more
manually deleting filters or Motion or Cropping, etc when you
change your mind;
- Support for 23.98 fps for high definition
video;
- Display of estimated render time - you'll
know if it's a bathroom break, lunch break, or time to start
a family;
- The ability to jump to matching Timecodes
between Clips in the Viewer window's recent clips list;
- Through edit detection that shows a
unique symbol where there is continuous Timecode across an edit
(i.e. the edit is redundant). You can remove through edits;
- Improved Media Manager - new layout,
new graphical display of resulting size of selected process,
batch transcoding; Bins of Clips as well as creating sequences
and more reliable;
- Mark to Markers sets an In and Out range
to the two markers either side of the Playhead - if you mark
a whole bunch of markers in time with music you can set edit
markers to edit clips to markers;
- Set Opacity lines on a Clip no longer
requires the entire Clip to be rendered - only the sections with
opacity changes need to be rendered.
- And much, much more - there is over
150 pages in the 'new features' volume of the revised User Guide
back to contents
What's missing? No integration with FilmLogic other than what already existed and no multi-camera features - but both were acknowledge as being "important". Important features missing from previous releases turned up later, so I believe we'll see more, soon.
Apple are certainly proving they're serious
about Final Cut Pro with this 5th revision in two and a half
years only 9 months from the last major release. An enviable
record.
Well done.
P.S. The Yak might have moved, but he
can still be called, although I think he might have learnt a
few new phrases in this release.
copyright©2001Philip Hodgetts
All screen captures and textual
references are the property and trademark of their creators/owners/publishers.
Philip
Hodgetts is the author of the DV Companion and co-developer of the Intelligent
Assistance approach to "What you want to know, when
you want to know, how you want to know." Philip has had
his own video production company since 1980 and worked on everything
from long form documentary to corporate video to national TV
commercial (Australia) with a strong emphasis on education and
training video production.
Having worked with Non-Linear Editing
since 1994, Philip fell in love with Final Cut Pro when he saw
an early alpha at NAB in 1998. He recognized the potential and
has worked with Final Cut Pro since before
it's formal release in 1999.
As well as continuing to edit a documentary 'trans-Pacific' from Los Angeles by sharing Project files with a producer in Sydney, he is currently busy updating the The Intelligent Assistant for Final Cut Pro - DV Companion to add in all the new features of Final Cut Pro 3. In his business life he's developing the concept of Intelligent Assistance even further and in his spare time developing an new concept in 'documentary' deliver for demonstration at QuickTime Live in February 2002.
You can purchase
DV Companion by clicking HERE
NOTE:
lafcpug gets a small percentage of sale
|