September, 2002
A Final Cut Pro user looks at Avid Xpress DV 3.5
System Requirements:
Mac OS X and Windows XP
Avid Xpress DV v3.5 $ 1699.00 US
Avid Xpress DV v3.5 PowerPack $ 2499.00 US
Power Pack includes: Avid DV FilmMaker's Toolkit, Avid Illusion
FX Pack, Image Stabilization AVX plug-in, Boris FX and Boris GRAFFITI
for Avid Xpress DV
By Ken Stone
I came to Final Cut Pro almost three years ago with no previous knowledge or experience with digital NLE applications. I'm a still photographer and at that time I did not even know what the letters NLE stood for (Non Linear Editing). My goal was to make a movie using my own stills and graphics, a photographer's 'Reel,' as it were. I looked briefly at Adobe Premiere but chose to purchase Final Cut Pro. Over the past three years I have worked with FCP on almost a daily basis and am truly enamored with the application.
At the June 2002 LAFCPUG meeting we saw a demo of Avid's Xpress DV v3.5. This was the first time that I had seen an Avid application running though I have been aware of Avid and its history. The fact that Avid was one of the first NLEs and the first digital NLE explains some things about its interface and its approach to workflow. Avid was designed to attract the generation of film editors coming from flatbed editors. Its 'desktop' was like a splicing table with several tracks of synced film and audio mag. Source footage was cut up from different 'reels' into 'clips' which you hung into a 'bin' or 'spliced' into a 'track' in a 'sequence.' The quotations are there because they are both metaphorical and actual in an Avid. There is no real film bin in a computer, but the folder in Avid does the same thing a film bin does for a film editor cutting celluloid. It holds clips until you need them in a sequence.
In the late 1980s Avid was the first successful application to bridge the real world of the 'flatbed' film editors and linear video editing stations with the digital work space of computers. The paradigm used was to have the interface, workflow and feel be analogous to a 'real world' cutting station. Since that time many new features have been overlaid onto the 'cutting station' paradigm. These new features are called 'Avid Editing Tools,' the FCP equivalent is 'Window Layouts'.
Final Cut Pro, which was developed later, embraces a different paradigm. It has a very different look and feel and in most cases, has a different way of doing things. FCP is also a hybrid application combining editing with compositing abilities. FCP's compositing abilities sits at its core. Like After Effects and Commotion, FCP allows the use of an Alpha channel (transparency information) with all media clips. It's this ability that makes FCP a powerful compositing application. Xpress DV has compositing abilities, but these abilities are included in its effects filters and transparency ability is not applied to video media globally.
While both Xpress DV and FCP are digital NLEs, they are two very different animals. Each has its strong and weak points. As I have worked in Xpress DV over the past few months, I have come to appreciate the differences between these two applications.
Xpress
DV User Interface
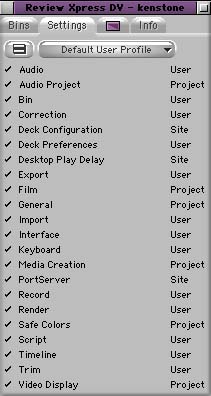
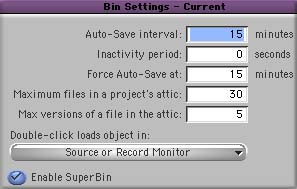
Xpress DV launches with both the Project and Bin windows open. The Project window has four tabs. The Bins tab holds all the Projects bins and it is from inside the Bins tab that you open, close, create, rename and delete bins. The Settings tab, shown below left, contains 22 items that set the User Profile. One of those items, 'Bin,' houses the Auto-Save attic settings, shown below right.
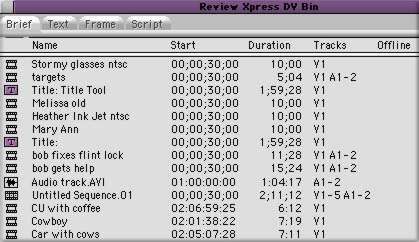
The Bin window, shown below, contains all the clips and media that belong to the Project. The Xpress DV Bin window is very similar to the Browser window in FCP. Both contain video and audio clips, sequences, graphic imports, audio imports, saved effects and titles and employ similar approaches to the organization of the information for the media. There are, of course, some differences. FCP puts a red slash through the clip's icon denoting that the clip is off line. Xpress DV has the words 'off line' in a column that is harder to spot. In Xpress DV you can delete both the clip and/or its associated media from the Bin window. In FCP this is a two-step process but offers more flexibility; first, use 'Make Files Offline,' ('unlink'in Xpress DV) then three options: Leave on Disk, Move to the Trash or Delete from Disk.
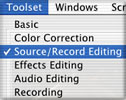
Xpress DV offers different window options depending on the Toolset
you are using. You can arrange the various windows for each different
Toolset and save the arrangements. The Basic Toolset offers the
Record window and the TimeLine (shown later) with the Project
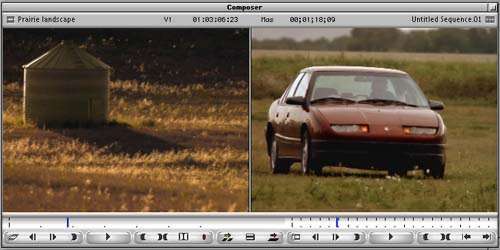
Bin and the Toolbar. Source/Record editing opens both the Source
window (FCP's Viewer) and the Record window (FCP's Canvas) as
shown below with the Toolbar.

Record
Tool
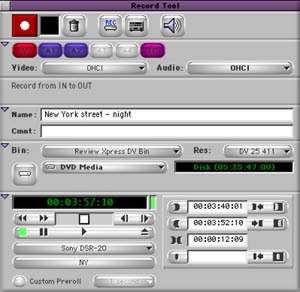
The Record tool, shown below, is used for both Log and Capture and Capturing on the Fly (Capture Now). To Log and Capture use the deck control buttons in the Record window (or J-K-L keys) and set both In and Out points, then click on the Log button. The face of the Record Tool changes and you are given the chance to name your clip and add comments. The logged clip will appear in your bin. For capturing On the Fly (Capture Now), use the deck controls to move to your starting point and then simply hit the Record button. The capture process will continue until you hit the Record button a second time to stop the process. Xpress DV's capturing procedure is very similar to the way that FCP works, however, the Record window seems to be built more for speed. FCP's Log window offers the chance to add additional information for each clip, which can be used to sort clips in the FCP Browser. During the batch capture process FCP displays important clip progress information in the Capture window, information which is missing from Xpress DV Record window. I captured using both Log and Capture and On the Fly from my Sony DSR -20 with no problems.
The
TimeLine
The differences between the two paradigms of Xpress DV and FCP is evident in the TimeLine. The Xpress DV TimeLine has three different modes and it is necessary to switch between these modes to accomplish your work. In the Standard TimeLine mode you cannot select, delete or move clips around, there is no Track Visibility control and the TL will not let you move past the end of the last clip. FCP has no modes and all editing tools are always available and clips accessible. Xpress DV has a maximum of 8 video and 8 audio tracks, though you can work around this limitation by nesting clips. FCP offers 99 video and audio tracks.
Xpress DV's standard TL is analogous to a 'flat bed' film cutter. This is where you do 'basic' editing chores. Using the Blue line indicator (Playhead) as a position marker and selecting the track you want to use, you can perform both 'insert' and 'overwrite' edits. You can drag transitions and filters to clips on the TL and you can keyframe audio volume in the audio tracks in the TL. Using the Trim tool, in Trim mode, you can perform trimming operations in the TL, though the 'J-K-L' keys do not work and you cannot move the Blue line indicator (Playhead) in the TL.
The TimeLine has two additional modes. These two modes are identical except that the Segment mode "Extract/Splice-in", Yellow arrow bottom left of the TL window, will Ripple the cuts you make. Segment mode "Lift/Overwrite", Red arrow will leave a gap. It is in either of these two modes that you can select, delete, or move clips around. However, the Blue line indicator (Playhead) is inoperable in either of these two modes. The TL ruler is a bit vague.

RealTime
Preview
Both FCP and Xpress DV use the expression "Real Time Effects", but a word is left out. The missing word is 'Preview'. This is an important distinction as RT 'Preview' is just that, a preview. Xpress DV and FCP preview the RT effects in the Record window (Canvas window) of the computer monitor and if you have the proper PCI card or PowerBook, previewing on NTSC or PAL, though at lesser quality than FireWire DV. You will still need to render all effects to view as full quality DV NTSC or PAL or before outputting to tape. This is the exact same RT effects 'Preview' feature that FCP employs. With both applications, FireWire output must be turned off for RT 'Preview' to work.
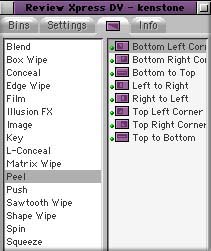
In the Bin window is the Effects tab which contains the Xpress DV filters and transitions, shown below left. You drag an Effect and drop it onto a clip in the TL. This will open the Effects Editor, below right. To return to an already applied effect, you first make that track active, you then place the Blue line indicator (Playhead) on top of the effect and then click on the Effect Mode button top left of the TL.
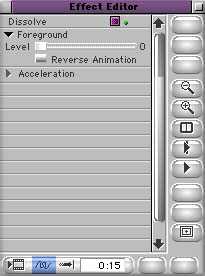
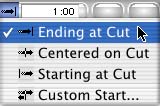
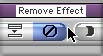
It is here, in the Effects Editor, that you set the effects parameters. When working with Transitions, there is a drop-down menu at the bottom of the Effects Editor (below left) that allows placement of the transition between the two clips and setting the duration of the transition. If you later want to remove an effect, you must once again select the track that the effect is on, place the Blue line indicator on the effect and then click on the Remove Effect button at the top of the TL. There are no reset buttons for the effect in the Effects Editor. To return the settings to default you would need to delete the effect and reapply.
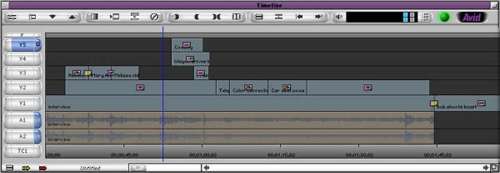
With the exception of one filter, the Region Stabilize filter, all of the Effects that come with Xpress DV are capable of RT Preview. To enable RT Preview click on the RT button found at the top of the TL to turn it green. As I have been working through Xpress DV, I have built a sequence with five video tracks. As you can see below, I have an interview video on V 1 with two tracks of audio. On V 2 I keyframed a moving title. Above that I have added three additional tracks that each have an effect applied. I can play this sequence in RT Preview mode on my G 4 dual 800. I have been working this sequence for over a month testing different aspects of Xpress DV and the RT Preview has worked every time. Impressive.
As powerful as Xpress DV's RT Preview is, there is a major drawback with the way that Xpress DV has implemented its effects. Whether in RT Preview or Standard mode, the fact is, that with rare exception, you cannot apply a second filter to a clip without nesting. If you apply a second filter without nesting first, the first filter disappears. In order to apply addditional filters to a clip, Option drag the filter to the clip which will automatically nest the filter. For example, the X and Y Spin filters are each separate filters. In order to spin an object along both axis you must apply the first filter and then apply the second filter, nesting in the process. If you wish to apply a third filter, you must nest again. As there are no Matte (Garbage or Shape) filters in Xpress DV, matting is not an compositing option.
The difference between the two different paradigms of Xpress DV and FCP is most apparent is in Effects/Compositing. Compositing involves the use of transparency. FCP adds transparency information to its video, information needed to create effects, to composite. Xpress DV does not have this ability, so in order for Xpress DV to accomplish compositing tasks some of its filters have the transparency ability built in. While this compositing technique works, it is limited.
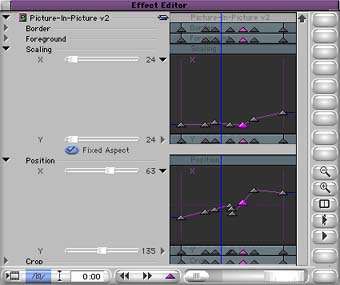
For example, I want to change the opacity of a clip over time. In FCP this is a simple matter, in Xpress DV you will have to use an effect that has transparency ability and that can also be keyframed. You can used the 'Superimpose' filter by changing parameters in the Effects Editor and keyframing in the Record window. With the 'Picture in Picture' effect you can change opacity and keyframe in the Effects Editor window using the 'Advanced Keyframe' feature, a better option. Drop the 'Picture in Picture' filter onto your clip, resize the clip back to 100% size, then keyframe your opacity changes over time.
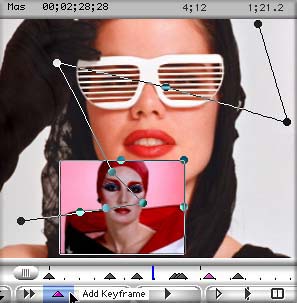
Keyframing
![]() All effects
are keyframable except for color effects, i.e. Color Correction.
Parameters are changed in the Effects Editor window (the equivalent
to the Effects and Controls tabs in FCP) but keyframing is done
in the Record window. Only the Picture in Picture effect offers
an advanced keyframe feature which allows parameter changes and
keyframing in one window. Clicking on the Advanced Keyframe icon
will open the 'Advanced Keyframes' window, shown below left. You
can also keyframe in the Xpress DV Record window, below right,
in much the same way that you can set keyframes in FCP Canvas.
When you set keyframes in one window, those changes are reflected
in the other window as well. One thing missing from both of Xpress
DV's windows are 'time' rulers which would aid in the exact placement
of keyframes. When working in the Record window, you can see that
the keyframes pile up on top of each other, making it difficult
to get to an exact keyframe. The Keyframing features in Xpress
DV are not as well implemented as in FCP.
All effects
are keyframable except for color effects, i.e. Color Correction.
Parameters are changed in the Effects Editor window (the equivalent
to the Effects and Controls tabs in FCP) but keyframing is done
in the Record window. Only the Picture in Picture effect offers
an advanced keyframe feature which allows parameter changes and
keyframing in one window. Clicking on the Advanced Keyframe icon
will open the 'Advanced Keyframes' window, shown below left. You
can also keyframe in the Xpress DV Record window, below right,
in much the same way that you can set keyframes in FCP Canvas.
When you set keyframes in one window, those changes are reflected
in the other window as well. One thing missing from both of Xpress
DV's windows are 'time' rulers which would aid in the exact placement
of keyframes. When working in the Record window, you can see that
the keyframes pile up on top of each other, making it difficult
to get to an exact keyframe. The Keyframing features in Xpress
DV are not as well implemented as in FCP.
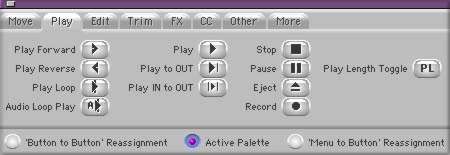
Command
Palette
Xpress DV offers a unique and powerful feature, the ability to map virtually any function to the Keyboard, Tool palette or TL Tool bar. To access this feature open the Commands palette from the Tools menu. The Command palette opens with 8 tabs, each for a specific area: Move, Play, Edit, Trim, etc. You can create custom Tool sets and Keyboard shortcuts and Save and Name these settings for future use. These custom settings are stored in the Project window and can be accessed at any time. In addition to mapping functions you can leave the Command palette open on your screen; it helps if you have a second monitor. Selecting 'Active Palette' from the bottom of the Command palette, as show directly below, turns the Command palette into an active palette allowing you to simply click on any function in the Command palette to do your work. The ability to map functions to the keyboard or TL toolbar is an excellent feature as it allows you to customize your work space to suit your own personal workflow.

Audio
Tools
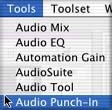 The audio tools in Xpress DV are both mature and robust. Each
tool has its own set of features and several are accompanied with
their own set of filters. You access the full set of Audio Tools
from the 'Toolset' menu. There are a total of five different tools:
Audio EQ Tool, AudioSuite, Automation Gain Tool, Audio Output
and Audio Punch-In Tool. All of these Tools have RT 'Preview'
capabilities. When you make an adjustment using one of these tools,
you can play the TL and hear your adjustment, stop the playback
and make another adjustment then play again. No need for audio
render to 'Preview'. One Tool, the Automation Gain Tool, can actually
be adjusted and the changes recorded while playing the TL, you
hear your changes as it plays, more on this later.
The audio tools in Xpress DV are both mature and robust. Each
tool has its own set of features and several are accompanied with
their own set of filters. You access the full set of Audio Tools
from the 'Toolset' menu. There are a total of five different tools:
Audio EQ Tool, AudioSuite, Automation Gain Tool, Audio Output
and Audio Punch-In Tool. All of these Tools have RT 'Preview'
capabilities. When you make an adjustment using one of these tools,
you can play the TL and hear your adjustment, stop the playback
and make another adjustment then play again. No need for audio
render to 'Preview'. One Tool, the Automation Gain Tool, can actually
be adjusted and the changes recorded while playing the TL, you
hear your changes as it plays, more on this later.
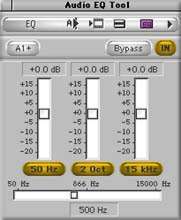
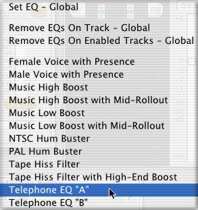
The Audio EQ Tool is shown below, with its attending filters or templates. While FCP has a Three Band EQ filter and the filter will produce the same results, the Xpress DV Audio EQ Tool has a graphic interface, which for me makes it easier to make adjustments. In addition there are a number of 'templates' which can be applied. Each template gives you a good starting point and can be further adjusted.
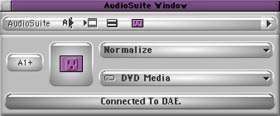
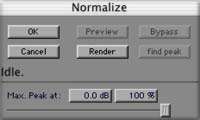
The AudioSuite Tool is used for basic audio sweetening. After selecting a filter, clicking on the purple plugin icon opens the settings box for the filter.

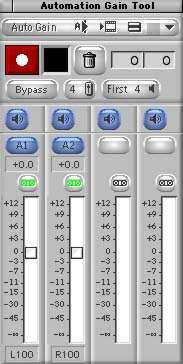
The Automation Gain Tool will allow you to change audio volume on selected tracks while you are actually playing the TL. This tool can handle up to eight audio tracks and you can select the tracks that you want to modify. The slider controls can be ganged together so that moving the volume slider for one track will move the volume sliders for the other ganged tracks. In the Automation Gain Tool box select those tracks that you want to change and click on the chain icon to turn it green and gang the tracks. Because there is a latency period of several seconds, place your playhead on the TL in advance of the area you want to modify, known as preroll. Hit the red record button, the TL will start to play. As you listen to the audio, make changes by moving the slider up or down. Hit the record button a second time to stop recording. Xpress DV will write a series of keyframes to the audio track on the TL that will reflect your changes, as shown below. I exaggerated my volume shifts so that you can see the keyframing in the TL. If you want, you can redo sections of your audio and new keyframes will be written to the TL. You can adjust keyframe levels manually in the TL. You can also remove all of the keyframes that the Automation Gain Tool has written.
 v
v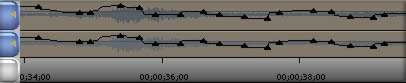
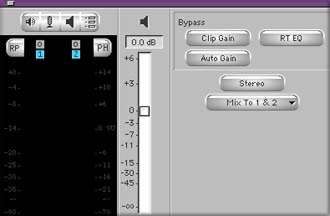
The Audio Output Tool is used to set global audio levels
for final output of audio via Firewire to your DV device.
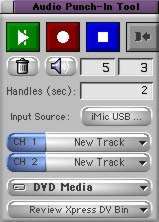
The Audio Punch In Tool is used for adding Voice Overs or audio from any external audio device. You can set Pre and Post rolls and can add handles. The Audio Punch In tool is the same as the Voice Over Tool in FCP. While I think that the Voice Over tool in FCP is better implemented with better visual and audio cuing, Xpress DV's Audio Punch In tool offers 2-channel audio recording (stereo). The FCP Voice Over tool will allow 2 channels of audio input, however, both of these audio channels will be recorded to one audio track as mono.
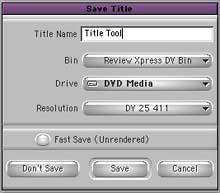
Title
Tool
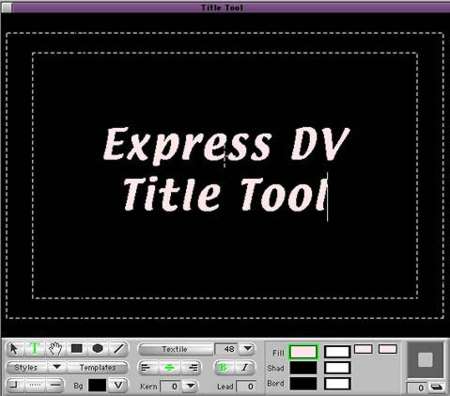
Clicking on the Title Tool icon opens the Title Tool. All of the tool's parameters are contained in this one box. You can select a colored or transparent background, position, size, font, color, kerning, leading, borders and drop shadow. The Keyframing of; Foreground Level (opacity), Acceleration, Scaling, Position, and Crop must be performed in the Composite window which has no TL Ruler and the keyframes for the different attributes tend to stack up on themselves making it difficult to tell which keyframe belongs to which parameter.
When you have finished setting your titles, they do not automatically show up in the Source window. You must first save the title as a media file which is placed into the media bin. You can then edit the title onto the TL.
Color
Correction Tool
Avid has added the Avid Symphony's color correction system to
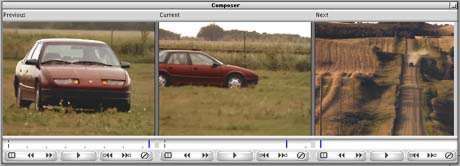
Xpress DV. The Color Correction tool opens two new windows on
your screen. The Compositor window has three panes. The left window
displays the previous clip, the center window displays the current
clip (determined by the blue line indicator in the TL) and the
right window the next clip. Each pane has its own scrub bar at
the bottom of the window so you can move to the exact frame in
each of the three clips. You can load different clips or segments
into the three different panes.
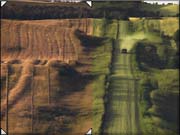
Each pane has the Dual Split feature which shows both corrected and uncorrected portions of the clip. The Dual Split places four white triangles in the clip window that you can adjust to select which portion of the clip you want to view uncorrected and which portion corrected. The Dual Split feature becomes disabled when playing RT Preview. The Color Match Control feature allows you to sample a color from one clip, the input color, and target that color to another clip, the output color. An eyedropper is used to sample the reference and target colors. Color Matches can be Saved for future use.
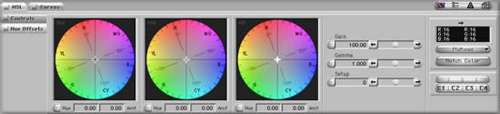
The Hue Offsets Tab, below, has three control wheels for adjusting Shadow, Midtones and Highlights areas for Hue and Saturation values. You can also control Gain, Gamma, and Offset. This window also has a Curves tab for doing color correcting using standard Curves controls.
Xpress DV Color Corrector works well and Color Match is an excellent feature. The Color Correction Tool offers RT Preview as does FCP's Color Correction tool but this is a moot point. RT Preview only plays on the computer monitor or in lower quality through S-video. To do final color correction work you have to view using FW DV on NTSC or PAL which means turning FireWire back on thus disabling RT Preview. There is one major drawback to Xpress DV's Color Correction tool, color corrections cannot be keyframed as they can be in FCP. There is a rough workaround to Xpress DVs inability to keyframe color corrections. You can cut your clip into a number of pieces, apply color corrections to each piece and then apply the dissolve effect to each cut to smooth out the color transitions.
Conclusion
Xpress DV is first and formost a 'cutting station'. It's a paradigm
of the world that once cut film by hand. As such, it does this
with great skill. It is dedicated to trimming clips and dropping
them into a sequence. The interface is streamlined and in the
standard mode, the TL is locked down allowing just the basic editing
functions. In the 14 years or so since the arrival of the Avid,
the paradigm has shifted from using a digital system to arrange
edits that you would have to match later with the original film
or video source footage, to actually finishing your work digitally.
With Avid Xpress DV, Avid themselves have entered the new world
where the media you are editing is expected to remain in the digital
form rather than be 'matchbacked' to film or higher quality 'online'
video.
Over the years, Avid has developed a mature and powerful set of tools that are available in Xpress DV. The flexibility of mapping the keyboard to arrange access to the tools in the workspace means you can work with Xpress DV without ever touching the mouse. The sets of Audio tools show depth and maturity. All audio tools and filters have RT Preview. This means that you can sweeten your audio and immediately play back to hear your adjustments. No need to render your audio as you must in FCP. There are a good number of audio filters that are a must for basic audio work. The Automation Gain tool allows you to keyframe audio changes in the TL in Real Time.
The Color correction tool with its three-up window display showing Past, Current and Next clips, or any three clips, side by side helps enormously in correcting and balancing color and luminousity between clips. However, the Color Correction tool is hampered by its lack of keyframeablity. Match Color gives ability to sample and match color between two clips and to save those matches.
Avid counts 100 RT Preview effects, but considering that the 'Peel' transition (and others) is counted as eight effects, the real number is lower. Still the RT Preview effects run well. My G4 dual 800 with 1.25 gigs of ram played five video tracks with effects on every track and encountered no problems. This was over a course of two months. I did experience a fair amount of instability over this time with a lot of quits but never when running RT Preview. There are a few other oddities relating to OS X -- you can not move an Xpress DV window to the dock, for example.
Avid's PowerPack offers 'Avid DV FilmMaker's Toolkit' which is used for matching back to film, where the DV format is used for doing offline film work. Unlike FCP, Xpress DV does not have the ability to work with any other video formats like uncompressed or HD.
This is the paradigm that Avid built. A highly functional and utilitarian 'cutting bench' with many talented Tool Sets. Avid is master of its own paradigm.
It is in this recent paradigm, a world where Projects will remain in digital form through to the finish, that Xpress DV shows its weakness. Cutting a project together is no longer the final goal of a digital NLE but rather simply the first phase. Completion of a project requires powerful compositing capabilities, abilities that are built into the core of the application. RGB video inherently has no Alpha channel. FCP makes transparency available to all video and it is this transparency information that unlocks the powers of unlimited compositing. In Avid's efforts to move into the new paradigm, it has built compositing abilities into some of its effects. It is the effects that do the transparency work and not the application. While this works on an effect-by-effect basis, lacking the core compositing abilities greatly restricts Xpress DV's ability to enter into the compositing world. Xpress DV is not a compositing application.
FCP offers 99 audio and 99 video tracks, Avid offers only 8 each. In Xpress DV you must nest each additional effect that you wish to add to a clip. While this does work, it adds complexity to changing the parameters of a number of effects that are applied to one clip. In FCP, all effects are listed and are immediately available in the Filters tab. Some of the most important tools used in compositing work are not even available in Xpress DV and there are no workarounds. There are no Matte (mask) filters, no Garbage, Shape or Feather mattes. All matting work must be done in a third party application like PhotoShop and this assumes that you will not need to change the parameters of the matte over time.
Like transparency, keyframing abilities are attached to Xpress DV's effects and really are not inherent in the base application. This means that some effects can be keyframed while others can not. There is no way to properly keyframe the color correction of a clip. The Text Tool parameters must be keyframed in the Composite window and it doesn't offer the number of standard keyframeable parameters found in FCP, e.g., Scale, Rotation, Center, Anchor Point, Crop, Distort, Opacity, Drop Shadow and Blur. Because keyframing abilities, like transparency, have been added to the old paradigm, -- to the effects themselves -- keyframing does not exhibit the intuitive, flexible qualities that are found in FCP.
Xpress DV does a good job at hiding all tools not directly used in cutting until the editor needs to call them up. For straight cutting this is efficient but for editing and compositing work this creates the need to constantly change modes. The Avid TL has: Standard mode, Segment mode "Extract/Splice-in", Segment mode "Lift/Overwrite", Effects Mode and Trim mode. Being in one mode denies access to the tools available in other modes. In FCP there are no editing modes and all the tools are built into the FCP interface for instant access.
So which digital NLE is for you? This depends on who you are, where you've been and where you are going. Xpress DV can be used as a DV 'off line' editor which anticipates the use of a higher end Avid by exporting an EDL from Xpress DV to an Avid 'on line' suite. If you are an experienced Avid editor and do cutting work, plan to work only with DV, with the occasional need for very basic compositing, Picture in Picture, fades, dissolves and simple Title requirements, then you will be very comfortable with Xpress DV. It has numerous RT Preview effects like Squeeze with 15 variations, Shape wipes with 9 versions. Edge wipe, Box wipes, Push and Peel have 8 each.
If, on the other hand, your needs extend past cutting and minimal compositing, then you need to look to an application like FCP which has complete compositing capabilities as well as cutting skills. While Xpress DV has a much larger number of RT Preview effects, the FCP effects bin offers more capable effects with a wider and more diverse gamut of abilities. FCP offers 'Chapter Markers' for DVD authoring, Xpress DV does not.
Xpress DV, which comes from an old paradigm, is moving into the new era. It brings with it 14 years of experience and many of the Tool sets show this maturity. Final Cut Pro, just three years old, was born of the new paradigm and some of its Tool sets lack the sophistication and maturity that Xpress DV possesses. It will take time for FCP to mature some of its Tools sets, however, FCP is a complete and powerful compositing digital NLE, something that Xpress DV may never be able to achieve.
Enjoy,
--ken
I
found the manual that ships with Express DV to be somewhat lacking.
Its seems to be written for experienced Avid editors who know
Avid and simply need to learn about Xpress DV. As I was brand
new to Express DV, it was not much help. I got a copy of the 'Quickstart
Avid Xpress DV' tutorial CD by ProMax. This tutorial is for the
Xpress DV beginner and was invaluable in helping me get started.
Review copyright © www.kenstone.net 2002
This article first appeared
on www.kenstone.net and is reprinted here
with permission.
All screen captures and textual references are the property and
trademark of their creators/owners/publishers.
| | Home | Next Meeting | Forum | Join | Past Meetings | Talent Directory | Reviews | Features | Tutorials | About Us | Discounts | Store |Training Classes |Contact Us | |