|
|
   
| Review: - Digital Anarchy's Beauty Box |
December, 2009
 Digital Anarchy's Beauty Box

www.digitalanarchy.com - $199.00
Review by Steve Douglas
Digital Anarchy has produced some truly fine plug-ins over the years. I still think their Psunami plug in for After Effects rocks and rolls and have used it often over the years. Not too long ago they sold most of their video software to Red Giant and focused on the marketing of their Adobe Photoshop filters and other products.
Looking to get back into the video genre, Jim Tierney and Digital Anarchy have produced 'Beauty Box' for both Final Cut Pro and Adobe After Effects.
One serial number is all I needed for both the Final Cut Pro and Adobe After Effects installations and both went smoothly.
Beauty Box is a skin retouching software, which uses Face Detection to identify skin tones at the same time as it preserves important facial features. It is, by design, easy to use and intuitive even though the downloadable manual provides a considerable amount of additional and useful information, which helps to clarify many of the manually adjusted parameters that Beauty Box incorporates.
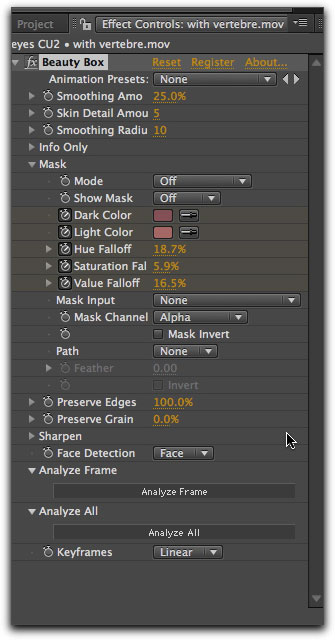
Beauty Box parameters as seen in Adobe After Effects.
There are some differences between AE's parameters and Final Cut Pro's
but nothing to confuse the user.
Digital Anarchy's Beauty Box is really not about creating fancy effects and appearances that stand out from the crowd, though I suppose one could create them to some degree. It is about doing the final retouching to facial characteristics and skin tones once you have created your sequence. Its effects are subtle, as they should be, which only makes it that much more valuable a tool to have. Using it was really quite simple and automatic.
With the original frame in After Effects on the left, you can see how the frame on the right with the applied Beauty Box has done an excellent job of reducing skin glare, pore size and creating a natural smoothness to actress Renee Gray's complexion. Note there is a slight softening of the image in the blinds behind her face.
Once applied in Adobe After Effects or Final Cut Pro, you are instructed to set the playhead upon a good frame that best shows as much face as possible and click on the 'Analyze Frame' button. This analysis sets key frames for that frame and clip. In many cases, clicking this just once in After Effects will do. Final Cut Pro requires clicking this twice in different parts of the clip. There are no analyzed files stored somewhere as there are for Final Cut's Smooth Cam filter and other filters that do analysis. Beauty Box looks at the frame, changes the values appropriately, and sets key frames.
Should there be lighting changes which affect the image throughout the clip you can move the playhead to those areas and click on the 'Analyze Frame' again which, by default, will analyze the second frame and keyframe that in a linear manner so that abrupt changes in skin tone will not occur to the audience. Three types of keyframes can be set, the Linear keyframe will probably be the one you most use when there is little color variation or lighting changes as you might have in a talking head situation. A Bezier keyframe is another option should you want to manually key your parameters and a Hold keyframe if your clips has multiple lighting or scene changes. If there are many changes in the skins appearance over the course of the clip due to lighting, angle, or scene change, you have the option to click on the 'Analyze All' button which will literally analyze the clip frame for frame. However, this will probably not be a necessary step for most and the 'Analyze All' button is not included in the Final Cut Pro version due to Apple's FX plug API (Application Program Interface which allows a software program to interact with other software) making including it difficult. In addition, unlike when using Adobe After Effects, Final Cut Pro does not automatically set key frames. This is really not a problem as once you click on the Analyze Frame it is easy enough to set the key frame manually in the Filters tab, move to the next section of the clip, click on Analyze Frame and now a new group of key frames will be set. It's really the same protocol as when key framing any filter in Final Cut Pro.
Once the 'Analyze Frame' button is clicked the actual analysis runs quite quickly in Adobe After Effects. While it is best to use Beauty Box on a full face, side profile analysis is also possible. There may be times when a warning pops up saying that the analysis failed. According to Digital Anarchy this is just a warning letting you know that this was the case and that you should switch to a different frame where the face may be more visible. In my case, I was experimenting with a very tight facial shot so that the mouth was barely visible. This may have thrown off the facial identification algorithms as, oddly enough, when using a similar frame, it worked just fine.
In After Effects the warning dialogue that came up on the left just lets you know that the analysis did not work on that particular
frame. On the right, in an almost identical frame, Beauty Box was successful.
Beauty Box's Face Detection automatically looks for a face to base its mask on. However, according to the manual as well as some of my tests, it can fail should the face be tilted back or be on an angle. This makes it all the more important to be sure that you have a good full frontal shot under the same lighting conditions that your interview or scene has been shot in.
While the automatic 'Analyze Frame' button does the job, there are many manual controls for customizing your results. The most important are the smoothing parameters. The Smoothing Amount serves as the master control. Set too high will result in lost contrast and an unnatural smoothing out of facial features. Not much adjustment needs to be made as the default settings really seemed to be the best for me during testing. The Skin Detail parameter allows for both detail and texture in the skin, which can offset the work of the smoothing control. Thus, use it carefully and in small increments. The final smoothing parameter is the Smoothing Radius, which is useful for smoothing larger features, however, like the 'Smoothing Amount' parameter, this can cause a loss of contrast.
Never the less, I found the default settings to really be the best way to go and any adjustments I might have made were quite small, a percentage here or there did the trick.
If you will be doing this type of video work, I strongly encourage the use of an external high definition monitor through an MXO or similar output device. Because the proper use of Beauty Box creates such subtle appearance changes, I found that using the computer monitor made it difficult to evaluate the filter's effect. Viewing the image through my output device onto my Sony Bravia made it much easier to see the improvements to the image.
On the left is the original image and the right with Beauty Box applied. While there was no suggestion as to what percentage of the frame a head should fill, even with such a small head size as in this frame, Digital Anarchy's Beauty box did a great job on the face with minimal effect upon either the foreground or background. However, if a face is too small as to prevent you from seeing much detail, Beauty Box is probably unnecessary. A face smaller than 150x150 pixels would definitely fall into that category.
And what of the results? As previously noted, changes are gentle. There is a smoothing of the skin tones wherein blemishes and large pores are not as obvious. You can, manually, adjust the parameters to take the smoothing a few steps further but that tends to flatten out the face and introduce an artificial, plasticized appearance. This might be the look you are seeking but Beauty Box's primary function is simply to clean up the appearance of the skin tones and facial features such as distracting blemishes, scars or patchiness. In After Effects as well as Final Cut Pro you can also work with the mask that Beauty Box creates. This is a great tool to utilize to tweak your image. In Final Cut Pro there is a thumbnail image to work with. Once you set the Mode to 'Foreground' and the 'Show Mask' to 'On', you can click anywhere on the thumbnail (unfortunately, very small but serviceable) to help clean up the image. This worked quite well when doing final blemish smoothing.
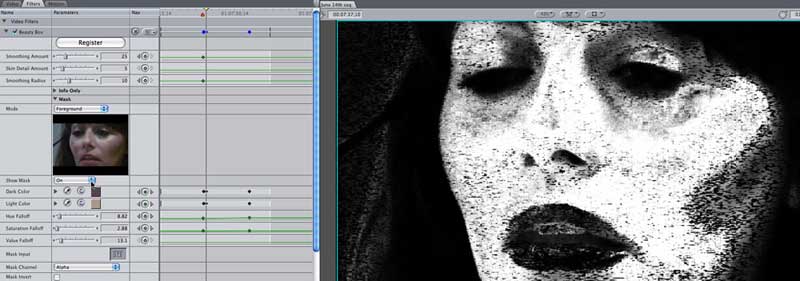
In Final Cut Pro you can further tweak your image by using the mask thumbnail. Because Final Cut Pro's API does not allow you to click on the canvas as you can in Adobe After Effects, clicking in the areas of the thumbnail you wish to clean up provides the same dexterity as you would find in AE. In the FC canvas you can see the original mask after Beauty Box has been applied. While there is already improvement to the image, I can now click within selected areas of the thumbnail to provide further smoothing.
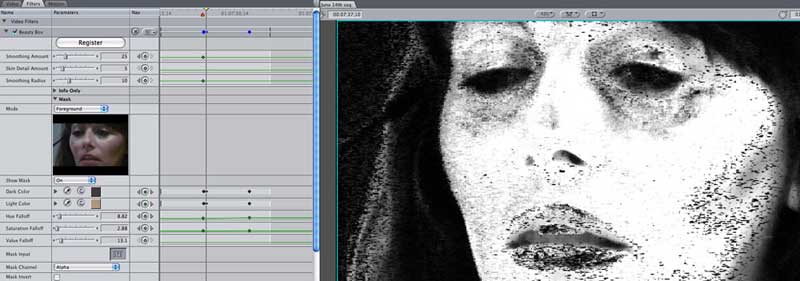
With only a couple of clicks within the thumbnail I am able to clean things up even more as evidenced by the mask in the FCP canvas.
While there is no 'check for updates' within the software itself, Digital Anarchy has always sent out regular newsletters notifying subscribers of any new tutorials or software updates. They already have a few excellent tutorials covering Beauty Box's use in After Effects, Final Cut Pro and how to use it to smooth hand features. The tutorials narrated by Jim Tierney are perfectly paced and clear as a bell serving to clarify any of the uses and parameters found within Beauty Box.
I've said it before, and will say it every time I see it; when companies have regular notices of updates to registered users and tutorials as to how best use their software, the customer, as well as the company itself, always stands to gain. This care for the customer can't help but pay off and be appreciated.
For the editor shooting a number of close ups and editorials using talking heads Digital Anarchy has come up with an excellent and unique piece of software. I am unaware of another filter like it that is so simple to use. In Final Cut Pro, I would suggest downloading the demo from their website. For those who do make use of Adobe After Effects, skip the demo and make the purchase as I can safely recommend that Beauty Box will be a very useful tool to have.
 Steve Douglas is a certified Apple Pro for Final Cut Pro 7 and underwater videographer. A winner of the 1999 Pacific Coast Underwater Film Competition, 2003 IVIE competition, 2004 Los Angeles Underwater Photographic competition, and the prestigious 2005 International Beneath the Sea Film Competition, where he also won the Stan Waterman Award for Excellence in Underwater Videography and 'Diver of the Year', Steve was a safety diver on the feature film "The Deep Blue Sea", contributed footage to the Seaworld Park's Atlantis production, and productions for National Geographic and the History channels. Steve was a feature writer for Asian Diver Magazine and is one of the founding organizers of the San Diego UnderSea Film Exhibition. He is available for both private and group seminars for Final Cut Pro and leads underwater filming expeditions and African safaris with upcoming excursions to Kenya, Yap, Lembeh Straits, Indonesia, Wakatobi Resort and Bali. Feel free to contact him if you are interested in joining Steve on any of these exciting trips. www.worldfilmsandtravel.com
copyright © Steve Douglas 2009
This article first appeared on www.kenstone.net and is reprinted here with permission.
All screen captures and textual references are the property and trademark of their creators/owners/publishers.
|