Main Features:
- Professional multitrack recording, editing
& processing solution
- Up to 64 simultaneous tracks - no audio
hardware required
- Runs on most Macs - even Powerbooks
- Up to 999 virtual tracks
- Real-time DSP effects include graphic
& parametric EQs, delay, chorus, gain & more
Support for Adobe Premiere audio plug-ins
- 24-bit automated level mixing with high-res
moving faders
Automated mutes, pans & levels
- Copy, paste, drag & draw automation
envelopes
- Integrated digital video support - with
frame-accurate MTC & SMPTE/EBU timecode sync
Syncs to all OMS compatible MIDI sequencers
- Launch Peak or Peak le directly from
Deck
- Includes Peak LE and a free upgrade
to Deck 3.0
The Search
We're all looking for it. You know, high quality sound to accompany
the hopefully mesmerizing images we have edited in Final Cut
Pro for our film, video and Internet projects? Final Cut Pro
offers an amazing array of editing, compositing and sound tools.
For a video editing piece of software, Final Cut's designers
have included a good, basic set of audio editing tools and audio
filters. But the big question for many of us has been, "when
we will all have real time image and sound capabilities within
Final Cut Pro?" Almost all of FCP's audio effects and filters
must be rendered. This limits the usability of FCPs tools to
an "apply audio filter to a short sample clip, render it,
play it back, listen and re-adjust the parameters, re-render
the changes, etc." workflow that is unsatisfactory for most
professional applications. The audio tools that are included
with Final Cut are a set of basic audio filters and tools which
are typically used to enhance and clean-up minor audio problems
like 60hz AC line hum, EQ, compression, gating and so on. The
audio tools in FCP focus on dialogue editing with a few of the
tools being somewhat useful in working with music and sound effects.
Many serious FCP editors have been searching for a complimentary
audio application for working on audio mixes for Final Cut Pro
projects.
A Possible Audio Solution for FCP?
In our search for inexpensive
audio post solutions for FCP, we received and tested Bias Inc.'s
Deck software V2.7. Deck generally looks and acts just like a
portable mixer and recorder. It enables you to record tracks,
monitor them while recording other tracks, adjust the level and
EQ of what you've recorded, and mix down your recording to a
master. Deck also offers many features you would not find on
a portable analog recorder, including advanced visual waveform
editing, noiseless track bounce, multi-point auto location, moving-fader
mixer automation, non-destructive real-time and destructive effects,
and 44.1kHz 16-bit sound. An exhaustive search on-line found
that none of the major retailers of Mac audio software seemed
to have Deck for sale, although it can be purchased directly
from Bias
on-line. (Deck seems to be mostly available from music
retailers including Guitar Center, Sweetwater, AudioMIDI.com,
West LA Music and Computers & Music.)
For $399.00, you receive not only Deck but also Peak le (bundled
free) which handles even more formats - and lets you the encode
your projects as RealAudio or Shockwave files, ready for high-quality
Web-based audio streaming. You also receive a copy of Adaptec's
Toast 4.1 CD burning application.
Our Experience with Deck
We installed Deck on a B&W
400mHz G3 with OS 9.04, QT 4.12, 448 MB of RAM, a 6-gig system
drive and a ATA 75 gig IBM Deskstar to serve as a media drive.
It should be noted that the version 2.7 .PDF documentation that
accompanies the software only recommended using SCSI drives "with
a SCSI throughput of at least 1.2Mb per second is required to
work with 8 tracks." Since we all know that DV video requires
a sustained throughput of at least 3.6Mb per second, Final Cut
Pro users should be confident that Deck can be used with any
ATA hard drive that is being used with DV video. This documentation
was obviously written some time ago and does deserve a more current
update from Bias.
It should be noted that our installation
experience with Deck was not one of the easiest and most streamlined
processes we have ever encountered. We began this review in November,
2000 with Bias' previous version of Deck, V2.63. While it is
acknowledged that software piracy is rampant these days, it should
also be noted that to make a product so difficult to install
for legitimate purchasers of your software as seems like a curious
way to do business. Upon installing Deck from a CD, we were given
a dialog that told us that our copy of Deck would expire in 15
days. So far, pretty normal. This still the same in the V2.7
(current) of the software.You must then decide whether to continue
and use the software or authorize it. In v2.63, Bias used a very
inconvenient method of activating the software that involved
the user having to transcribe eight "challenge" nonsensical
words to Bias, then Bias returning a "response", another
string of eight nonsensical words that "respond" to
the challenge. Very arcane and inconvenient method of activating.
In version 2.7 Bias has finally eliminated this system and just
requires a regular password authorization code like most other
software. Of course, Bias' hours to issue a PAC or product authorization
code to register the software via e-mail or phone are bankers
hours, M-F 9:00 AM to 5:00 PM PST so beware of this if you choose
to embark on a big audio project on a Saturday night or over
a holiday. The software can also be authorized by fax or postcard.
Granted, the software will function for
15 days without going through this entire procedure, but as many
users of the recent QT5 Beta version can attest to, the software
will inevitably expire at the least opportune moment in the middle
of a tight project schedule or just before a deadline on a due
project unless the user is conscientous enough to remember to
register for the password authorization code in the first few
days that the software is installed. Many of us have been not
so conscientous though and have been caught with the software
expiring on a weekend or under the stress of a project deadline.
It seems curious to make legitimate purchasers jump through so
many hoops to use the product that they have just paid for. When
we installed the original 2.63 software in November of 2000,
the first response we were issued was missing two of the required
eight words so we couldn't activate the software. Two calls to
Bias' tech support and several e-mails later we finally received
a correct, authorized response to activate the software. Hopefully
a software manufacturer will soon figure out a better, industry
standardized way to authorize legitimate buyers to use their
software products without making them jump through so many hoops.
Many of us look at computers and software as just necessary tools
so that we can do what we like to do best, create! Most directors,
producers and content creators don't enjoy having to become computer
detectives to get their work done. Bias is "currently working
on implementing a way to automate the process on-line" so
that products will be able to be authorized 24 hours a day.
The Setup
The first step after installation
is to allocate RAM to the Deck application. Deck is happy with
as much Ram as you can afford to allocate to it. Since Deck does
not run from within Final Cut, it is probably safe to allocate
a good chunk of your Mac's RAM to the program as long as you
are careful about not having Deck and Final Cut Pro open at the
same time. The available number of tracks seems vary from computer
to computer and is not only dependent on CPU speed, system RAM
and RAM allocation, but is also dependent on hard drive speed.
Users of 7200 rpm ATA drives will be able to access more tracks
than users of 5400 rpm drives should be able to although this
is dependent on sustained transfer rate. The owner's manual also
recommends that file sharing be turned off. Deck 2.7 supports
most ASIO-compatible audio hardware, Apple Sound Manager, Creamware
Pulsar, Digidesign Direct IO, Digidesign AMII, Digidesign AMIII,
Digigram VX Pocket, Echo Gina, Layla, Darla, and Mona, Gadget
Labs Wave 824, M-Audio Delta 66, M-Audio Delta 1010, MOTU PCI-324,
SeaSound, Sonorous STUDI/O, Tascam US-428, Yamaha DSP Factory,
Lexicon Core 2, MOTU 2408/1224, Event Layla/Gina/Darla, M-Audio
Delta Series, Sea Sound Solo, and the TASCAM US-428 so chances
are if you have an ASIO spec audio card, you are covered. With
the proper drivers, Deck will work the Digidesign ProTools Digi
001 card as well for those Pro Tools LE users who are more comfortable
using Deck.
Most Final Cut editors probably don't
own one of these cards and will mainly be inputting audio via
CD, camcorder or Firewire deck, but if you do own one of these
cards or are considering one, it does increase the power of Deck
having direct access to multiple digital inputs. Current owners
of analog mixers like the very popular Mackie series of mixing
boards or one of the many Mackie clones from Behringer, Samson
and others can input directly to the Deck application through
the Mac's 1/8" stereo input jack, although the long term
strength of the jack after numerous insertions and the noise
rejection abilities of the Mac's unbalanced audio input mean
that this is not the preferred nor recommended method of moving
high quality audio signals in and out of the Mac. A dedicated
ASIO card is recommended for those who have a PCI slot and few
dollars to spare.
Sessions and Deck Terminology
A Deck session is a Mac document
that contains a map of a specific recording project. It does
not contain audio files, but instead contains pointers to audio
files on your hard drive. Sound a little bit like a "ref
movie" in Final Cut Pro? It works the same way. Deck does
support sample rates of 22,050Hz, 24,000Hz, 44,100Hz and 48,000Hz
although the owners manual does suggest working at 44.1 KHz.
Everything coming from DV and FCP should obviously be at 48KHz
but you should be aware that the 32KHz setting is not supported
if you bring in pure digital audio from DAT, Mini Disc or other
digital multi-track recorded at 32KHz digitally through an audio
card. Deck uses mono sound files in the Sound Designer II format
(the same format Pro Tools uses). If you add any other types
of sound format files auch as .aiff, .wav, Deck converts them
to SDII format at a supported sample rate. Deck imports sd1,
sdII, aiff, snd, QT and wav formats.

The Lay of the Land-The Tracks, Transport,
and Mixer windows -
Deck's layout is simple and fairly uncluttered,
although two monitor windows can come in handy if you plan to
use many tracks and perform large mixes. To perform the basic
functions in Deck you will be frequently using three application
windows.

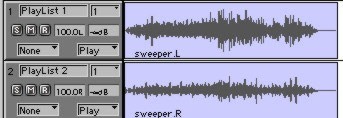
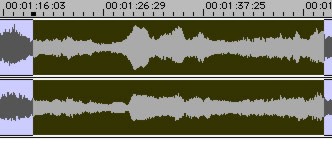
The Tracks window is where you view,
arrange and edit audio files along a timeline. Although only
the allotted number of play tracks can play, you can always bounce
those tracks down to one track or two stereo tracks, or use virtual
mixing to create mixes that are hundreds of tracks deep. This
is where the 999 virtual tracks number becomes relevant. Although
most DV projects do not end up needing more than a mono V/O track,
two dialogue tracks and a two stereo pairs for cross-faded stereo
music soundtrack, it's nice to know that with Deck, you have
the capacity to add as many tracks as your hardware is capable
of playing back. On our system, we allocated 400Mb of our system's
448Mb of total RAM to Deck and we were able to run comfortably
with as many as 28 real-time tracks at once with no "choking"
or crashing on a now outdated B&W 400MHz G3. Often, in feature
film projects, hundreds of tracks may be utilized and through
careful use of track combining and "ping-ponging",
this is possible in Deck although you are limited to as many
tracks your hardware configuration allows.
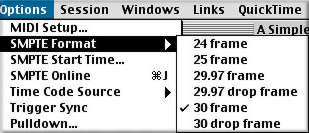 Deck does also
support all necessary video and film frame rates including PAL
although frame rates lower than 24 for streaming web and
Internet video clips seem to be absent. Of course, you can always
finish a project in 29.97, import, do the necessary audio work,
then export the finished project to Media Cleaner or whichever
application you use for web compression so the lack of 15 or
20 fps shouldn't be too limiting.
Deck does also
support all necessary video and film frame rates including PAL
although frame rates lower than 24 for streaming web and
Internet video clips seem to be absent. Of course, you can always
finish a project in 29.97, import, do the necessary audio work,
then export the finished project to Media Cleaner or whichever
application you use for web compression so the lack of 15 or
20 fps shouldn't be too limiting.
The Tracks window allows you
to record directly into any of its playback tracks.
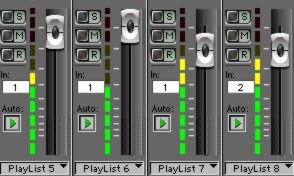
By monitoring the signal with the Mixer
window's VU meters you can adjust the signal to avoid it being
too low level (resulting in a noisy recording due to poor signal-to-noise
ratio) or too high of a level (resulting in digital distortion
due to clipping). As we all know, this feature has been sorely
missed in FCP and having fairly responsive VU meters for each
track in Deck is really nice. As we were preparing this review,
the announcement that Final Cut Pro 2.0 will have a single on-screen
VU meter has been announced. Deck will give you a VU meter for
each track or track pair used though which could still be an
advantage for some users.

The 10 segment VU meters are not
provided with any sort of reference or calibration beyond color
coding of three of the segments, presumably to signify unity
level and the top two segments being red to signify over modulation.
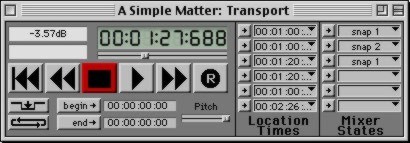 On the right
side of the Transport window you see two sets of six pop-up menus.
The six pop-ups on the left are Deck's Location Time buttons.
For those familiar with multi-track recording devices, these
are the Deck auto-locate memories. Each of these six pop-up menus
gives you access to the full list of all location times you have
ever stored for the current session. The arrows directly to the
left of each menu are the controls that you will use to record
and playback location times.
On the right
side of the Transport window you see two sets of six pop-up menus.
The six pop-ups on the left are Deck's Location Time buttons.
For those familiar with multi-track recording devices, these
are the Deck auto-locate memories. Each of these six pop-up menus
gives you access to the full list of all location times you have
ever stored for the current session. The arrows directly to the
left of each menu are the controls that you will use to record
and playback location times.
ADR and Foley Tools
ADR (automated dialogue replacement)
is the process of "looping" or replacing bad or unusable
performances recorded in the field. Foley is the process of creating
and recording sound effects using live artists to create the
effects in real time. Although ADR in the studio is a difficult
process and never as good as looping in the field during shooting,
using Deck could give FCP editors some nice tools for ADR. Several
of the tools are listed below.
Loop Mode
Most quality audio applications
have a special rehearse, or loop, mode that lets you define a
section of your recording and automatically loop playback of
that section over and over. This is particularly useful for practicing
along with a short section of a session in preparation for recording
a track, or for evaluating potential loops for arrangement purposes.
This can be useful in mainly music but can also be very handy
in ADR and Foley applications when an actor or Foley artist is
try to achieve a specific sound to blend in with pre-existing
sounds on the soundtrack i.e.; a sneeze, scream or yell. Nice
feature.
Automated Punch-In & Punch-Out
Although sometimes a recorded
track is perfect after the first try, in most situations at least
part of the track will need to be recorded again. Picture, for
example, a five-minute vocal track that has only a single line
with a mistake. As the engineer on this session, you would want
to make one more recording pass and replace only a small piece
of the recorded track. In traditional recording, this process
of piecemeal replacement is called punch-in recording. In the
pre-digital days, to punch-in a small section of a track, a second
person used to be required. This person would watch the time
on the track, and physically punch the record button at the start
of the section to be replaced. When the end of the replacement
section was reached, the person would punch the record button
out to prevent erasing any section of the track that should be
kept. This was a risky process, and an unclean punch often damaged
good sections of the track. For this reason, high-end multitrack
recording decks began to offer automated punch-in and punch-out
points. These points could be set carefully and stored, and at
the time of replacement recording, the punch-in and punch-out
points were handled automatically. Deck offers automated punch-in/punch-out
recording in the digital domain for the same reasons. This feature
is very helpful in ADR especially when an entire scene had good
sound except for one small stumble or external noise ruined a
take. Using auto punch-in, one can obtain the correct timing
and feel for the talent, then just punch in and out during the
new word or phrase needed. Quite handy, although somewhat specialized.
Basic Range mode and Object mode editing
Range mode lets you select any
piece of any waveform on any track, and slice or copy that piece
to create or alter a region. Object mode lets you select groups
of regions and move those regions for the purposes of editing,
effects spotting, or general organization. You can't select anything
smaller than one region in Object mode. Range mode allows you
to select waveform ranges by dragging across those ranges. Most
of the edits you would perform in Range mode pertain to defining
pieces of an audio track as regions, cutting and pasting small
portions of longer audio regions, and fading or cross-fading
sections of audio regions. Object mode is designed for wholesale
arrangement of existing regions, and general trimming and
placement functions.
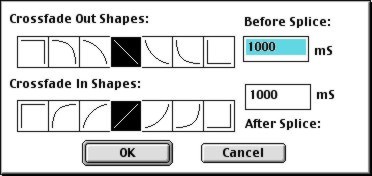
Crossfades
 Deck
offers more crossfade styles for in-points and out-points than
Final Cut does. FCP 1.2.5 offers basically a fade and a 3dB
fade. Deck offers seven basic fade shapes that range from a simple
fade straight down linear fade at the end of a selected track
to a gentle curved fade range. Two of these fade types can be
combined at any audio transition point to give you literally
dozens of choices for how you want your audio to most smoothly
transition based upon the visual look and feel that editor wants
to communicate. The Deck owner's manual does give good illustrations
and suggestions of different fade envelopes to obtain specific
results. This is an example of the nuance that is needed for
true sound design versus just chopping the audio together in
Final Cut.
Deck
offers more crossfade styles for in-points and out-points than
Final Cut does. FCP 1.2.5 offers basically a fade and a 3dB
fade. Deck offers seven basic fade shapes that range from a simple
fade straight down linear fade at the end of a selected track
to a gentle curved fade range. Two of these fade types can be
combined at any audio transition point to give you literally
dozens of choices for how you want your audio to most smoothly
transition based upon the visual look and feel that editor wants
to communicate. The Deck owner's manual does give good illustrations
and suggestions of different fade envelopes to obtain specific
results. This is an example of the nuance that is needed for
true sound design versus just chopping the audio together in
Final Cut.
Spotting audio regions to timecode
One of the most common tasks
in the audio post-production process is the placement (or spotting)
of sound to a particular SMPTE frame. Deck allows you to do this
in a very simple way using the normal editing tools. To spot
an audio region to a specific SMPTE frame:
|
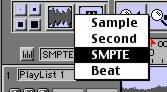
1.Open the Tracks window
and set the units of the window to SMPTE using theAxis Units
pop-up.
|

2.
Click the Edit mode button (or ~ key) to switch to Object mode.
|
3. Add the
audio region you wish to spot
4. Click and hold on the audio region you wish to spot.
5. Drag the region to the frame you desire.
|
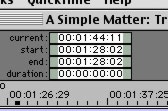 As you drag
the region, the number indicator boxes near the upper right of
the Tracks window are updated to show the start time, end time,
current time, and duration of the selected range The current
time is the time that is directly under the cursor. The current
time indicator is particularly useful when you want to spot a
sound to an internal sync point (a point other than the start
or end of the region). If, for example, you had the sound of
a truck roaring by, with a skid sound half way through, you could
place the mouse at the skid sound and spot that sound to the
desired frame. You do not have to drag the region to place it.
You can also Copy or Cut the region, click to place the insertion
point at the correct frame, and then choose the Paste At or Paste
After command. If you know the exact time to which you wish to
spot a region, double-click the region, which brings up the Region
Info dialog. You can change the region's start time by typing
in the new time or capturing one. You can also change the region's
name by typing in a new name.
As you drag
the region, the number indicator boxes near the upper right of
the Tracks window are updated to show the start time, end time,
current time, and duration of the selected range The current
time is the time that is directly under the cursor. The current
time indicator is particularly useful when you want to spot a
sound to an internal sync point (a point other than the start
or end of the region). If, for example, you had the sound of
a truck roaring by, with a skid sound half way through, you could
place the mouse at the skid sound and spot that sound to the
desired frame. You do not have to drag the region to place it.
You can also Copy or Cut the region, click to place the insertion
point at the correct frame, and then choose the Paste At or Paste
After command. If you know the exact time to which you wish to
spot a region, double-click the region, which brings up the Region
Info dialog. You can change the region's start time by typing
in the new time or capturing one. You can also change the region's
name by typing in a new name.
Continued
on Page 2-