Feburary 2003
Final
Cut Pro 4 
http://www.apple.com/finalcutpro/
System Requirements
Macintosh computer with 350MHz PowerPC G4 processor and AGP graphics
card.
Power Mac G4 with 500MHz processor and 1MB level 3 cache,
Power Mac G4 with 733MHz processor or faster, or any dual processor
Power Mac G4 required for RT Extreme and Soundtrack.
PowerBook G4 with 667MHz processor or faster required for RT
Extreme and Soundtrack.
Mac OS X 10.2.5
QuickTime 6.1 or later
384MB RAM (512MB required for RT Extreme and Soundtrack)
1GB of disk space required for application installation.
5GB of disk space required for Soundtrack content.
9GB of disk space required for LiveType content
DVD drive required for installation
Price:
$999.00 Full Version
$399.00 Upgrade
A Hands on "Sneak Peak" by
Steve Martin
By now you are probably aware that Apple
recently announced version 4 of its award winning non-linear
editing software, Final Cut Pro. Not since version 1 was released
in April of '99 has there been a more significant release. In
the past, Final Cut Pro has had it's detractors mostly coming
from producers and editors who thought that it was too "comsumery"
to be taken seriously in the professionally marketplace.
With this version of the app, most of
those complaints can finally be put to rest as Apple has truly
listened to it's customer base and created pound-for-pound the
most impressive feature set found in any editing application,
let alone one costing under a thousand dollars. A few month's
ago I compared Final
Cut Pro to Final Cut Express and claimed that for the most
part, they were the same app minus a few "pro" features.
With this release they are not even in the same ballpark.
There is much to commend in this new
product and I had difficulty deciding how to approach this review
since Apple added over 300 new features to their software. So
in view of the fact that most of the high profile features like
unlimited real time playback through Firewire, customizable keyboard
layouts, and real time audio mixing (to name a few) have been
adequately covered on the Apple web site, I thought I might focus
on some of the smaller improvements that in my opinion, makes
Final Cut Pro 4 an important upgrade.
As a side note, for those of you wanting
to see the new FCP 4 features in action, I recommend going to
the Apple site and click on the Quick Tour button (http://www.apple.com/finalcutpro/quicktour/).
Once there, you will be treated to almost 2 hours worth of tutorials
that were written and voiced by myself and produced by Digital
Film Tree in Hollywood. These tutorials cover FCP 4 as well
as the new bundled apps like LiveType,
SoundTrack,
CinemaTools,
and Compressor.
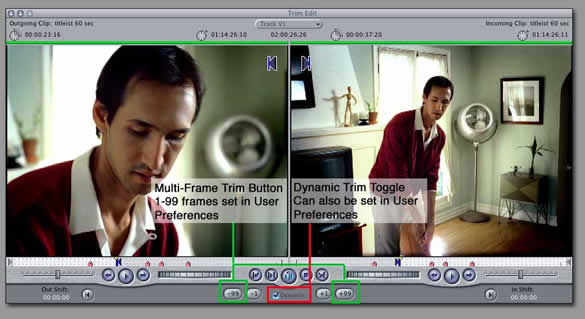
Trimming Improvements
If you do a lot of feature film cutting
or dramatic story telling that involves heavy use of the trim
window, there a few things that will make you want to do back
flips. In the trim window, you can now set your multiple trim
button up to 99 frames (that's eleven times as many frames you
could trim in FCP 3). This useful because in many cases it is
helpful to do a half second or even a full second trim without
having to click the buttons or tap the keyboard repeatedly.
Another useful feature that has been
added to the trim window is the ability to do dynamic trimming.
With dynamic trimming enabled in the user preferences, you can
now use your J & L keys to "rock and roll" over
a cut point, then once you stop playback by tapping the K key,
your edit point will automatically move to the new playhead location.
You can toggle dynamic trimming on or off using the check box
at the bottom of the window.
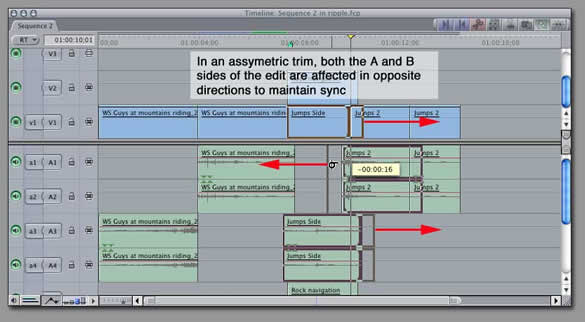
And what about assymetric trims? This
is now a reality in FCP 4. For those of you who do a lot of multi-track
dialog editing, this feature is incredibly useful because you
can now Command-click with your ripple tool to select both the
A side of your outgoing clip and the B side of your incoming
audio clip. When you perform the trim, the B side of the clip
is trimmed in the opposite direction as the A side, which effectively
keeps everything in sync while giving you more flexibility in
experimenting with various types of dialog edits.
You can also perform assymetric trims
in the trim window as well as in the timeline directly.
Dupe detection has been one of those
features that film editors cannot live without because unlike
video, every time they reuse a clip (or a portion of a clip)
somewhere else in their timeline, it will cost them in additional
dupe costs to physically cut that section into their film work
prints. As you can see in this timeline, you FCP display vary-colored
bars at the bottom of each clip where duplicated frames have
been detected.
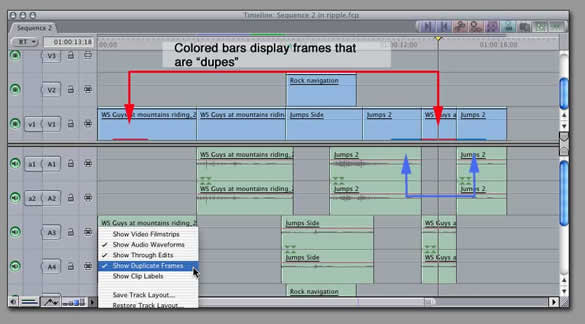
If you are a video editor, I still see
value in this feature because up until now, there has been no
quick way of determining whether you used a particular clip in
your timeline and you want to make sure you aren't repeating
a shot or a section of a shot.
New User Prefs
Remember the days when you had to worry
about time code breaks in your source footage? No longer. Final
Cut Pro 4 now has an ingenious way of dealing with timecode breaks
on souce tapes - it simply creates new clips on your hard drive
with unbroken timecode . For example, by selecting "Make
New Clip" you could capture an entire 60 minute tape with
broken time code in three places, and FCP will automatically
create three separate clips on your hard drive with frame accurate
time code.
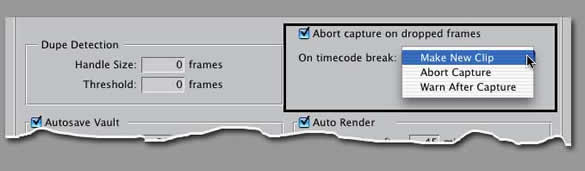
The Auto Render feature is a nice little
addition to the app that takes care of rendering when you get
up to go to go to the bathroom. You can specify which sequences
actually get rendered when you step away as well as the interval
before such renders will be commenced.

The Button Bar
One of my favorite features has got to
be the button bar. The button bar is frighteningly utilitarian
in that it allows you to create a custom set of shortcuts for
the myriad of commands in FCP 4 . Button Bars are found at the
top of almost every major window and can be added by dragging
from a button list or the keyboard layout window. You can even
customize the look of the button bar by dragging the buttons
into a different order, changing their color based on function,
and saving the layout to your hard drive.
In this screen shot, I have added a button
to turn on and off the audio waveform display as well as add
a button to fit-to-window (otherwise known as shift-z). I also
included a button to bring up the button list as well as add
some editorial functionality like ripple delete and marking in
and out points.

The Keyframe Editor
If you're like me, you appreciate FCP's
built-in compositing features as a good work-horse that although
not as robust as After
Effects or Combustion,
does enable you to get most of what you need out of it. Granted,
I wish there were a few more compositing and animation tools,
in this version, but I'm not complaining given sheer number of
other improvements. And of course if you really want to do some
serious compositing you can always use Shake.
One of the features they did add to the
animation side of things is a new keyframe graph editor in the
timeline. By clicking the clip keyframe button at the bottom
of the timeline, you will get an expanded view of your audio
and video tracks that now includes an area where you can view
and manipulate motion and filter keyframes as a graph.
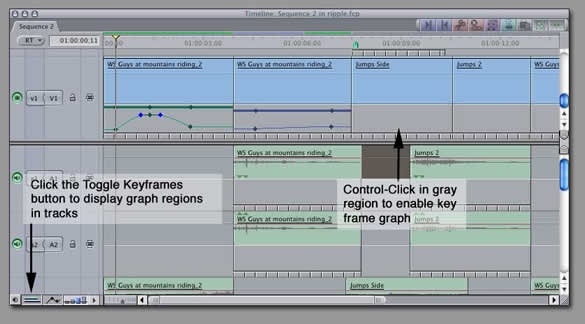
To view a particular motion or filter
property as a graph, you simply control-click in the graph area,
and a pop-up menu will let you select the property you wish to
see as a graph. To change the property value, just click and
drag on a keyframe. Dragging upward increases the keyframe value
while dragging downward decreases the keyframe value.
You may have also notice the tick marks
at the bottom of the graph editor. These are speed tick marks
and are put there to qive you a quick at-a-glance view of your
speed changes. Tick marks that are further apart indicated clips
that have been slowed down, while tick marks that are closer
together indicate clips that have been sped up. Clips that have
had their speed reversed will display red tick marks.
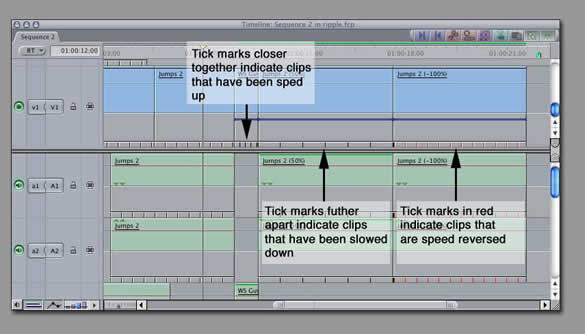
These tick marks are also extremely useful
when doing variable speed changes - also known as time remapping
because you can instantly see the areas in the clip that have
been sped up, slowed down or reversed.
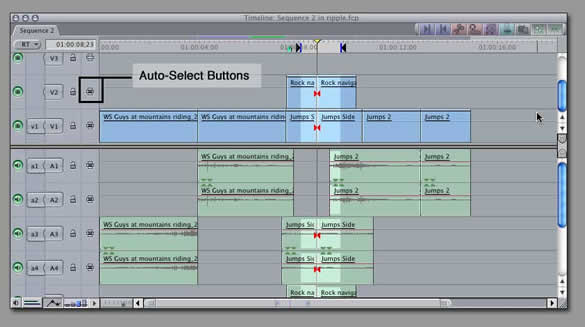
Auto Select Buttons
This feature has long been coming, and
one I'm sure, that most of you will find valuable. The auto select
contol allows you to select specific regions of your tracks using
in and out points. The light blue area indicates the selection
range on all tracks with the auto select control enabled. Toggling
this control off for a given track deselects the range for that
track effectively excluding it from common edit operations such
as cut or ripple delete. If you use the add edit command (control-V)
these buttons also control which tracks are "cut" by
the playhead. This means control-V now works across all tracks
or just selected ones. Hurray!
Modify Aux Timecode
One of the biggest things that separates
Final Cut Pro from the AVID has been the user ability to rewrite
the actual timecode track on any media file. Heck, you can even
give clips time code, that didn't have it to begin with! (see
my ripplefx tutorial "multicamera
tricks part I"). In Final Cut Pro 4, you can now write
or re-write the Auxillary time code tracks and these aux time
code tracks remain with the clip. This is extremely useful if
for example, you had two clips you wanted to sync up with different
source time code tracks but wanted to keep them referenced by
a secondary time code track.

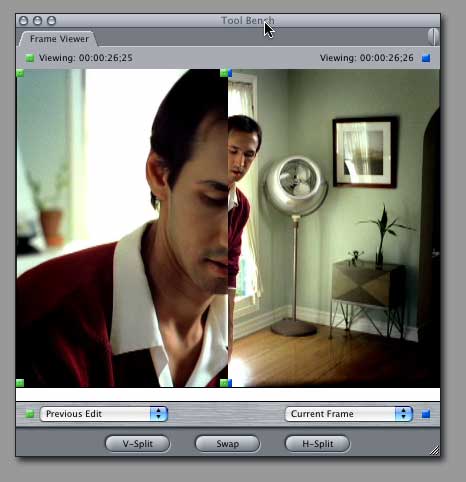
Color Correction Frame Viewer
Doing scene-to-scene color correction
has now been greatly enhanced by the inclusion of the Frame Viewer.
The Frame Viewer is called up every time you use the Color Correction
Layout and shows up in its own tab in the tool bench. It's primary
purpose is to give you a side-by-side comparison of two shots
in your timeline as a split screen. A pop-up menu on either side
of the frame allows you to choose what clips you want to load
into the Frame Viewer for comparision. You also can change the
proportion of the split screen by dragging on the little green
buttons at the bottom or top of the window.
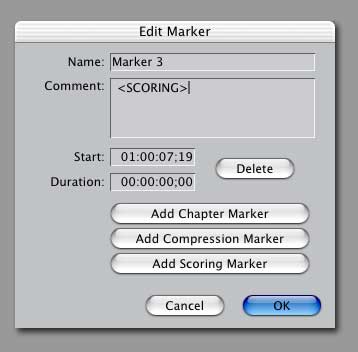
Scoring Markers
If you plan on scoring your movies in
the bundled SoundTrack Application, you will most likely be using
scoring markers. Scoring markers are added in the same way chapter
and compression markers are added - that is, by invoking the
edit marker window after the marker is placed in the timeline.
By clicking the "add scoring marker" button, you will
be flagging QuickTime to include them when you export your movie.
Once you bring your movie into SoundTrack, the scoring markers
show up in the SoundTrack timeline and you can use them to align
your music loops.
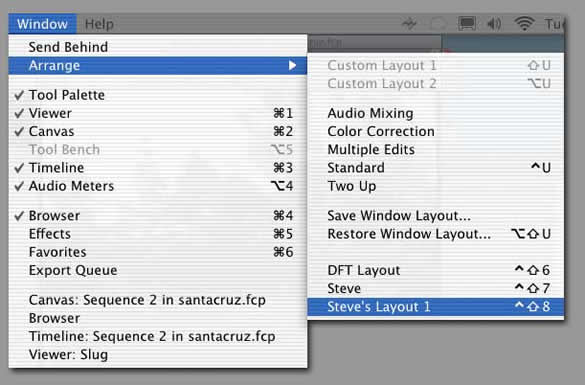
Window Layouts
I know it's seems like a small thing,
but the fact that my custom window arrangements now show up at
the bottom of the window menu for quick access had me quite giddy.
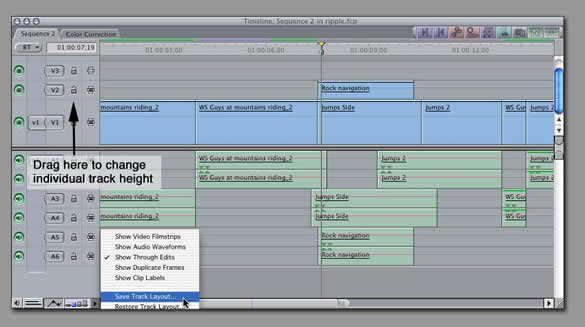
Save Track Layouts
Another small thing, but necessary -
the user ability to resize individual tracks by dragging on the
line between tracks. By holding down the option key while dragging
you can resize the video tracks independent of the audio tracks.
And if you look closely, there is even a little button that will
allow you to save your track layouts.
Match Frame back to Browser Clip
One feature that has been heavily requested
is the ability to match frame back to the original browser clips.
Just park your playhead over the clip in the timeline you wish
to find in the Browser, then hit Shift-F on your keyboard and
the browser bin that contains that clip now magically opens.
Of course you can still do a normal match frame of your master
clip to the Viewer by hitting the F key.
Merge Clips
If you need to sync up dailies or other
material that does not share a common time code source, you will
love this feature. Just command-click on the items you wish to
merge in the browser, then control click to pull up a contextual
menu where you choose "merge clips". This dialog shows
you the various ways you can choose to synchronize them.

Ok, I'm going to stop here. There a many
more features that I would love to talk about, but I'll leave
that for future articles and tutorials. From this release it
is clear that Apple has listened intently to their user base
and created an editing powerhouse that will now find it's way
into every area of professional post production. And considering
that Apple has not raised the price of FCP 4, and has included
four additional applications as well - Cinematools, LiveType,
SoundTrack and Compressor - you shouldn't have to think too hard
about whether you will be upgrading or not.
Final Cut Pro will be shipping in June,
2003 with an upgrade price of $399.
-Steve
Copyright 2003 Ripple Training
This article was originally
published at Ripple
Training and is reprinted here with permission. All screen
captures and textual references are the property and trademark
of their creators/owners/publishers.