|
   
| Review: - Zoom H1 Recorder |
March, 2011
 Zoom H1 Recorder
http://www.samsontech.com - $99.00
Review by Steve Douglas
Quality audio is one part of the editing equation that no one should forget. And yet, too many do just that and put aside audio concerns until it is too late. For those filming with the newer DSLRs on the market that provide high quality HD video on top of their photo capabilities, the need for a good microphone or recording device like the Zoom H1 is mandatory.
Recently produced, the Zoom H1, for the entry level shooter, does a very credible job of recording narration or music in stereo mode.

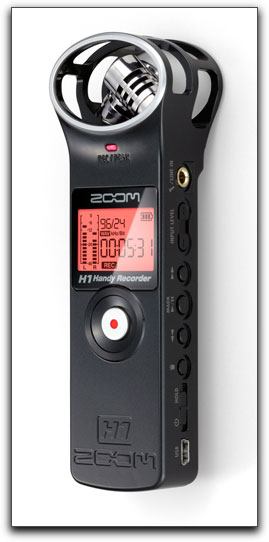
The Zoom H1 comes supplied with a 2 GB micro SD card, a AA battery, which can power the H1 for up to 10 hours, and pamphlet manual so you are ready to record as soon as you open the box. The USB cable, AC adaptor, windscreen and various other options are just that, optional. At the least, I would advise purchasing the USB cable, which can also power the Zoom H1, but is necessary for downloading your recordings to your computer and the windscreen.
Like its bigger brother, the Zoom H1 uses a stereo X/Y mic configuration and several features that really impressed. In tests, I found the stereo separation to be excellent. With the microphone centered in front of my television, I walked from the left side of the room to center to right and when the recording was ingested in the Mac Pro, my panning voice was clearly denoted moving from left to right with the television's audio clearly centered between the 2 speakers.
The microphones are a bit smaller than the H4n's and while the Zoom H1 can also record at 96khz/48khz and 44.1khz at either 16 or 24 bit, the recording on the Zoom H1 was a bit muddier on the bottom end as I listened to myself on the drums and compared it to a similar recording done on the H4n. In both cases, the recorders were placed at the same distance from the drums themselves. The high end of the H1 was quite good though transients seemed sharper on the H4n.
A small reference speaker comes as part of the H1 but even at its highest volume level of 100 you practically have to hold it up to your ear to hear. This is probably best as you shouldn't monitor any recording with an internal speaker. Instead the 1/8-inch stereo line output does a fine job with your headphones or ear buds. Monitoring any recording is an absolute necessity, and I strongly urge you to monitor all audio, no matter what recorder or microphone you may be using.
A 'Record Peak' light is a very welcome addition warning you when you might have your recording levels set too high. Adjusting record levels is simply accomplished by pressing on the input level + or - switch on the recorder's right side.
However, the H1 also has an 'Auto Levels' switch which I decided to test. The Auto Levels switch is designed to circumnavigate the manual levels control and prevent inadvertent peaking from occurring. Turning up the speakers in my editing bay as the Beatles blasted out 'Get Back', I set the manual levels control so that the peaking light was practically full on. If I had recorded this, clear distortion would have occurred in the recording. I then switched, mid-play to Auto Level and the peaking lights went off. This shows that the Auto Level control really does work as it should and is a great little feature to have. I would suggest setting the H1 audio levels manually and then switching over to Auto level as a bit of extra protection from unexpected noises coming on to the scene.
The Zoom H1 was very susceptible to handling noise so hand holding this recorder is not really advised for critical audio work. Fortunately, there is a built in tripod female mounting screw on the recorder's bottom. I would suggest using this whenever possible.
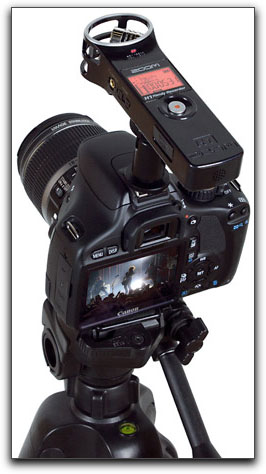
The Zoom H1 is considerably smaller in size than the H4n and will easily fit into your pocket. It is quite simple to use and though the 'manual' leaves much to be desired, most of what you need to know in terms of using the H1 is fairly intuitive.
After inserting the micro SD card and battery, the Zoom H1 is powered on by sliding the power switch to the on position and holding it there for a couple of seconds. You can't just slide it to on, you need to hold it there for a second or two. The same applies to powering the H1 off.
The digital screen on the H1's face displays what format you are recording in, battery power remaining and left & right audio levels. The audio levels are controlled by using the input levels slider on the right side of the H1. The one slider adjusts the levels for both of the on board mics simultaneously. There are no separate level controls for each mic. Once a recording has been made you have forward, backward and pause controls for listening to your different recordings. The screen also displays an icon showing whether you have the low cut filter on or not. The low cut filter helps a bit with cutting wind noise but having a windscreen is really necessary.

The H1 enables you to record in either WAV or MP3 formats using a sliding switch on the back of the recorder. The default recording is set to 44.1 16 bit. To change the recordings to 48Khz or one of the other choices, you use the play forward or backward buttons on H1 and the screen will show you what you are recording in as you scroll through.
As part of the power on/off slider there is a 'Hold' position which prevents anyone from mistakenly erasing or stopping any on going recording by disabling all other buttons. To enable them again one needs only to move the slider back to its middle position.
Deleting any recording off the card is simply done by pressing the 'trash' button on the side of the H1 and then pressing the Record button on the front to confirm that you want that specific file trashed. Of course, you can also trash any file with the recorder connected and mounted to your computer by dragging and dropping any of the files into your computers trash bin.
In order to download your recordings from the Zoom H1, turn off the recorder and connect it to your computer via a USB cable. Then you can turn the recorder back on and it will mount on your desktop where you can then open and drag any wanted files to your designated folder or scratch discs.
What would I have liked to see in the Zoom H1? For the best in audio recordings, XLR inputs are so important and unlike the H4n, there are none on the Zoom H1. You might not need all the many features and capabilities of the H4n but you will certainly want, at the very least, XLR inputs. However, the Zoom H1 does provide a 1/8" line-in jack for utilizing an additional microphone. This jack will accept stereo line-level inputs to be used in capturing audio from other analog sources. My only other complaint is, unlike the H4n, the Zoom H1has a very smooth plastic feel to it and both the case and the buttons do not provide much confidence in its durability. A higher quality grade plastic and only time and multiple uses will prove its ruggedness or lack thereof.
Aside from the lack of XLR inputs and inexpensive plastic housing, the Zoom H1 surprised me with its excellent audio separation and spacious sound. It certainly records with a quality that is heads and tails above any on-board microphones that most camcorders come with and its low price make the purchase easy on the pocket.
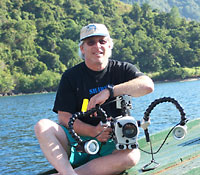 Steve Douglas is a certified Apple Pro for Final Cut Pro 7 and underwater videographer. A winner of the 1999 Pacific Coast Underwater Film Competition, 2003 IVIE competition, 2004 Los Angeles Underwater Photographic competition, and the prestigious 2005 International Beneath the Sea Film Competition, where he also won the Stan Waterman Award for Excellence in Underwater Videography and 'Diver of the Year', Steve was a safety diver on the feature film "The Deep Blue Sea", contributed footage to the Seaworld Park's Atlantis production, and productions for National Geographic and the History channels. Steve was a feature writer for Asian Diver Magazine and is one of the founding organizers of the San Diego UnderSea Film Exhibition. He is available for both private and group seminars for Final Cut Pro and leads underwater filming expeditions and African safaris with upcoming excursions to the Cocos Islands, Costa Rica, Lembeh Straits, Indonesia, and Wakatobi. Feel free to contact him if you are interested in joining Steve on any of these exciting trips. www.worldfilmsandtravel.com Steve Douglas is a certified Apple Pro for Final Cut Pro 7 and underwater videographer. A winner of the 1999 Pacific Coast Underwater Film Competition, 2003 IVIE competition, 2004 Los Angeles Underwater Photographic competition, and the prestigious 2005 International Beneath the Sea Film Competition, where he also won the Stan Waterman Award for Excellence in Underwater Videography and 'Diver of the Year', Steve was a safety diver on the feature film "The Deep Blue Sea", contributed footage to the Seaworld Park's Atlantis production, and productions for National Geographic and the History channels. Steve was a feature writer for Asian Diver Magazine and is one of the founding organizers of the San Diego UnderSea Film Exhibition. He is available for both private and group seminars for Final Cut Pro and leads underwater filming expeditions and African safaris with upcoming excursions to the Cocos Islands, Costa Rica, Lembeh Straits, Indonesia, and Wakatobi. Feel free to contact him if you are interested in joining Steve on any of these exciting trips. www.worldfilmsandtravel.com
copyright © Steve Douglas 2011
This article first appeared on www.kenstone.net and is reprinted here with permission.
All screen captures and textual references are the property and trademark of their creators/owners/publishers.
|