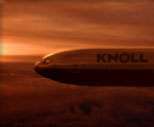
| Review: Knoll
Light Factory |
April, 2001
Knoll
Light Factory
Macintosh System Requirements
System 8.1 or later
32 MB of RAM
10 MB of hard-disk space.
Adobe After Effects 3.1 or later required for After Effects version
of plug-in. Adobe Photoshop 3.0 or later required for Photoshop
version of plug-in.
by
Pinnacle Systems/Puffin Designs
$395
Review by Andrew
Balis
 Adding some spice to your images
Knoll Light Factory is a series
of plug-ins for use in After Effects, Final Cut Pro, Electric
Image, Photoshop, Commotion Pro and Commotion DV. They are sold
by Pinnacle Systems/Puffin Designs, and retails for $395 US.
Previous versions of this product were known as Knoll Lens Flare.
I'm glad to see the name change, as Lens Flare alone under-values
the myriad of possibilities that you have with Knoll Light Factory.
It does much more than create a simple lens flare in a shot.
It can create all kinds of lighting effects that can be completely
customized, and can also "interact" with the video
footage itself, creating effects that can truly take on an integrated
3D effect.
For my tests, I used Knoll Light
Factory in After Effects and also in Final Cut Pro. As I will
discuss, certain elements work better in After Effects than in
Final Cut Pro.
Installation is simple. Simply
open the folder Installers on the CD. Inside are four installers.
For FCP, or AE, launch the Knoll Light Factory installer. Select
the plug-ins folder for FCP(or AE) when prompted where to install.
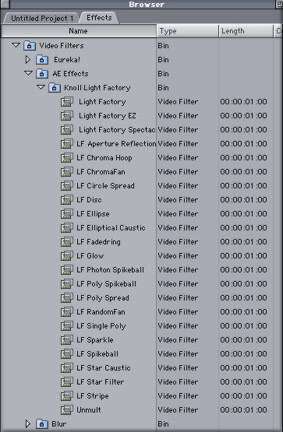
When you launch FCP, you will find
the plug-ins in the Effects Tab of the Browser, under AE Effects.
In After Effects, they are located
under the Effects Menu.
They consist of three main plug-ins,
Light Factory, Light Factory EZ, and Light Factory Spectacular.
In addition, you'll find a series of plug-ins for all the individual
elements (Lens Primitives) to make up a flare. Also included
in the package is the Unmult filter, which I'll talk about later.
For this article, I'll discuss
the Light Factory plug-in in detail, as it is the main plug-in
of the package.
The documentation consists of a
book manual, and a PDF manual. The paper book manual covers four
products by Puffins Designs (now under the Pinnacle umbrella):
Knoll Light Factory, Composite Wizard, Image Lounge, and Primatte
Keyer. On Composite Wizard, Image Lounge and Primatte Keyer,
the documentation appears fairly extensive. Unfortunately, for
Light Factory, it is way too brief. The PDF contains the same
information as the book, and didn't offer additional help.
As there were tutorials included
with the CD, I thought these would be of help. To my surprise,
they were all Adobe After Effects projects and of no use to someone
only using FCP. Luckily, I had access to After Effects, so I
learned the Knoll plug-ins there before going back to FCP to
apply what I had learned. This helped a lot, and I don't think
I would have faired as well in FCP without understanding how
they work with multiple video layers in After Effects first.
In FCP, to apply a lens flare,
drag the Light Factory filter on to the clip in the timeline
you wish to effect. In After Effects, select the clip in the
time layout window, and then select the Knoll Light Factory filter
from the Effects Menu. In FCP or AE, this applies the filter
at default settings.
In FCP, to customize, open your
clip in the Viewer and go to the Filters Tab. In After Effects,
double click on the Light Factory filter in the time layout window.
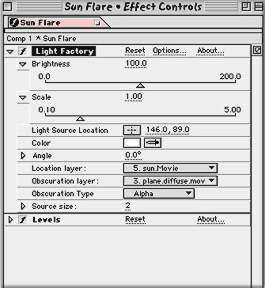
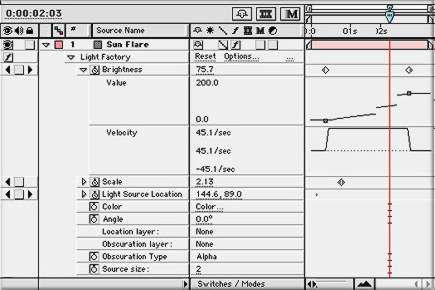
The filter interface
in After Effects |
|
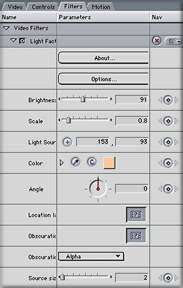
The filter interface
in Final Cut Pro |
The interface consists of the following:
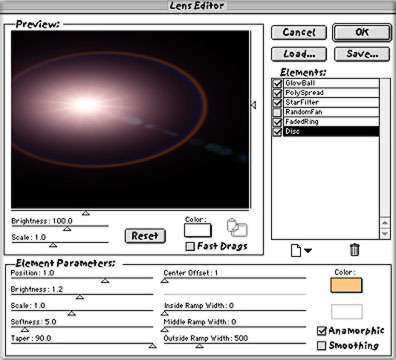
The Lens Editor
It appears similarly in After Effects and Final Cut Pro |
The Lens Editor: Click on options button to open. Here
you'll pick all of the elements of the flare. From how much it
glows around the center, the kind of glow, to spikes growing
out from the center, to streaks flaring out, to faded shapes
(that would be caused by a real lens flare), to many others (you
can even create the look of a laser). Each element can be added,
or, if not liked, deleted. Each element has a full range of settings
that can be individually manipulated for each element. These
include color, angle, intensity and position (the settings vary
depending on the element type). In the Lens Editor there is also
a preview area so you can see the combination of effects you
are creating.
Brightness: controls overall intensity of the flare.
This is different from the individual brightness that you can
apply to the elements individually in the Lens Editor.
Scale:
controls overall size of the flare
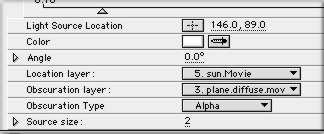
Light Source Location: Determines where in the frame the flare
is located. Just like other elements of this filter, it is keyframeable.
Therefore, the flare can animate across the screen. This location
can be entered with coordinates, or by simply clicking on the
cross-hair and then selecting a place in the Canvas in FCP, or
in the Comp Window in After Effects. If a Location Layer is selected,
then settings here will be ignored.
Color:
Sets the overall color of the flare. In the Lens Editor, you
can select the colors for individual elements of the flare.
Angle:
Determines the angle for the flare.
Location Layer: If you have a multi-layered video composition,
you can select one of the video layers in this box. If there
is a location layer selected, then any position included in the
position boxes above will be ignored, and the filter will look
to the location layer for placement (position). This is very
helpful if you wish a flare to track across screen during a shot
(i.e. a shot with movement). The location layer must consist
of something to track for this to work. In the tutorials, John
Knoll uses a white dot on a black background that animates across
the screen. The flare will follow this path, no matter what layer
the flare is applied. It also seems to be helpful to place this
location layer on the bottom-most part of the composition. This
way, the location layer is obscured by the other video tracks,
but it stills controls the path of the flare.
Obscuration Layer: If you have a multi-layered composition,
and you want the flare to appear to go behind a foreground object,
or appear from behind an object, then you need to make use of
this featur . Select a video layer in this box. This clip will
now act as the layer that the effect hides behind, or appears
from behind. This is a powerful feature of this filter. As an
object starts to obscure the flare, the flare can be manipulated
to look like it doesn't simply disappear, but gets gradually
hidden. Light behaves differently than a solid object; the way
it can look as though it bends around the edges of the object
it is starting to be obscured by. The amount of this reaction
at the edges can be adjusted by the Source Size.
 Obscuration and Location Layer in AE select
your video layer in these boxes Obscuration and Location Layer in AE select
your video layer in these boxes |
|
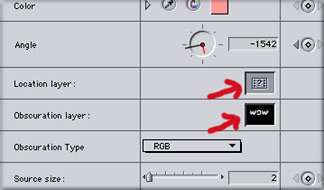 To select a Location or
Obscuration Layer for FCP, you will need to drop a video layer
from the timeline on to one of these "wells". These
wells are similar to wells used by other plug-ins or filters
for FCP that use multiple video layers for their effects. To select a Location or
Obscuration Layer for FCP, you will need to drop a video layer
from the timeline on to one of these "wells". These
wells are similar to wells used by other plug-ins or filters
for FCP that use multiple video layers for their effects. |
Obscuration Type: The choices here are Alpha, RGB, Alpha
+ RGB. For a flare that would disappear behind a solid object,
you would choose Alpha. For a flare that becomes partially obscured
behind an object, and even takes on the color of the foreground
object, then use RGB. John Knoll uses a sun shining through a
multi-colored stained glass window in one tutorial to show an
example of how this works. The sun created here is a flare created
by the filter. As the sun moves across the sky behind the stained
glass, it "filters" through this opaque surface, taking
on the color of the glass that is shining through! It creates
an incredible integrated effect.
Source Size: Determines the size for the Obscuration
Layer.
The Knoll Light Factory plug-ins
will work with a single video clip. But to get the richest effects,
a several layer video composition works wonders. This can create
effects that can blend with the elements of a shot. Here, it
seems best to work with (at the least): a Knoll flare layer,
a foreground layer, a background layer, and a location layer.
After a lot of testing in FCP,
I found that I could not get certain elements to work properly.
Although a Location Layer and an Obscuration Layer can be applied,
they don't seem to work. I contacted Pinnacle about this, and
they verified my results. They mentioned that these features
worked with previous versions of FCP, but apparently do not now.
They said that they would work on this. I hope that these things
do get worked out, as it would make it much more functional in
FCP.
As I couldn't apply a Location
Layer and Obscuration Layer in FCP, I tested these functions
in After Effects.
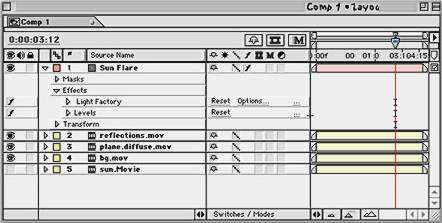
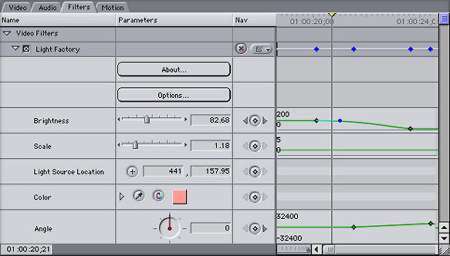
The time layout
window in After Effects with Knoll Light Factory applied to solid
on top layer. |
This demonstration comes from one of
the tutorials included on the CD.
Layer 1:
The manual notes that John Knoll often applies the flare to a
solid layer, instead of one of the video layers, giving more
flexibility for the effect. This can be easily done in After
Effects by creating a black solid. Lay this solid in the time
layout window on the top video layer of the comp. Apply the Light
Factory filter to this clip. Then apply the Unmult filer to this
clip. The Unmult filter comes with the Light Factory plug-ins.
This filter alone is worth the price of the package, although
it is available for free from the Pinnacle/Puffin website. When
applied, this filter will create alpha information from any black
pixels. Subsequently, anything that was previously black, is
now transparent. It will maintain shades of grey as semi-transparent.
As you can imagine, you can use this filter alone for all kinds
of applications, not just for working with these flares.
Layer 2:
In this example, there is an additional foreground element. This
layer is not essential to the comp.
Layer 3:
The foreground layer will work best if it is a separated element,
such as a person or object filmed(or taped) against a blue-screen.
The foreground element can also be a graphic with an alpha channel,
like text created in Photoshop. This foreground layer is then
used as the obscuration layer on the solid clip with the flare.
This clip would now be selected in the box for obscuration layer
on the solid clip with the Knoll flare.
Layer 4:
The background layer will be the background of the comp. Either
a separately filmed background, a matte painting or any other
type of graphic to be used as a background.
Layer 5:
The location layer can be created any number of ways. John Knoll
used a white dot on a black background that animated across the
screen. He created this in Electric Image, but this can be created
however you wish. This clip would now be selected in the box
for Location Layer on the solid clip with the Knoll flare.

Before sun(flare)
is obscured.
|
|
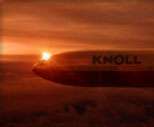
As the flare is
being obscured. |
|
Flare just obscured |
Every element on the filter tab for the
Knoll Light Factory plug-in is keyframeable(except Obscuration
Layer and Location Layer), allowing for the possibility of animating
any or all of the effects over time. Through the various settings,
and animating them by keyframes, you are not limited to lens
flares. You can create explosions, the flicker from a candle
(not the flame itself though), a star field, the sun, a sparkle
off an object, and many other effects, only limited by your imagination.
The Time Layout
Window in After Effects with keyframes for parameters of Knoll
Light Factory.
|
The Viewer Window
in FCP of a video clip with Knoll Light Factory applied. Keyframes
are present for parameters. |
In addition, you may add any or all of
the individual flare elements separately, as their own filter,
for animating them on their own for even more control.
Like icing on a cake, another really
great aspect of the Knoll Light Factory plug-ins is that the
individual elements have a checkbox for standard or anamorphic
type. This appears when editing parameters in the Lens Editor,
or when adding elements on their own (as their own filter). This
gives you the flexibility of matching footage shot in an anamorphic
format or in a spherical format.
The following are a few examples of different
applications for Knoll Light Factory:
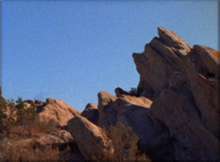
Without flare. |
|

With flare. |
Without flare. |
|
With flare. |
The following are some ideas for adding
a little spice to text:
My only problems related to how the filters
worked in FCP. The main problem that arose in FCP was that I
was not able to get the Location Layer and Obscuration Layer
to work correctly. This limits the abilities of Knoll Light Factory
in FCP.
And although these elements don't currently
work, a lot can still be done. The above pictures are just a
few examples of what I did with the plug-in package in FCP.
Important Note:
If you are using Final Cut Pro 1.2.5, then your sequence settings
should be set to render in RGB mode.
Another problem that I found in FCP was
that making settings changes didn't update the effect in the
timeline. You could change a setting in the Lens Editor, and
that change didn't appear in the timeline.
The only way that I found to get the
filter to update itself (after making changes) was to un-check
the box for the filter itself, and then re-check it. That seems
to force FCP to acknowledge the current settings of the filter.
It took a little while of playing around before I found this
solution.
This is a FCP specific problem with these
filters. I did have completely reliable results in After Effects.
My only other gripe is the lack of documentation
for FCP. It definitely hampered my learning curve in FCP.
Aside from these complaints, I found
the Knoll Light Factory plug-ins to be very powerful. The customization
and possibilities are almost endless, allowing for very interesting
effects that can be integrated into your video composition, and
not simply sitting over a video clip.
So I sit here thinking about all kinds
of past shots that I have worked on, wondering how I can use
the Knoll plug-ins to enhance them. A glint here, a sparkle there,
a glow, an enhanced sun... just so many possibilities. I get
the feeling I'm going to start digging up past projects and see
what I can do.
copyright© 2001 by Andrew
Balis
Andrew
Balis is a director of photography
on commercials, music videos and narratives. He has worked in
film for a dozen years, having advanced through the ranks up
to his current position.
After discovering Final Cut Pro a year
and a half ago, he found himself spending many hours here at
2-pop. Currently, when he is not shooting he teaches Final Cut
Pro classes and one on one training sessions. Andrew also does
consulting and freelance editing on Final Cut Pro systems for
production companies in the L.A. area.
This article
first appeared on www.kenstone.net as is reprinted here
with permission
All screen captures and
textual references are the property and trademark of their creators/owners/publishers.