|
   
| Review: - Red Giant's Magic Bullet Mojo |
April 2010
Red Giant's Magic Bullet Mojo
http://www.redgiantsoftware.com - $99.00
Review by Steve Douglas
In recent years, Red Giant has produced some wonderful color grading applications. I have long been a fan of Red Giant's Magic Bullet Looks and have used their Colorista plug-in whenever the project called for it. Not to replace either of these plug-ins, but to provide both an alternative and supplement, Red Giant's new offering, Magic Bullet Mojo, provides a quicker alternative to achieve the look you are seeking. Professional colorists, while often also working within deadlines, never the less usually have more time, skill and opportunity to spend on their productions. Too often the individual or freelance editor does not have the allowance of time or money to hire a professional colorist and is expected to be able to present to their client a finished product frequently inclusive of a particular 'look' that the client wants to see. Color correcting with Final Cut Pro's 3 way color correction and scopes is one thing, achieving certain cinema graphic looks is another. While Magic Bullet Looks provides an excellent starting off point for many of these looks, tweaking the appearance and just settling upon the great many choices within MBL can be as time consuming as when working in After Effects.
What many T.V. and movie viewers do not realize is just how much work and effort go into the color-grading end of postproduction. People who are not in this field, more than likely believe that what they are seeing is simply the way it was shot. Only when they get their first camcorders and NLEs themselves do they then realize that achieving many of the looks they see in the movies is actually done as a part of the color grading/correction process.
The Mojo interface presents 10 sliders that adjust your footage to quickly and easily manipulate the appearance and arrive at the 'look' your project needs. Actually, the limited number of 10 option sliders makes Mojo both easier to use and helps prevent you from 'overdoing things' as some can be prone to do.
Where Mojo particularly shines is in its ability to focus upon skin tones. It further helps the editors to rid themselves of that 'video look' by diffusing the backgrounds. Actors, of course, need to be in focus, but frequently when adjusting contrast and color, focus can also be drawn away. I found that Mojo does do its best work when there is a shallower depth of field, which is hard to achieve with many of the prosumer camcorders on the market today.
Mojo seems to work best when background details are in shadows, which allows you to bring out the skin tones of the subject. In an open area, where skin tones might be in the same color range as the foreground and background, the skin tones controls often affected the entire frame a bit more than I would have liked. Thus, if you will be using Mojo for color grading, I found it best for videographers to keep in mind that a tight focus on the subject's face with a more shadowed background will help you to make using Mojo more effective.
Mojo's default settings make a clear and instant difference by pushing the shadowed areas towards a bluish green while affecting the highlights towards a warmer yellow/orange keeping the basic skin tone of the subject, for the most part, unchanged. The first, and most important of the 10 sliders, is the Mojo slider which when slowly brought up further affects the shadowed areas towards a deeper bluish green. Bringing it down and towards the left, removes the affect. You do need to use the slider in small increments so as to avoid any unwanted artificial looking effects. When fine-tuning, it was easier to type in the setting percentage I wanted than to use the slider.
The following examples of the Mojo parameter uses and Favorites (presets) have deliberately exaggerated settings to demonstrate their uses and make them more visible to the reader.
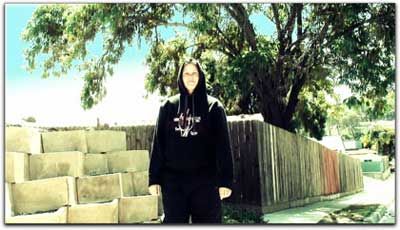
Original Frame on the left and with the Mojo filter on the right with only the default settings.
The next slider is the Mojo tints, which will, depending upon the direction you move the slider, will either bring up a deeper blue or green tint to the overall frame.
The original frame on the left and using both the Mojo and Tint slider on the right produced a cooler appearance while crushing the dark color of her clothes and the shadows behind her.
The Mojo balance slider affects the overall appearance in a similar way to the Mojo tint by either warming or cooling the image while maintaining the differentiation between the shadows and highlights. The Warm It slider seems to work along with the Mojo slider by creating a warmer, almost sepia, image while, as you bring up the Mojo slider, brings the shadows back down allowing your subject to pop out a bit more.
Same frame as the two above but with the warmer slider used to warm it up a bit.
This is particularly noticeable in the stone blocks and background fence.
I found the next slider, Punch It, to be very helpful in bringing in more contrast. You'd have to really bring it way up to crush the image too much, so, used judiciously, it can work wonders for your look.
The Bleach It slider, when brought into negative values, can make anyone appear as if they have a great tan.
Whenever you use any color correction or grading plug ins, the color of the skin will be affected. Most editors wanting to preserve skin tones will use the Vector scope in Final Cut to check as to whether the subjects skin tone is on the line showing that the skin tone is as it should be. To be used in conjunction with the skin tone line of the vector scope, Magic Bullet's Mojo provides a Skin Color slider, which, no matter what look you have created using Mojo, will bring the skin tone of the subject back to the correct place using the vector scope. I loved the way this worked so easily and simplified the entire process of keeping skin tones while manipulating the look of the image.
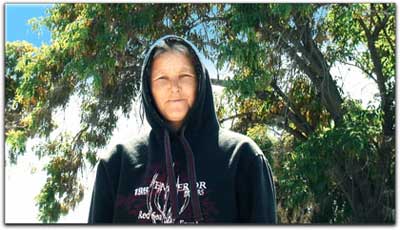
This image has a Skin Solo setting of 0%.
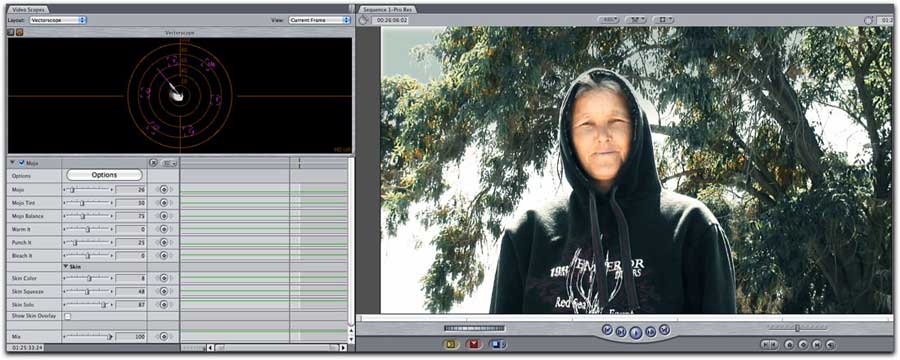
Using the vector scope in Final Cut Pro, I was able to maintain skin tone by bringing up the Skin Solo slider to 87%,
and adjust the Skin Tone slider to desaturate the background.
To further your ability to achieve the skin tone of your choosing, Mojo provides a skin overlay checkbox. Not really all that necessary if Mojo is being used in Final Cut Pro but very helpful if used in Motion or After Effects which do not have vector scopes, the skin overlay checkbox places an orange grid over the faces and skin which by which you can then adjust the Skin Squeeze slider to create a uniformity of the skin tones or not. The 10th slider, Skin Solo, will desaturate the entire image except for the skin itself.
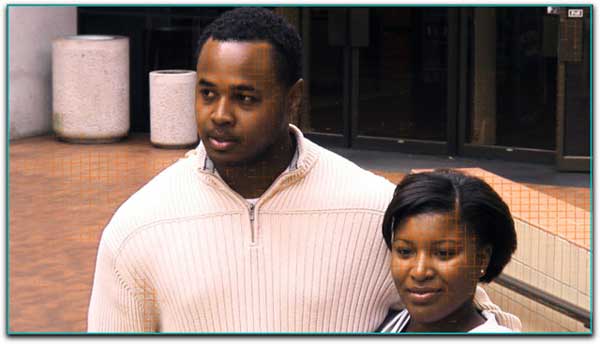
I do wish there were the option to change the color of the skin overlays grid. I found that it was frequently difficult to see on both the Final Cut canvas as well as my external monitor. In addition, I discovered that the skin overlay, when used with Afro-Americans did not recognize the darker complexion but rather the tan color of the wall behind and to the right them.
In both shots, the skin overlay fails to recognize the darker complexioned individuals and overlays the tan wall beside them.
In this clip, when using the Mojito preset, the skin overlays do appear on the subjects skin, but also on the wall to the right and floor tile.
You can do more with Mojo than just make the skin pop. By just experimenting you can create and save any number of looks to use now or for future projects.
On the left is the original frame but look how the colors just pop out at you from this Kenyan woman's shawl with Mojo applied.
Mojo also comes supplied with 9 separate 'Favorites' created by Stu Maschwitz, which download along with the Mojo plug-in. These 'favorites' download as a folder which you then drag into your project's Favorites Folder in the Browser. These present several individual looks or starting points which you can then tweak from there or keep as is. The Mojito preset (favorite) is very similar to the Mojo default but is a bit subtler in its effect upon the image. The Mojo Resident preset provides a good starting point to get that old image/sepia toned frame.
Original frame on the left and using the Mojo Resident preset on the right.
While Magic Bullet's Mojo was created primarily to focus on maintaining a skin tone appearance while manipulating both fore and background appearances, I found it useful to use on clips having no 'human' subject as well.
On the left the original frame. On the right using the Mojo Rising preset as the default settings
Using the Mojo Rising Preset and the Punch It slider brought up. On the right the same frame utilizing the Mojo Bruce preset.
The original frame is on the left but using the Mojo War preset, on the right, creates a whole new feel to the image.
On the left we have the original frame while on the right, using the Optimus favorite,
our model now provides a considerably greater presence with a skin tone that jumps out at you.
One can spend an awful amount of time just experimenting with the many creative looks one can produce with Magic Bullet's Mojo, yet its strength, once you grow accustomed to how the 10 parameters work together, is that you can adjust the appearance of your footage quickly, save your settings for future projects and easily achieve the look you were seeking out.
Magic Bullet Mojo, designed by Stu Maschwitz, is completely compatible with Final Cut Pro, Adobe After Effects, Motion, Premier Pro and Avid systems. Magic Bullet Mojo was simple to install and found its Final Cut Pro, Motion and Adobe After Effects destinations without problems. Red Giant and Stu Maschwitz have produced an excellent starter tutorial for Mojo which can be found both on the Red Giant website as well as on Vimeo. My bottom line is that Magic Bullet Mojo is an excellent and trouble free plug in enabling you to move away from the harsh appearance that video often presents and create many of the 'looks' you might want to replicate from films you have seen. Keep in mind my recommendation that Mojo does appear to be most productive when the footage is shot with the background shadows in mind. Whether you already have Magic Bullet Looks or Colorista, Magic Bullet Mojo stands on its own as a very useful color grading tool.
Epilogue
As always, when installing any Red Giant software, you are brought to an Internet site where you can then register your software. To Red Giant's credit, they frequently produce video tutorials and updates for any of their software. Unfortunately, they do not appear to use any of your registration information to notify you of these updates. When updating an application it is easy to know which version of the application you have by using the application's 'check for updates' button or to check an updates page. However, with plug-ins like the excellent ones the Red Giant team produces, it is far too easy to forget just which versions of a plug in you have. I have a major issue with any company that requires you to register your software yet does not utilize that information to inform you of any update that might come around the corner. Most plug-in companies I have worked with send out regular notifications of plug-in updates and I see no reason why Red Giant would be reluctant to use the registration information to do the same.
 Steve Douglas is a certified Apple Pro for Final Cut Pro 7 and underwater videographer. A winner of the 1999 Pacific Coast Underwater Film Competition, 2003 IVIE competition, 2004 Los Angeles Underwater Photographic competition, and the prestigious 2005 International Beneath the Sea Film Competition, where he also won the Stan Waterman Award for Excellence in Underwater Videography and 'Diver of the Year', Steve was a safety diver on the feature film "The Deep Blue Sea", contributed footage to the Seaworld Park's Atlantis production, and productions for National Geographic and the History channels. Steve was a feature writer for Asian Diver Magazine and is one of the founding organizers of the San Diego UnderSea Film Exhibition. He is available for both private and group seminars for Final Cut Pro and leads underwater filming expeditions and African safaris with upcoming excursions to the Cocos Islands, Costa Rica, Lembeh Straits, Indonesia, and Wakatobi. Feel free to contact him if you are interested in joining Steve on any of these exciting trips. www.worldfilmsandtravel.com Steve Douglas is a certified Apple Pro for Final Cut Pro 7 and underwater videographer. A winner of the 1999 Pacific Coast Underwater Film Competition, 2003 IVIE competition, 2004 Los Angeles Underwater Photographic competition, and the prestigious 2005 International Beneath the Sea Film Competition, where he also won the Stan Waterman Award for Excellence in Underwater Videography and 'Diver of the Year', Steve was a safety diver on the feature film "The Deep Blue Sea", contributed footage to the Seaworld Park's Atlantis production, and productions for National Geographic and the History channels. Steve was a feature writer for Asian Diver Magazine and is one of the founding organizers of the San Diego UnderSea Film Exhibition. He is available for both private and group seminars for Final Cut Pro and leads underwater filming expeditions and African safaris with upcoming excursions to the Cocos Islands, Costa Rica, Lembeh Straits, Indonesia, and Wakatobi. Feel free to contact him if you are interested in joining Steve on any of these exciting trips. www.worldfilmsandtravel.com
copyright © Steve Douglas 2010
This article first appeared on www.kenstone.net and is reprinted here with permission.
All screen captures and textual references are the property and trademark of their creators/owners/publishers.
|