|
|
   
SEptember, 2011
DP4 Monitor Only
DP4 + EVF Attachment
SmallHD
http://www.smallHD.com/
$549.00/$749.00
by David A. Saraceno
Those that say that good things come in small packages must have had SmallHD’s DP4 in mind. This diminutive on-camera monitor packs a bunch of features in a reasonably priced, well-built, and versatile package. Its scaling function, low weight, small size, and HDMI connectivity make it attractive for DSLR users, and the additional YPbPr port provides monitoring capabilities for a host of other camcorders. As with all products, there are some compromises, but none that diminish its overall value.
What’s In The Box. Included items depend on what package is purchased. The DP4 monitor alone package includes the 4.3-inch monitor, sun hood, mini HDMI to HDMI cable, ball mount, power supply, acrylic screen protector, cleaning cloth, battery adapter, dual removable battery plate (Canon LPE6), illustrated manual, tight angle HDMI adapter, and proprietary YPbPr male (3) component cable to 1/8-inch plug. More on the last item later.
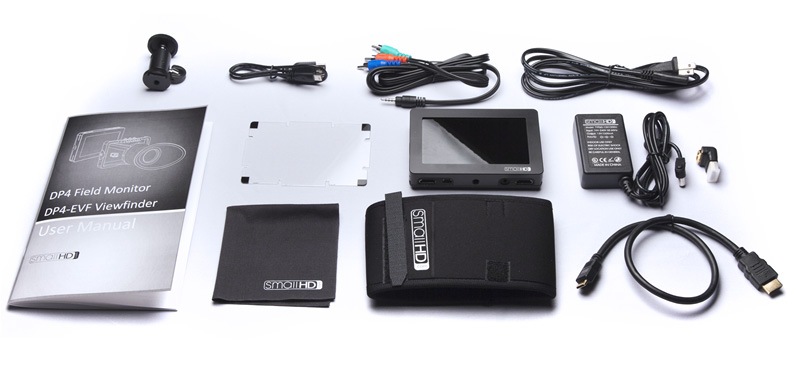
The optical loupe accessory package provides the EVF and cleaning cloth for an additional $200.00.
The Hardware. The DP4 yields a 3.69-inch x 2.21-inch viewing area positioned on a 4.3-inch 800x480, 8-bit screen. The monitor is constructed of milled anodized aluminum, weighs about .4 pounds, and is approximately 5x3.25x.75-inches. It looks, feels and is solidly constructed with recessed ports, and little use of plastic. On/off button, rotary click wheel menu switch, and two mechanical function buttons are located on its top. Three 1/4-20 thread mounts are provided.
A headphone monitor jack doubles as composite out and is located top side. HDMI in/out (pass through), and YPbPr/Component ports are located on the unit’s bottom. A PIP (picture in picture) mode can display footage from the composite and HDMI inputs simultaneously. A mini USB port purposed for incremental firmware updates from SmallHD is included. The DC power port is located on the back of the monitor. The DP4 utilizes a dual position power button that toggles the monitor on and off depending on whether battery or DC power is used.
The dual battery plate currently accepts Canon’s popular LPE6 batteries, although the company indicates forthcoming support for Nikon DSLR batteries. The plate attaches securely to the monitor’s back. Slide a LPE6 battery into an available slot, and push downward to achieve a solid, secure fit. The battery plate supplies three hours of continuous power per battery for six hours total. A six AA battery plate that provides two hours of power is being developed, although pricing is not yet available.
SmallHD recommends using Canon’s original batteries with the DP4. However, my tests with a top quality, generic 3rd party smart battery produced the same run time, and performance as the more expensive Canon brand.
The Component Cabling Solution. I tested the monitor’s HDMI capabilities cable with a Panasonic SD600 palmcorder, and a friend’s Canon 7D. The monitor produced clear, bright images from both cams and responded quickly to focus adjustments. The monitor’s scaling function, which scales DSLR output to full screen when recording, was helpful, but not significantly so, with the 7D. Still this is a nice feature for this moderately priced monitor for DSLR users.
SmallHD provides component out capability using a proprietary YPbPr male (3) cable to 1/8-inch plug. This presented a connection issue with our Panasonic AG-HPX170. The 170’s cable ends with three male RCA plugs, the same as the DP4’s cable. If your camera has a similar connection for YPbPr component out, there is a simple, albeit inelegant solution.
Several companies sell three (3) RCA/Component Female to Female Couplers like the one pictured below.
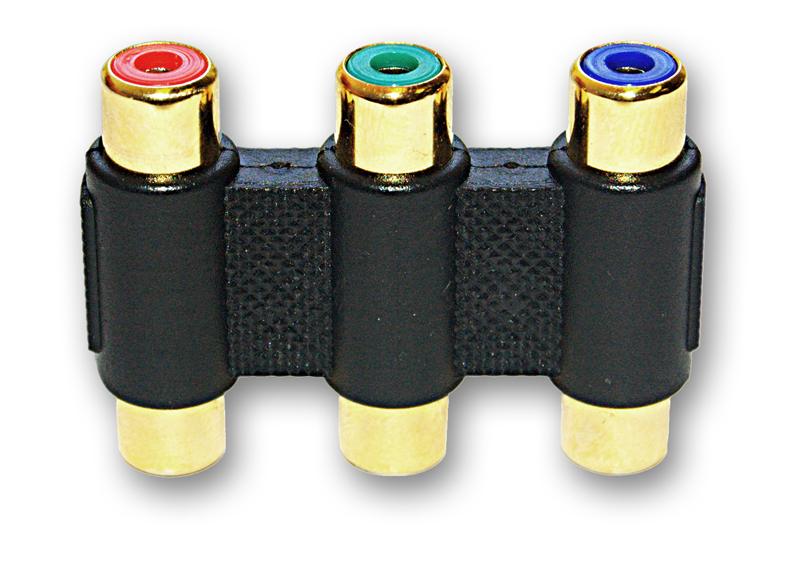
The companies style the coupler as either RCA or component. Connect the DP4 male YPbPr cable to one end of the coupler, and the Panasonic HPX170 cable to the other. Plug the DP4 1/8 plug, and you’re set.
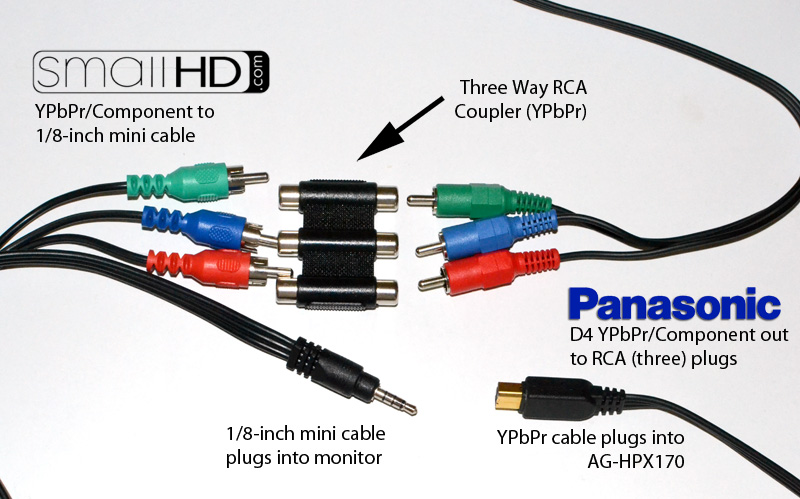
The downside is the total length of the combined cables, which can exceed seven feet. With this in mind, I tried to splice, then solder, the two cables together after shortening each to manageable lengths. Unfortunately, the splice didn’t work.
The Menu System. The DP4 utilizes a simple, easily navigable menu system controlled by the unit’s recessed scroll wheel. Click and then roll the wheel to move between menus; click to access the sub menus, and navigate to the settings. Select the submenu choice with a click, and adjust the selected parameters by scrolling the wheel. It actually takes longer to describe the process than to perform it.
The “A” back/exit button is used to exit the sub and main menus. Press it to reverse it if in a menu, or to activate or deactivate a preset. Unfortunately, the exit button didn’t work reliably on my initial demo unit, and the company promptly replaced it. The “B” button performs similarly.
Each button can be assigned a custom function. The function acts operates like “user” assigned buttons found in some camcorders. For example, to assign access to the focus assist function to button “B,” hold the button for three seconds while in a menu and release, scroll to the desired function, click the scroll wheel to assign it to button, and then exit the menu. That function is toggled on and off using the assigned button.
Seven (7) independent menus are provided: Image> Advanced> Input> Guides> System> Miscellaneous> PIP. “Image” is self explanatory. It controls contrast, brightness, hue, saturation, sharpness, RGB control, and gamma. “Advanced” offers several focus assist controls that include focus assist, peaking, 1:1 mapping, scale, and image flip. “Input” sets HDMI, Component, and Composite inputs. There are controls for volume, displaying the voltage meter, backlight, menu flip, display, USB power, and a factory reset under the “System “menu. The menus are self explanatory, and the manual details how each function is used and modified.
The menu system is easily accessed, and the controls are responsive. That’s the upside. On the other hand, I didn’t see significant changes when adjusting the DP4’s screen image, especially in the strong light. This is not surprising given the resolution and size of the monitor. Nor did it diminish the overall usefulness of the monitor for focusing, framing, and other functions noted here.
Again, most useful in the image section are the focusing controls. Both the Focus Assist, and Peaking functions were real time savers in my testing. When combined with our Panasonic AG-HPX170’s focus assist, correct focus was much improved over the cam’s LCD and EVF alone.
Preset Set Menus. When not in any menu, rolling the scroll wheel brings up the preset menu. It contains nine (9) unassigned presets, one preset each for Nikon and Canon DSLR cameras, and one for playback. The two DSLR presets are factory defined to scale output to full screen when recording.
The presets are a nice feature. Select an unassigned preset, and then adjust any of the parameters in the remaining menus. That preset holds the adjustments. Do the same for any or all of the remaining unassigned presets. The company indicated that many users set “preset 1” as their standard preset, and then assign different functions to each succeeding presets, such as focus assist for preset 2, and 1:1 mapping for preset 3. The presets automatically hold the settings until changed. Note that you cannot rename any of the presets.
EVF Adapter. The DP4 viewfinder loupe accessory attaches to the monitor, by hinging to its top size, and is secured by magnets. Remove it by releasing one side tab, and pulling the unit out. When attached, the two units felt solid. This hinge/magnet combination enables a quick move from monitor only to EVF.
The unit’s lens assembly is manufactured from aluminum. Like the monitor, it feels solid. The eyepiece is large, and is rotated for adjustments. No built-in diopter is included, an omission the company intends to address by offering one as an accessory. Standard 46mm threads for filters are supplied.
My Real World Testing. We tested the DP4 on a bright, cloudless day at a heavily treed university campus. The DP4 and EVF performed admirably when moving among shade, filtered sunlight, and full sunlight. The loupe quickly attached when needed and blocked out the bright sunlight. We were also impressed when using the monitor in the evening at a spotlight lit auditorium presentation. We’ve owned both more and less expensive on camera monitors, and each invariably present compromises. The pricier ones were larger, bulkier, and required, for the most part, heavier batteries, plates, and expensive chargers. The less expensive ones were characterized by plastic construction, short battery life, flimsy attachments, and poor focus. The DP4‘s size, feature set, battery configuration, low weight, HDMI and YPbPr outputs, battery life, and other functions represent a distinct quality value given our experience with other solutions. However, each user’s needs vary.
Focusing issues are inherent with high definition cameras, and was a chronic concern with HPX 170. When the 170’s focus assist function was used with the DP4’s focus assist and peaking features, we achieved the best focus experience quickly and easily. Another major concern was monitor brightness, especially in well lit rooms, or full sunlight. On this count, the DP4 was a pleasant surprise. The default brightness for the DP4 is a setting of five (5). SmallHD cautions not to use the DP4 in EVF mode with the brightness at 10. It is too bright and can cause discomfort.
Thoughts. There is much to like in this monitor and EVF combination, and some factors to be aware of when making a purchasing decision. The first obviously is size. The DP4 is among the smallest of all on camera monitors being sold, and with its 800x480 screen, is not as sharp as larger, more expensive monitors. That didn’t presented issues during our use, but our needs may differ from yours. We felt it produced a surprisingly good, bright image for focus and framing. For brightly lit environments, particularly in direct sun, the EVF was an added bonus.
A second major selling point is how well the monitor is built. It can take some pretty significant abuse. The company’s web site hosts a video graphically demonstrating exactly how much. And the company is responsive to suggestions, and has continuing firmware update program for all its monitors.
As noted above, the menuing system is well designed and accessed, comprehensive and imminently useful. A firmware upgrade to allow naming of the presets would be welcomed, however. Having HDMI in/out and component capabilities are pluses, albeit with the inconvenience of gerry-rigging a component cable for some cams. In addition, the company is exploring a SDI retrograde. Battery life is exceptional, especially with widely available Canon 5D batteries, and the backplate mount worked very well.
Of course the DP4 will not meet every user’s needs. If a higher pixel count and a larger screen are necessary components of your workflow, then a larger monitor such as the DP6, is a better candidate. Each user must coalesce performance and features with price and size. But if you want an exceptionally performing monitor/loupe with a surprising amount of advanced usefulness and versatility, then the DP4 is your ticket.
Copyright ©2011 David A. Saraceno
David A. Saraceno is a motion graphics artist located in Spokane, Washington. He runs a video blog and review site called secondchairvideo that provides information on most things Final Cut Pro and video related. He has written for DV Magazine, AV Video, MacHome Journal, and several state and national legal technology magazines. David moderates several forums on 2-pop.com, is active on the Apple Support Discussions forum for their Pro Applications, and and is a moderator at dvxuser.com.
|