|
   
| A quickstart guide to getting started with FCP 2.0 part 2 |
April, 2001
Final Cut Pro v. 2.0, an ambitious beginning...
by Charles Roberts AKA Chawla
Copyright Charles Roberts, 2001.
continued from page 1
Version 2.0 of Final Cut Pro contains much stronger Media Management tools than previous versions, but the need to understand and control your media files is just as necessary as ever. Now FCP will let you eliminate media from your drives to make room should you need it. Your capabilities in MID-project are fantastic, but the ability to juggle multiple projects on the same drive and clean up the system after you are finished depends on how carefully you construct your projects at the beginning.
Take responsibility for your own Media Management. Never ask a desktop computer to do a job you can do better.
Make certain to disable capturing Audio and Video to Separate Files. Once again, if you are not using Firewire to capture, this may not be correct for you. A/V should be separated when using much higher data rates, for example Targa, Igniter and other Analog capture cards. If you are using such hardware, the info on these preferences probably not only doesn't apply to you but could screw you up. This info is for DV Firewire capture ONLY. For particulars as to why, ask me or wait for the stimulating lecture.
Another important setting for this preference menu is the "Minimum Allowable Free Space". This is the 10% buffer to which we referred earlier in the article. "Minimum" should be set to avoid getting poor drive performance and possibly dropped frames as a result of drive fragmentation. Drive performance degrades dramatically past a certain point of drive capacity. In the old days, 85% capacity of a drive was generally considered the limit. This meant that on a ten gig drive, you could expect massive drive slow down after writing 8.5 gigs to it. Some really neurotic people (like me!!!) used 75%.
This is not a written-in-stone policy and there are a jillion variables that affect whether or not a drive becomes massively fragmented after a certain capacity. I generally set mine at 1 gig (or 1000mb). A 1 gig buffer leaves plenty of space to avoid fragmentation and is realistically only burning about 5 minutes of capture time. Not too bad. I would recommend that you choose a number that is either 10% of the total drive size or 1 gig, whichever is less. That should keep it happy.
"Maximum Size for Capture/Export" should be left unchecked unless you are attempting something in particular that requires specific limitations on file sizes and/or you know what you are doing. This will not affect your system's performance under generic capture and playback situations. If you are going to use Capture Now (and not the preferable method of logging your clips), you can also enter a maximum limit to the length of the capture. Hit OK in the bottom right hand corner.
If that weren't enough:
Next you need to set the Audio/Video Settings. You can actually do what is called an Easy Setup to speed up your process in future projects. But you need to do an initial check to make sure your system is set up correctly. Then you can assign this as your Easy Setup, using it every time you work and easily adapting your system when your hardware or media situation changes. To get to the Audio/Video Settings, go to Edit>Audio/Video Settings(N).
This will bring up the A/V Settings
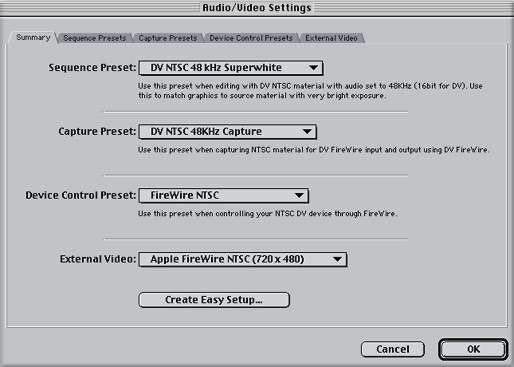
The first tab displays the settings currently active in the other four tabs and lets you set up Easy Setup settings. We'll come back to this tab after configuring the other four tabs. Click on the Sequence Presets Tab
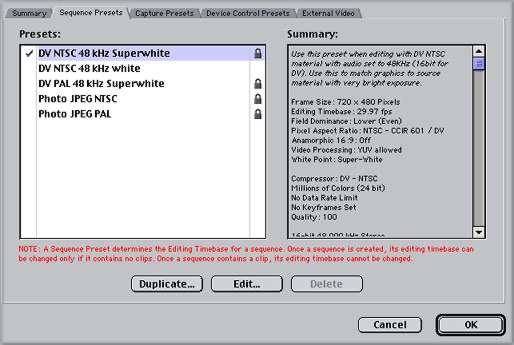
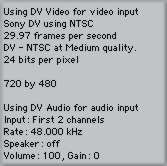
You will want to set up this preset depending on what your own needs are. FCP requires that your settings for Sequences and Capture match, and that both match the actual DV media you capture from tape. For Firewire, the DV NTSC 48K Superwhite preset should be fine here. But most DV cameras allow you to record Audio in your camera at either 32K or 48K. It is IMPERATIVE that you know which you have used, and that you set it correctly here.
A note on audio sample rates
As much as we'd like it to be intuitive and human, FCP really is kind of a stupid machine. It can only do exactly what we tell it. It does not evaluate the data we give it, it simply re-produces that data according to how we have told it the data should be evaluated. If you tell FCP that the audio on your DV tape was recorded at 48k, when it was really recorded at 32k, it will process the audio at the wrong rate. Incorrect audio settings are the main source of out-of-sync audio and video on the timeline.
If your audio goes slowly out of sync as the playhead moves down the timeline, your settings were probably wrong at some point. It is important that you inform FCP what rate the audio was recorded at and that you keep the rates consistent across the application. This means that 48k audio should be set at 48k in the capture settings and sequence settings. Not all cameras record at 48k; the Sony VX1000 only records at 32k, for instance. If using this camera, you must set up your project accordingly.
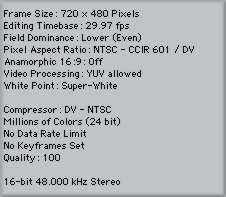
If you need a different preset from those provided, simply Duplicate the DV NTSC 48K Superwhite preset, select the copy, hit edit and change whatever you need to. Be sure to name it something other than Copy, since it no longer IS a copy. Consult the FCP User Manual for more details on what the rest of the settings imply. If you are using 48K audio, the Summary on the right hand side of the Tab should read like this.
Click the next tab to set the Capture Settings.
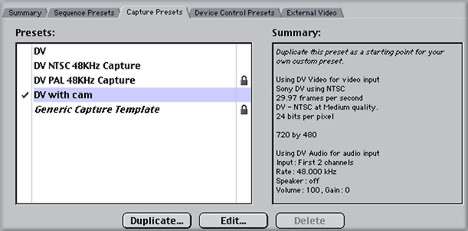
As stated above, this Tab needs to accurately reflect the media you will capture through Firewire. The DV preset should be mostly correct, but you may want to Duplicate it and then hit Edit on the copy correctly configure it for your system. Remember that you will need to correctly set the Audio Sample Rate here as well. If you are using 48K, then your settings should look like this in the Summary window.
With respect to Sequence and Capture settings, be advised that you will be miserable if you do not nail this down. If you capture media and then see the red render line when you place it in the timeline, chances are you didn't get these settings correct.
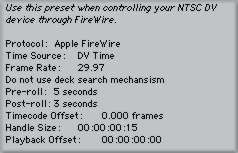
The next Tab you need to address is the Device Control Tab.
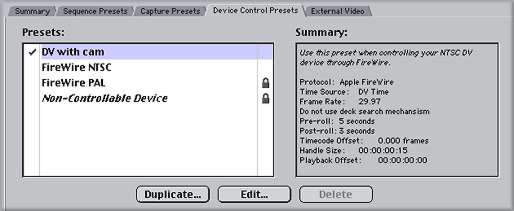
Device Control allows you to control, or not control, a Device like a camera or deck. Since you will be using Firewire, whether you are using a deck/camera or a DV converter, you need to check this tab. If you are using a DV converter, you need to select the Non-Controllable Device. If you do not, FCP will try and receive Timecode Data from the Firewire stream that is not there, resulting in failed captures. If you are using a deck or camera, you need to decide between Apple Firewire or Firewire Basic for Protocol (consult Apple's website to see which is appropriate). It is suggested that you set the deck Pre-Roll to 5 seconds and the handles to 15 frames. Consult the Manual for the reasoning behind these settings. The summary should look like this with variations based on your deck or camera situation.
Finally, you need to check the last tab for External Video.
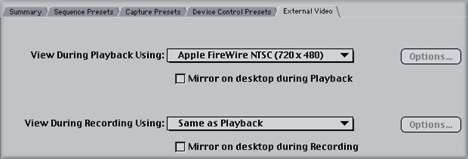
This tab lets you decide how you will monitor the video as you edit. You can decide to watch playback through the Firewire to a video monitor or set it to None for just viewing on-screen. You also tell FCP whether or not to view on your computer monitor while playing back, called mirroring, or recording to tape. Until you have gotten acceptable performance with your system, leave 'mirroring' off. Older systems or systems which are not optimally configured may drop frames if forced to display the video in both places.
Once you have completed the four tabs, return to the first tab, Summary, and hit the Easy Setup. Now you will take your optimized settings and save them under a preset name.
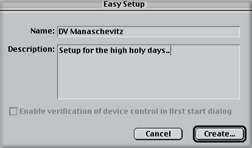
Give the Easy Setup a name, and give it a description. Click Create and save the preset in the Custom Settings folder.
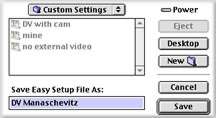
Now when the time comes to work, you can simply choose the preset instead of going through all the tabs individually.
Save Early, Save Often
Finally, its time to name your project and save it appropriately. Remember that we have turned off AutoSave, so any crashes will lose anything you haven't saved. Also remember that the Preferences are not saved with the project file, so you will have to recheck them when you start back up. Go to the File menu and select New Project (unless of course you already have a project you are working on, in which case you would merely open that project). On doing so, any number of the windows shown below will appear on screen.
This project you have opened will have the name Untitled 1 assigned to it by FCP. That name is unacceptable. Do not let me catch you with Untitled anything. Name your files according to what they are. To name your project, select Save Project As from the File menu.

A dialog box will immediately pop up asking you to name the damned thing. FOLLOW THE FOLLOWING METHOD EXACTLY !!! If you do not save your files in the appropriate locations, you will lose everything, hours and hours of work. Save your project files on the desktop and AT LEAST one MAC FORMATTED zip disk. This is REALLY important, Follow the order of these steps exactly...
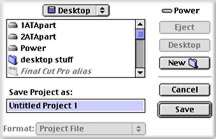
When the Save as Dialog Box appears, do not name your project first. First, hit the Desktop button so that you will be saving it to your Start Up Drive, then select New Folder. It is very important that you not save your project to the same drive that your media is saved to and instead save it to the same drive that your System folder and Applications live on. You will be asked to name the new folder. Name it with your project's name and the word "folder". Remember, unrecognizable stuff is WAY more likely to disappear.
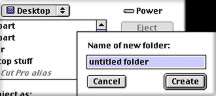
Hit Create and you will return to the Save Project dialog box. Change Untitled to something relevant and then hit OK.
Your project file will now be saved in YOUR folder on the desktop.
Backing up your project periodically is an incredibly important step that you should be doing. You are investing incredible amounts of time and effort and it all boils down to one fragile project file. If that project file goes belly up, your work could be gone for good. That will not be as catastrophic if you are regularly backing up and archiving your project files to another location. I suggest two locations. Have a copy of the project file stored in a separate folder on your hard drive and also copy it out to your zip disk.
To copy them to your zip disks periodically, simply pop in your zip and drag the project folder onto it. Then re-name the copied folder on the zip with the date and time. This process is called sequential back up, because each time you back up your project files to the zip disk (or other folder on your drive), you are creating a version of the project up to the time you copied it. If you ever decide you went a wrong direction with your editing several days back, you can easily return to your previous version. As you copy these project folders from your desktop to the zip disk, you will rename the folder with the date or a number identifying that the project in that folder was current on that date. Sequential Backup is standard in an industry that can not be subject to the whims of a single corruptible project file.
(note-Remember never to run a FCP project from a zip disk. ALWAYS REMOVE YOUR ZIP FROM THE MAC BEFORE WORKING IN FCP.)
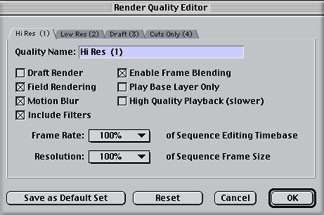
Ok, now the last setting and you're home free. Go to the Edit drop down menu and select Project Properties. The following box will open.
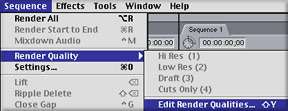
Without altering anything, hit Edit Render Qualities. The next box that opens should look like this. Adjust the settings exactly as shown. The time will come when you can adjust these to benefit and streamline your process, but for now they will keep you from dropping frames.
Hit OK for this window, OK to close the Project Properties window and you have finished your settings. Now you can work reasonably assured that you are not going to drop frames.
A Few Last Words
Remember, this is only a QuickStart guide for preparing a generic project from and to Firewire. Your own editing needs as well as your materials and configured system will determine how you should vary from this tried and true path. If, for instance, you attempt to do the Apple Manual Tutorial with these settings, you will quickly discover that they are not right. Settings depend on what you are using and what you intend to accomplish. This is why much literature on FCP seems vague about settings. The possibilities are just too numerous. However if you are using Firewire in/out with "nothing weird" as they say, this should be just fine.
More Tips:
#1 Read the User Manual for Final Cut Pro. The version 2.0 User Manual is a fantastic resource. If you have trouble understanding it, that means you need to do a little more research, not that the information isn't important.
#2 Shoot and edit little things first, don't start out with Moby Dick. By the time you do a couple of small things, you'll realize that you know what you're doing and can tackle the big ones. Trying to do a monster project before you're ready is just going to give you big headaches. Patience, grasshopper.
#3 Read the books. Learn how to use time code. It is the bestest tool you have. Without it, you are at the mercy of a merciless machine that likes to eat media.
#4 Boost the RAM allocation as high as possible for FCP without choking your System. Unlike previous versions of FCP, 2.0 apparently does take advantage of more RAM. RAM is very cheap these days; consider purchasing more. FCP running the minimum RAM allocation will crash if you try anything interesting. To figure out the correct RAM allocation, subtract around 75 mbs from your actual physical RAM (look in About This Computer for this number). Then select (but not double click) the FCP icon and hit command-I (Get Info in the File drop down menu in the Finder). In the window that opens up, click the drop down and select memory and you will see the place to enter the same value for both preferred and minimum values. Remember that this means you can not run anything else while FCP is running if you do this. If you get a lot of Type 2 errors, pull the RAM allocation back and see if that corrects the problem.
#5 Go to 2-pop's site on a regular basis anyway. It's by far the best, most up-to-the-minute resource on FCP. Where do you think all this info came from, aside from my own blood, sweat and tears?
#6 Do routine weekly maintenance. Rebuild your desktop regularly (start up the Mac and hold down the command and option keys until it asks if you want to rebuild, then select OK). If you don't do this, your machine may start crashing or losing files. If you are new to the Macintosh system, go ahead and drop the dough on a book about the Mac OS. It is not a PC and you should find out how it likes its tummy scratched.
Copyright © Charles Roberts, 2001.
back to page one
Thanks Without Whom etc. (and hearty tribute) to Apple, Ralph F., Philip H., Ken S. and the rest of the faceless but amazingly helpful and resourceful regulars on the 2-pop forum. All screen captures and textual references are the property and trademark of their creators/owners/publishers.
Charles Roberts AKA Chawla teaches Digital Video and Audio Production at Fitchburg State College in Fitchburg, MA. He uses his long tedious rendering times to generate content and tackle hard hitting issues on the discussion boards of 2-pop FCP Home Page
This article first appeared on 2-pop.com and the images were prepared by Ken Stone. It is re-printed here with permission.
|