|
October, 2001
How to Create
a 3D logo "Bug."
by Philip
Hodgetts
The following "technique"
can be found in the DV
Companion from
Intelligent
Assistance.
Commonly seen as 'station branding' on television,
transparent logos are treated so they appear to be raised on
the surface of the image. The effect is a combination of 'edge
lighting' and displacement. -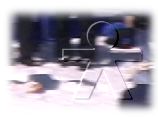
The graphic is most easily prepared in
Adobe Photoshop or other image editing application. PSD files
are best for importing to Final Cut Pro.
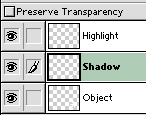
Inside Final Cut Pro we separate out
the 3 layers to individual Clips and add the Highlight and Shadow
over the image(s) in the Sequence. The Highlight uses Add Composite
mode; the Shadow Subtract Composite mode. The Object is used
as a Displacement Map to move pixels in the image.
Preparing the Logo
in Photoshop
- Open the Logo in Photoshop and scale
it to the size and position required.
 IMPORTANT: If working in DV remember to prepare the logo
in square pixels ahead of scaling to non-square pixels. IMPORTANT: If working in DV remember to prepare the logo
in square pixels ahead of scaling to non-square pixels.
Tip:
Use the Canvas size to change the pixel size of the overall image
to the square pixel equivalent if the Logo is not already at
right size. This avoids changing the shape of the Logo.
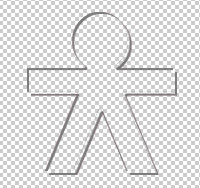
- Duplicate the Logo twice, so there are
3 copies in the file.
- Name the Layers "Object";
"Highlight" and "Shadow"
- Select the Highlight layer and offset
it 2 pixels left and 2 pixels up from the starting position.
(This example uses 2 pixels for a 2 pixel "deep" extrusion.
You can use any number.)
- Select the Shadow layer and offset it
2 pixles right and 2 pixels down from the starting position.
Note:
the Highlight to the top left will simulate a raised logo, reverse
the positions of Highlight and Shadow to indent the logo.
- Select the Object layer and the select
the content of the layer as a Selection.
- Select the Highlight Layer and delete
the Selection - this will leave a 2 pixel wide outline for the
highlight.
- Select the Shadow Layer and delete the
Selection - this will leave a 2 pixel wide outline for the shadow.
- In turn select the Highlight and Shadow
layers and use the Output White Level of the Levels Control to
make the Highlight and Shadow a mid gray.

- Select the Object layer and use Levels
to make it fully white.
- Scale to the non-square pixel size and
save as a layered Photoshop document (.psd).
Importing the Photoshop
file and separating the Layers
- Import the Photoshop
file as a Sequence.
- Open the Photoshop Sequence
by double-clicking on it.
- Select all Layers in
the Sequence and drag the Clips to the Browser or a Bin. This
will create separate Clips for Highlight, Shadow and Object.
Compositing the Highlight
and Shadow
- Edit the Highlight and
Shadow Layers over their background footage. Extend the Clips
for as long as you need the logo to appear.
- Change the Composite
mode of the Highlight Clip to Add.
- Change the Composite
mode of the Shadow Clip to Subtract.
- Adjust the Opacity of
the Highlight and Shadow Clips until the logo takes on a realistic
3D look.
- Set the Shadow to approximately
75% Opacity
- Set the Highlight to
approximately 80% Opacity
Displacing the Object
- Add the Displacement
Video filter to the Video footage.
(The Displacement Filter is found in the Video Filters' Distortion
category.)
- Open the Vide Clip with
the Displace Video Filter applied into the Viewer and open the
Filters Tab for the Clip.
- Drag the Object Clip
to the Map Image well in the Displace Filter's Controls.
Set the Settings to:
- Luma Scale to the default
of zero;
- Horizontal Scale to
2;
- Vertical Scale to 2.
Tip: The Horizontal and Vertical Scale
should be set to the amount of offset applied to the Highlight
and Shadow in Photoshop.
Philip
Hodgetts
is the author of the DV Companion 2 and co-developer of the Intelligent
Assistance approach to "What you want to know, when
you want to know, how you want to know." Philip has had
his own video production company since 1980 and worked on everything
from long form documentary to corporate video to national TV
commercial (Australia) with a strong emphasis on education and
training video production.
He fell in
love with Non-Linear Editing the first day he saw an Avid MCXpress,
and purchased a Media 100 in late 1994. His first exposure to
Final Cut Pro was at NAB 1998 when the alpha version was on limited
display and immediately recognised its potential. His first Final
Cut Pro job was a TV commercial that was on air in PAL the week
Final Cut Pro 1.0 was released. FCP 1.0 did not officially support
PAL.
His current
major project (apart from updating the DV Companion, extending
the Companion concept to other software and building a new website)
is editing a long form documentary with 40 hours of source tapes
in Final Cut Pro across the Pacific. Editing in LA with a Producer
making revisions in Sydney by sending Project files by email.
You can purchase
DV Companion by clicking HERE
NOTE:
lafcpug gets a small percentage of sale
Copyright
2001 Intelligent Assistance, Inc and Philip Hodgetts
|