|
   
| Tutorial: -Working
with Audio on the Timeline |
April, 2001
Working
with Audio on the Timeline
By Ken Stone
You have placed your
clips on the Timeline and now you want to adjust your audio. The
volume could be too high or low. You may need to remove a door
slam or when someone bumped the microphone. You might have two
actors and need to adjust the volume of only one of the actors.
You might have a background music track and need to raise and
lower the volume of the music depending on the dialog. So let's
get started.
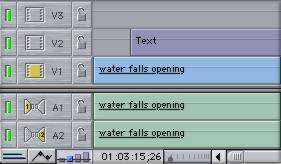
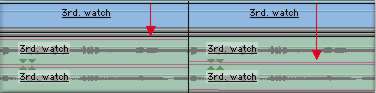
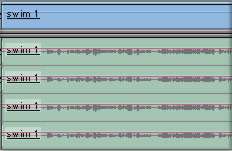
Use your Magnify Tool to enlarge
the clip so you can see what you are doing. Your clip may look
like this.
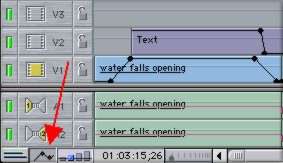
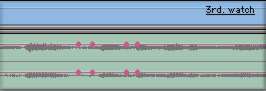
First we will turn on 'Overlays' by clicking
the small graph icon in the lower left of the TL. The overlay
lines will be pink for audio and black for video. Sometimes overlays
are referred to as 'rubberbands'.
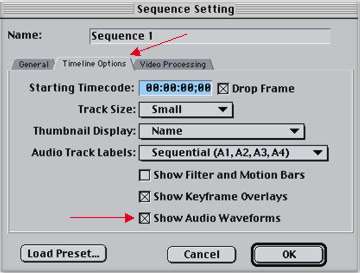
Next we need to turn on the waveforms
for the audio. From the Menu > Sequence > Settings >
Timeline tab. Check the 'Show Audio Waveforms' box.
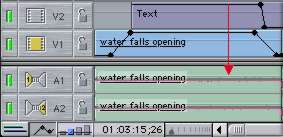
Now your TL will look like this showing
both overlays and waveforms.
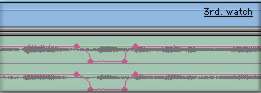
If you place the tip of your cursor on
the pink overlay line it will turn into 2 short horizontal lines
with little arrows pointing up and down. Click and hold, drag
up or down. This will move the pink line which will raise or lower
your audio volume. As you do this a small box will appear that
will show the amount of increase or decrease of your volume in
dBs. The maximum increase will be + 12 dBs, - 60 dBs will be no
audio. When you first click you will see that 0 shows in the small
box. This is the starting or reference point for the audio of
this clip. Your changes will show as + or - dBs. If you wish to
return to your original volume setting click on the overlay line
and drag until the little box shows 0. The changes that you make
this way will effect the volume of the entire clip. If you are
working with a stereo pair when you set anchor points in one track
anchor points will appear in the second track. If you are using
Ch 1 and Ch 2 then you will have to set anchors in each of the
tracks. Volume up and volume down shown below.
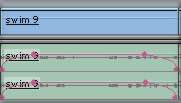
Now lets say that you want to change the
volume of only a section of the clip, for example to remove a
door slam. From the FCP tool bar click on the 'pen' tool or p
on your keyboard. Click with the tool on the pink overlay line
to set anchor points. You will set 2 anchor points just before
the part of the audio you want to change and 2 anchor points just
after this point. Once you have set your anchor points you can
move them left or right by placing your cursor on an anchor point,
your cursor will turn into a +, drag left or right. To remove
an anchor point select the pen tool and hold down the option key,
this will turn your cursor in to a -, click on the anchor to delete.
In the Tool bar select the arrow tool
or a on the keyboard. Now click on the pink line in between the
sets of anchor points and drag down.
You can use this technique to fade your
audio up or down at the start or end of a clip.
Let's say that you have good clean audio
but the volume is too low. Even raising the pink overlay line
to + 12 still does not give you enough volume. First select your
audio tracks and 'unlink' them from your video. Then Copy and
Paste or option drag your 2 audio tracks exactly below creating
a second set of audio tracks. You will now have 4 tracks. When
FCP plays the Timeline it will play all 4 audio tracks and this
will boost the volume.
There may be occasions where some of your
audio is too loud, too hot and is producing bad audio output.
Lowering the volume by 2 to 6 dBs sometimes helps.
If you need to change the volume of all
the clips in your Project the way you do this will depend on what
version of FCP you are running. For 1.2.5 and older you will need
to select all of your clips and 'nest' them. Then you will be
able to change the volume of all the clips at one time. The other
choice is to change each clip one at a time. In FCP 2.0 you can
select all of your clips and from the Menu > Modify > Audio.
This will allow you to raise or lower the volume by 1 dB or 3
dB. Or Menu > Modify > Levels. This will allow you to make
exact changes.
A little bit about 'pan' or 'spread'.

Panning audio is changing left channel
to right and right to left, passing through mono. Not unlike the
'Balance' knob on a home stereo. In FCP we use the 'Spread' slider
to pan our audio. For stereo the box next to the spread slider
will show -1 for, left channel out of left speaker and right channel
out of the right speaker. A 0 setting will produce mono and a
+1 setting will play left out of right and right out of left.
There will be times when 2 adjoining clips
will be from different scenes or takes and playing through the
edit point of the two clips makes for a rough audio transition.
In FCP we have two Audio Transition filters found in the Effects
Browser near the bottom. The '0 db cross fade' filter works by
dropping the volume at the edit point. This effect is used when
the ambient or background sound is different for the two clips
or if there is very little ambient sound. It is also useful when
cutting dialog. The '+3 db cross fade' maintains a constant overall
volume crossing from one clip to the next. This cross fade is
used when the background sound is the same and provides a smoother
transition.
Everything that has been outlined here
can be done in the Viewer, generally I find it easier to work
audio in the Timeline, but for very precision work use the Viewer.
Stretch the Viewer window all the way to the right to work your
audio, put it back when you are done. It should also be noted
that these techniques can be applied to your video tracks as well.
Instead of changing the volume you will be changing the opacity
of the video. Good for fading video in or out.
copyright © Ken Stone 2001
This article first appeared on www.kenstone.net and is reprinted here with permission
All screen captures and
textual references are the property and trademark of their creators/owners/publishers.
|