|
   
|
DVD Studio Pro 2- Bitshifting
|
May, 2004
 | BitShifting & Bit Extraction
Creating a playlist function with DVD Studio Pro 2 |
By: Alex Alexzander
- Part I - BitShifting
- Part II - Bit Extraction
- Part III - Loose Ends
Brief Overview
BitShifting is a simple technique you can use to shift bits from one location to another inside a register. If you have ever wanted access to more GPRM registers than you have available then this is for you. Recently I had the desire to create a playlist function but quickly realized that I would not have nearly enough GPRMs to keep track of the button selections made for each track, let alone to keep track of which track was selected first, second, third, and so forth.
This project will create a capability to store up to eight track selections in any order. At anytime I would like to be able to play those tracks back in the proper order in which they were selected. The obvious idea is to watch SPRM 8 and hold the value of each selection inside a GPRM and then later recall that information. Since we have only eight total GPRMs and we need to store up to eight SPRM 8 selections, we will quickly run into a problem. We need more GPRMs for navigation and this function than we currently have available.
This is where BitShifting will help us. With this technique you'll be able to store the track selections of up to eight tracks using just two GPRMs rather than eight GPRMs. We will do this by watching SPRM 8 for each selection made and then shifting those resulting bits into defined spaces inside a single register.
This project is broken down into three sections. The first is to create the process of watching the user selections and stuffing them into a more compact area inside a single register, which I have defined as BitShifting. The next part will focus on extracting those same bits so that the playlist will play back in the same order that the user made those selections in. We will call this Bit Extracting. I'd like to get these two large parts out of the way first, then we will go over some of the more minor details in Part III. Up above we have a fully functional download which is only one single megabyte in size. It contains a fully working version of this project ready for you to run and examine. I substitute the tracks and graphics you see throughout this tutorial for Apple-provided default buttons. PICT based images are used in place of the tracks I used here. You also have complete access to the scripts used to create this entire process. These scripts are inside the scripts folder. Once you download and expand this folder, simply double-click on the project file and hit the simulator button to watch this project work.
First, let's get a little language clear between you and I. I use the terms SPRM and GPRM often. SPRM is a System Register. Your DVD player uses System Registers to keep certain information alive about the player being used and about the current state of its use during playback of a DVD. For example; SPRM 20 holds the region code. When you purchase a DVD movie it comes encoded with a region code that is compared to the players region code. This is used to control which DVDs are bought and sold in various markets world wide. SPRMs are also used for simple things such as which button are you currently selecting on a menu. Like the Hollywood DVD, you typically have a menu where buttons such as Play, Extras, Setup, and other features are displayed. The DVD player processes your selection and holds that information in a set register known as SPRM 8. We'll be working with this register in addition to our own GPRM registers throughout this project. You likely know all this already; however, it is a good idea to go over it anyway. DVD Studio Pro 2 allows the author access to eight GPRMs, which the author can use to create greater interactivity for the user in your own authored projects. Okay, so let's get started.
[Top]
[ Part I ]
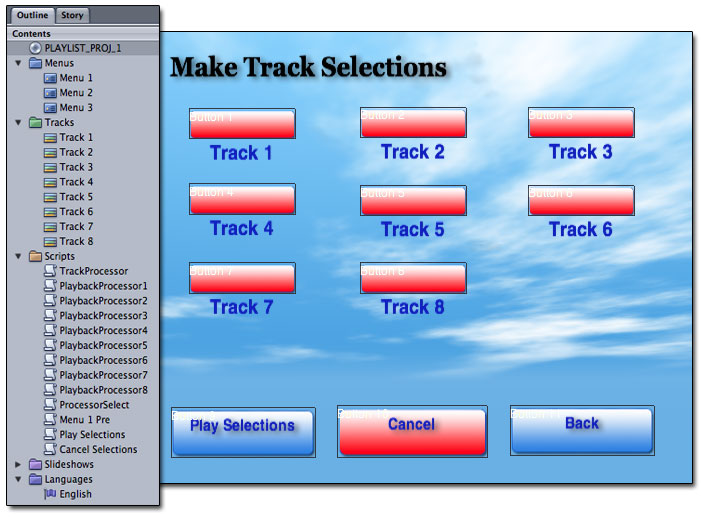
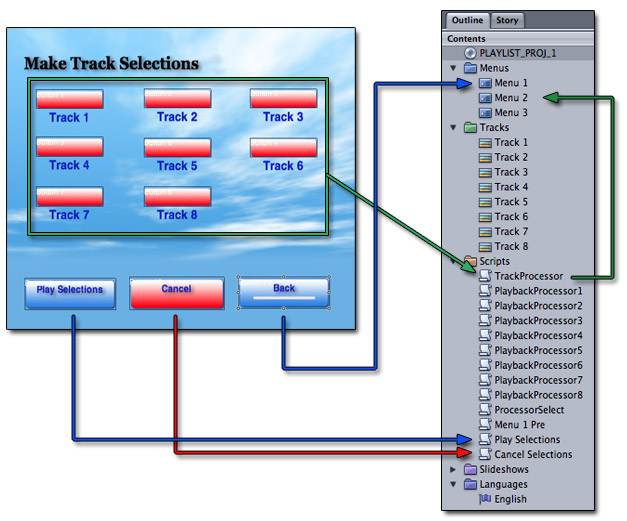
Menu 2: Track Selection Asset
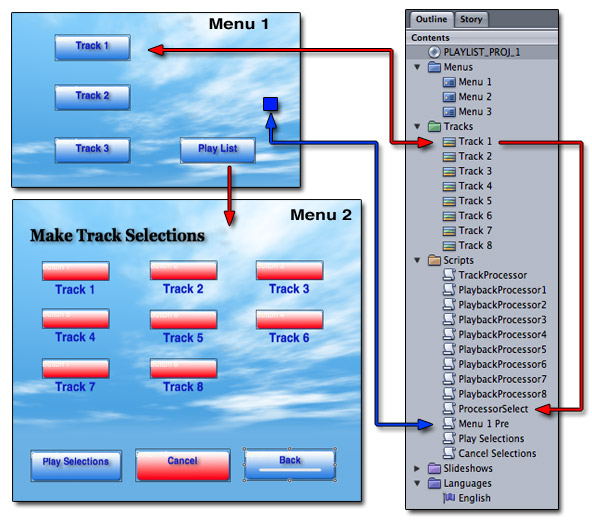
This is our Menu 2 asset along with the Outline tab inside Studio Pro 2. Take note that I have three menus, eight tracks, and several scripts. We're going to focus on just one script for a while and this menu. There is a lot of repetition here, so don't let the many scripts scare you. Once you understand a few of them, the rest are more of the same scripts with only slight modification. The PlayBackProcessor1 though 8 scripts are all almost identical for example. Each is very small and easy to understand.
Let's start with part of the map layout of this project. We start as most any project does with a primary menu, in this case, Menu 1. Menu 1 contains whatever basic functions you would normally like to have. A setup page or Extras, or anything at all. I setup a Menu 1 here so that you will see how to integrate the playlist menu into an existing project. The scripts I have here are secondary in nature to your primary functions that are normally set in Menu 1. That is to say, this is not the heart of your project, but an additional function, and as such, you need to see how it flows into a project without affecting the normal operation of that project.
My project starts with the DVD itself, which of course has a First Play set to Menu 1. Menu 1 is the main part of the project as stated above. Inside Menu 1 we have an optional playlist that the user may select. Choosing the playlist leads to Menu 2, where we will focus most of our time in Part I of this article.
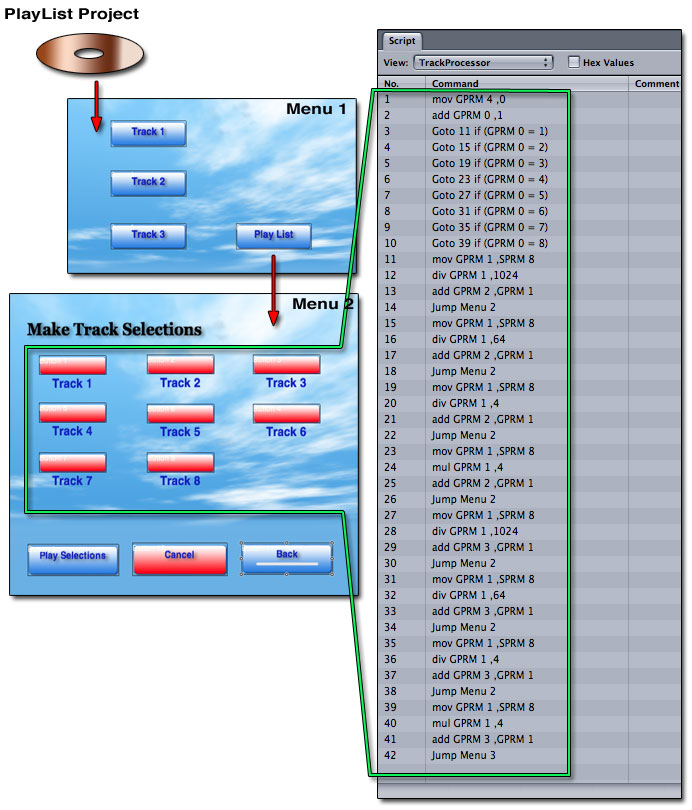
TrackProcessor Script
Once in Menu 2, we have eight track selections, each of which is tied to a single script called TrackProcessor. You can see the script in detail on the right. The buttons under the eight track selections serve to play the selections you have made, cancel and start over again, or simply go back to the Menu 1 asset. Going to Menu 1 cancels the selections made in the Menu 2 playlist. This section of this article will focus on the eight track selections and the script you see here, which again is called TrackProcessor.
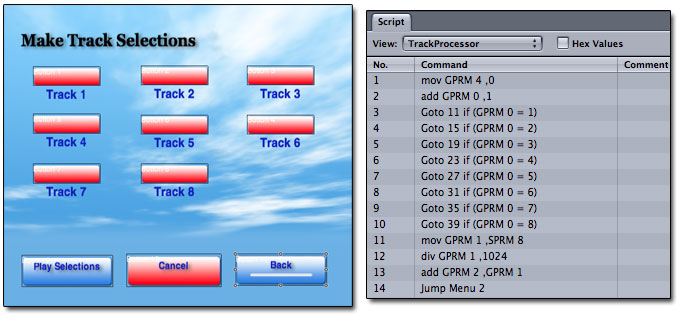
First 14 Commands of TrackProcessor with Menu 2
Take note of the first 14 commands in the track processor script. TrackProcess is called upon anytime the user selects one of the eight available tracks in Menu 2. That is to say, each button labeled Track 1 through 8 is pointing at the script: TrackProcessor.
The first 14 commands will take us as far as what happens when the first track selection is made. Note that the last command in the first 14 of this script sends us right back to Menu 2. Selecting each track will run TrackProcessor and return us to Menu 2 until up to eight track selections are made, at which time we are sent to Menu 3 to prevent more than eight selections from taking place. This script is really a sophisticated counter and BitShifting storage script that interacts with two storage GPRMs: GPRM 2 and GPRM 3. Other GPRMs are used as counters and as a temporary holding register for the resulting selections made. Let's get started with line 1.
1. mov GPRM 4 ,0
This command is used to signal that we are running this script. I do this because Menu 1 has a prescript called: Menu 1 Pre, which changes GPRM 4 to a value of 1. This is important, because when the selected tracks are done playing from our playlist option in Menu 2, they need to decide if they should continue running the rest of this script to see if other tracks require play-back because a playlist exists or if they are not part of a playlist and came from Menu 1 as a single selected track. If any track is selected from Menu 1, once the track is finished playing, it will execute the script ProcessorSelect, which will check for a GPRM 4 value. If that value is a 1 it knows Menu 1 was used to play just a single instance of the track and no further processing needs to take place. If on the other hand the value is 0, the script ProcessorSelect will continue on past this check-point and further process the instructions in the script. We'll go over this later as we describe the End Jump and playback properties of our tracks. For now, this is not important to think about, but I don't want you to think that this line serves no purpose.
2. add GPRM 0 ,1
This script is a counter of sorts and it will be used over and over again, up to eight times before this script stops accepting entries. This script will track how many times it has run for two reasons. The first is, it will only store up to eight track selections and so we need to know when we have stored eight values so we can prevent overlapping. So each time a track selection is made, we execute the script: TrackProcessor and add a value to this GPRM 0 counter. When GPRM 0 reaches a value of 8, it will no longer accept anymore selections and brings the user to a third menu called Menu 3. Menu 3 will only allow the user to play the current selections or cancel them and go back to Menu 2.
3. Goto 11 if (GPRM 0 = 1)
This is where we start to get into the thick of this. We are going to follow this track to line 11. The first time this script is executed the value of GPRM 0 will be increased by 1 and for every time we re-execute this script, we add 1 again. Each of these eight track selections points to this script, so each track selection made adds a value of 1 to GPRM 0, which is our counter. The first execute gives a value of 1 to GPRM 0, and we go to line 11 of the TrackProcessor script.
11. mov GPRM 1 ,SPRM 8
SPRM 8 is the System Register (SPRM) that now holds the selection made. This selection could be any of the eight possible selections. No matter which one was selected, the value of that selection is held in SPRM 8. SPRM 8 can hold up to 36 different button selections using bits 10 through 15; however, for our limited eight selections, only bits 10 through 13 are used.

SPRM 8: Track 1 Selected
We'll use simple examples here to get past this first set of code. Let's pretend for a minute that the selection that was made is Track 1. Track 1 is Button 1 on Menu 2. Because it is Button 1, selecting it will yield a value of 1024, or bit 10 in the on position. No other bit will be on when this selection is made.
Line 11 copies the SPRM 8 value to our GPRM 1 register. This means that GPRM 1 now also has bit 10 in the on position and has a value of 1024. Note the chart above which shows that bits 10 through 15 are used to store up to 36 selections starting with a value of 1024, which is bit 10 in the on position. Note the other values as well. Button 2 would be 2048, which is bit 11 in the on position and bit 10 in the off position. Button 3 would be bits 10 and 11 in the on position and all others in the off position. Just keep adding 1024 to the prior value and you will know the value and which bits are in the on position and which are in the off position. No matter what the values, the only bits in use for any of the 36 potential buttons in any menu will always be bits 10 through 15 or fewer.
12. div GPRM 1 ,1024
This is where the shifting of bits takes place. Take a look at line 12. div GPRM 1 ,1024. Assume that the first selection made was button one, which we stated is bit 10, which holds a value of 1024. If we divide that value of 1024 by 1024 we get a value of 1. This is bit 0 in the on position and it is held in GPRM 1 because we applied the div command to the GPRM 1 register. We have shifted the value in GPRM 1 from 1024 to 1, or in other words, we shifted the value from bit 10 to bit 0.

GPRM 1 Shifted from Bit 10 to Bit 0
We're going to run through the remaining two lines of script. Don't worry, we're going to go over this in detail right after we go over the last two lines.
13. add GPRM 2 ,GPRM 1
Line 13 takes this new shifted value of GPRM 1 and adds this to GPRM 2. Since this is the first time this script has run, this is the very first value added to GPRM 2, which means it is the only value thus far. All GPRMs start with a value of 0.
So GPRM 2 now has bit 0 on and holds a value of 1. We have just recorded the first selection made by the user. We took the value of the SPRM 8 selection and copied it into GPRM 1. Then we shifted bit 10 to bit 0 inside GPRM 1 by using the div command. Once that was completed, we added that shifted value to our storage register, GPRM 2, by adding the value of GPRM 1 to GPRM 2 with the add command. GPRM 2 is one of our long term storage registers that we will extract the track selections from later so we can play them back in the order they were made in Menu 2. The next three values we record will also be piped into GPRM 2 for storage. Since eight track selections will only use 4 bits to record their selection we will use each GPRM storage area to hold a maximum of four track selections for playback later on. We are going to use shifting again, but before we go into that, we have to explain a few things about bits and shifting. For now, you have learned that SPRM 8 holds the value of any selection made of the eight possible selections. You also know that you can copy the value of SPRM 8 into a GPRM and that it is also possible to then shift the values from one bit location to another within that GPRM register.
Now, we did an easy one that had only one bit in the on position. Let's get into the real world and go over some of the other potentials that sometimes have more than one bit on at a time before we continue with any more scripting.
As I said earlier, SPRM 8 uses bits 10 through 15 to record user selections made. The first button, or Button 1 is always bit 10 on and a value of 1024. When the user selects the second choice, aka Button 2, the value is 2048, or bit 11 on and bit 10 off. Each successive button is exactly 1024 greater in value than the prior. So Button 1 is 1024, button two is 2048, button three is 3072, button four is 4096, and up to button 8 which is 8192.
Take a look at the chart below and note the bit structure of these varying bit and value selections.
SPRM 8: Track 1 through 8
This chart illustrates the eight possible SPRM 8 values of each of the eight tracks. A very important item to take note of is that none of these choices ever go beyond bit 13, which is just 4 bits. That means for all eight possible selections, no more than 4 of the 16 bits in SPRM 8 are ever used with our Menu 2. We are going to use this fact to help up stack multiple selections into a single register. By this time, I hope you already see where this is going. We will use the BitShifting to move the bits from locations 10 through 13 into locations 0 through 3, then 4 through 7, then 8 through 11, and lastly 12 through 15. We will call these four areas, quadrants. What we are doing is dividing up a single register into four parts. Since each GPRM register is 16 bits and each possible selection is only using 4 bits, we will divide our GPRMs into four quadrants. BitShifting will allow us to pick which of the four quadrants we will use to store any selection.
Now, in the beginning I said that this script is basically a sophisticated counter and BitShifting loader of sorts. Since we are counting how many times this script executes, we know when the first, second, third and so on choices are made. Because we know this, we also know where to store each of the SPRM 8 values for long term storage and future extraction. For example, we know all choices made use 4 bits or less. We can store the first selection choice in the first 4 bits, or first of four quadrants of GPRM 2, which is one of our storage GPRMs. When the second selection is made we will BitShift that result into the same GPRM 2 by altering the div command from 1024, which BitShifts bits 10 through 13 to bits 0 through 3, to 64 which BitShifts from bits 10 through 13 to bits 7 through 11. Bits 7 through 11 is our second quadrant of storage in our GPRM storage registers. We'll go over this is detail with a table that illustrates this point. For now, let's continue to focus on our script.
We shifted bits 10 through 13 to 0 through 3 by dividing by 1024. We know that bits 10 through 13 are where SPRM 8 stores the selection numbers and those values range between 1024 and up in increments of 1024. Bit 10 or 1024 divided by 1024 is 1. So shifting that is easy. What if the selection had been Track 7? Looking at the chart we see Track 7 is bits 10, 11, and 12 on and that the value of those three bits is 7168. If I divide 7168 by 1024 I get a value of 7. Let's look at the first 4 bits of GPRM 2, our storage GPRM. I want to show you what a value of 7 looks like compared to a value of 7168. Look at the bit structure itself. The first 3 bits of 4 bits are on in the SPRM 8 register and when we divide by 1024, the same 3 bits of 4 are now shifted to bits 0, 1, and 2 in the on position while the fourth is off. Note the values add up to 7 on the bottom and 7168 on the top. Divde that by 1024 and you get 7. SPRM 8 sees 7168 as Track 7. We store Track 7 as simply 7.

div 1024
No matter which selection, Track 1 through Track 8, we can always shift the answer to the first 4 bits of the 16 bit register GPRM 2. Bits 0, 1, 2 are on just as bits 10, 11, and 12 are on. It's a perfect match, just shifted from one area to another.
Bit Shift Map
Take a look at the map above. This is a basic map which shows a track selection of Track 7. The very top shows this would have an SPRM 8 value of 7168 and light up bits 10, 11, 12 on, and leave 13 off. Below this are the formulas to shift this value into any of the four quadrants we will use as storage throughout this article. Track 7 stored into the first 4 bits or quadrant one is 7, but storing Track 7 in quadrant two would have a value of 112, or bits 4, 5, 6 on and 7 off. We do not divide by 1024 to store in quadrant two. We divide by 64. In quadrant three, we BitShift using a divide of just 4, and Track 7 holds a value of 1792, or bits 8, 9, 10 on and 11 off. To BitShift into quadrant 4, we will multiply by 4 and Track 7 holds a value of 28672, or bits 12, 13, 14 on and 15 off.
We are going to use these four formulas in succession to BitShift the value of the selections made on Menu 2 from SPRM 8. We Copy each selection from SPRM 8 to GPRM 1 as a temporary area where we then apply one of these four BitShifting formulas, then add that BitShifted value to GPRM 2 and later GPRM 3. Since each of our GPRMs will hold 4 bits at a time, we will use each GPRM to hold four selections. Because we have eight tracks to store, we will use two GPRMs. In this case, those are GPRM 2 and GPRM 3.
Let's recap the first 14 lines of code much more quickly this time. You should have a much deeper understanding of this.
1. mov GPRM 4 ,0
Remember, this decides if we should go back to Menu 1 or continue to process this script further.
2. add GPRM 0 ,1
This counts how many times we execute this script and defines what quadrant we store BitShifted bits to our GPRM storage. It lets us know that this is the first time we have run this script and therefore we will store the selection made in the first quadrant of GPRM 2. GPRM 2 is our holding area for the first four selections. We watch SPRM 8, which is the register that holds the value of the selection that sent us to this script. So if Track 1 is selected, SPRM 8 is holding a value of 1024. If Track 7 was selected, SPRM 8 is holding a value of 7168 or 7 multiplied by 1024. Remember the buttons start with bit 10 on, which is a value of 1024, and then go up in increments of 1024. Therefore 7 is 7168.
3. Goto 11 if (GPRM 0 = 1)
This is our first time here, so GPRM 0 does equal 1 and we goto line 11.
11. mov GPRM 1 ,SPRM 8
This copies the value in SPRM 8 to GPRM 1. Remember GPRM 1 is our temporary GPRM used to BitShift. When we use the mov command as we have, we have a perfect copy of SPRM 8 now held in GPRM 1.
12. div GPRM 1 ,1024
Okay, here is one of the four BitShifting formulas we just went over. We are using the first formula because we intend to store this first value in the first quadrant of the storage GPRM, which is GPRM 2. We shift the bits from 10, 11, 12, 13 to 0, 1, 2, 3 by dividing the value held in GPRM 1 by 1024. No matter which of the eight tracks are selected, we know that they only use 4 bits starting with 10 and ending in 13.
13. add GPRM 2 , GPRM 1
Line 13 adds the BitShifted value from GPRM 1 to GPRM 2 for storage. GPRM 2 now holds any one of eight possible track selections made in Menu 2 as the first track selection stored in quadrant one of GPRM 2.
14. Jump Menu 2
This sends us right back to Menu 2 because we have made only one selection so far and we want to give the user the option of making more choices. We give the user the opportunity to select up to eight tracks from Track 1 through Track 8.
With this in mind, let's look at the rest of the TrackProcessor script.

Let's look at this script in three sections indicated by the red area designations in the graphic above. I have each of three sections partitioned and numbered one through three.
Section one is what we have covered thus far. You now see how to shift bits, and it's time to gather all eight of the user selections and store them into two registers, which are going to be GPRM 2 and GPRM 3. We have already gone through the start of the script once; however, each time any of the tracks are selected in Menu 2 the TrackProcessor script is executed again. This script is smart enough to know it should not run continuously past eight user selections. On line 2 we start a counter that when it reaches a value of 8 will send the user to Menu 3, where a choice of Play Selections or Cancel Selections is all the user is allowed to make.
Starting the script for the first time starts the counter off with a value of 1, which we can see from line 3 will take us to line 11. Line 11 took the value of the first track selected and copied that value from SPRM 8 into our temp GPRM 1, where we used div GPRM 1 ,1024 in line 12 to shift the bits from 10, 11, 12, and 13 to 0, 1, 2, and 3. In line 13 we then added those shifted bits to GPRM 2 for storage. So, GPRM 2 now has bits 0, 1, 2, and 3, which are holding the first track selected in the first position. Later we will extract this information so we can play that selection back, but for now we want to gather the other seven selections the user may make. To do that, let's start where we left off on line 14, which is where we jump back to Menu 2. We are now going to reference the red outlined area of the script marked 1 and 2.
Back at Menu 2, the user can select more tracks or can simply play the single track they have selected by choosing the Play Selections button. We will assume eight tracks are going to be chosen for the sake of explaining this script and later we will discuss what happens when less than eight are selected in Part III of this article.
Menu 2 has our eight tracks labeled Track 1 through Track 8. Picking another one of these tracks will result in the second time we run the script TrackProcessor. Let's assume this has now taken place. Let's go over this, but this time, much faster.
1. mov GPRM 4 ,0
We set this value to signal we are not coming from Menu 1. When tracks playback, they will look for this value and decide where the End Jump of the track should return to. By clearing this register, we are saying we are not from Menu 1 and we want to continue processing the script that ultimately brings them to this script. Had this value been left a 1, the script that brings us this far would stop and go to Menu 1.
2. add GPRM 0 ,1
This adds another value of 1 to the existing value, which was 1. We now have a value of 2 for GPRM 0. This tells the BitShifting to use the second BitShift formula and divide by 64. The first time we ran this, we used a BitShifting formula that divided by 1024.
3. Goto 11 if (GPRM 0 = 1)
This statement was true the first time we ran this script. It is now false. GPRM 0 = 2 at this time. See the line above.
4. Goto 15 if (GPRM 0 = 2)
This is the second time we are running this script, therefore this value is now true. GPRM 0 does equal 2, and we are going to line 15 now.
15. mov GPRM 1 ,SPRM 8
This is just as before. We are even using the same register we used as a temp register in line 11 the first time we ran this script. In fact we will reuse GPRM 1 as a temp register for all eight of the instances when we need a temprary register to store the value of SPRM 8, as user selections are made over and over again until eight are made or until the user plays the selections or cancels the selections. When you copy with the mov command, you overwrite the value. So even though GPRM 1 had an older value from the last time we ran this script, that value has been replaced with this new value.
16. div GPRM 1 ,64
As explained prior, this now BitShifts the bits from SPRM 8 of bits 10, 11, 12, and 13 as they were copied into GPRM 1and holds them in our temp GPRM 1. That is to say, they are shifted from 10, 11, 12, and 13 to 4, 5, 6, and 7 now. No matter what choice made, the bits have shifted by the use of divide by 64 which exactly moves the bits from locations 10, 11, 12, 13 to the shifted location of 4, 5, 6, 7 inside the GPRM 1 register.
17. add GPRM 2 ,GPRM 1
Now this statement may trick you. We are adding bits into a register where bits already exist. So why doesn't this over-write them? This is exactly where shifting plays so well. When we used div GPRM 1 ,1024 we assigned the bits to 0, 1, 2, 3. And when we now use div GPRM 1 ,64 we assign bit locations of 4, 5, 6, and 7. When we use the add command we are not over-writing. We are adding to something that exists already, and since the values are defined to ONLY use the 4 bits 0, 1, 2, 3 or 4, 5, 6, 7 they cannot possibly write on top of each other. Had we used the mov command to put those bits into GPRM 2, we would have replaced the old bits with the new bits, but add simply adds bits. We now have two complete selections copied into a single GPRM register and the best part is, we know the first set was the first selection the user made and we also know that the second set is the second selection the user made. Our GPRM 0 counter BitShifts in a sequence and we will use that to extract in the same sequence later on. This is how we will know in what order to extract them later on. By counting how many times this script is executed we are adding bits to a storage register in a predictable manner. We will know exactly what selections to play back and in what order now, and we do this in a clever way.
18. Jump Menu 2
Of course with only two selections successfully stored in GPRM 2, it's time to go back to Menu 2 and allow six more selections to be stored. We're going to move even faster now. Back in Menu 2, the user makes their third selection. And you guessed correctly, they are indeed running our script a third time now. So lets look at line 5 now.
5. Goto 19 if (GPRM 0 = 3)
And here we are. We do equal 3 now, so let's skip to line 19 this time.
19. mov GPRM 1 ,SPRM 8
We copy the user selection from SPRM 8 to our temp GPRM 1 and hold the bits 10, 11, 12, and 13.
20. div GPRM 1, 4
Okay, I hope by now you are ahead of me. This takes the bits in GPRM 1 that were copied from SPRM 8 and BitShifts them from 10, 11, 12, and 13 to 8, 9, 10, and 11.
21. add GPRM 2 ,GPRM 1
This of course now adds the Shifted bits of 8, 9, 10, and 11 into our storage GPRM 2 area. It is now holds 12 bits of information, which is three user selections in their proper order.
22. Jump Menu 2
We are now back at Menu 2. The user has made three choices and now selects a fourth choice, which runs our favorite script a fourth time. So let's look at line 6 this time.
6. Goto 23 if (GPRM 0 = 4)
GPRM 0 does indeed equal 4 so let's go to line 23.
23. mov GPRM 1 ,SPRM 8
You got it! We copy the value of the user selection. Bits 10, 11, 12, and 13 are now sitting in our temp GPRM 1.
24. mul GPRM 1 ,4
There is something different for you to look at. Instead of div, we use mul for multiply this time. This is because we are BitShifting 10, 11, 12, and 13 over to higher values on bits 12, 13, 14, and 15 now.
25. add GPRM 2 ,GPRM 1
Again we are adding bits and this time we are adding bits 12, 13, 14, and 15, which means GPRM 2 is now using every single bit available to us. We now have four user selections stored and can't fit in anymore. Because of this, in the next section of the script, which is outlined red with a 3, you will note that we no longer add bits to GPRM 2. Instead we add bits to GPRM 3 now and we start with div 1024 again so that we start filling those bits at 0, 1, 2, and 3.
We are going to move very fast now since the last section is exactly the same as section 2. The only difference is, we are taking the shifted bits and storing them in GPRM 3. So let's move at light speed now.
26. Jump Menu 2
Now we are back at Menu 2. We have four selections stored in a predictable way for future extraction. The user makes a fifth selection and that runs the script TrackProcessor a fifth time. Lets look at line 7 now.
7. Goto 27 if (GPRM 0 = 5)
27. We copy GPRM 8 to GPRM 1
28. div GPRM 1 ,1024
Remember, this now takes the users fifth selection, shifts the bits from 10, 11, 12, and 13 to bits 0, 1, 2, and 3.
29. add GPRM 3 ,GPRM 1
This adds the shifted bits 0, 1, 2, and 3 into our new GPRM 3, which is the first of four quadrants.
30. Jump Menu 2
Moving faster now.
The user makes the sixth selections and runs TrackProcessor a sixth time. So lets look at line 8 now.
8. Goto 31 if (GPRM 0 = 6)
31. copy SPRM 8 to GPRM 1 again.
32. div GPRM 1 ,64
This BitShifts 10, 11, 12, and 13 to 4, 5, 6 and 7.
33. add GPRM 3 ,GPRM 1
We add the sixth selection in the second quadrant of GPRM 3. which is now half full and waiting for two more quadrants.
34. Jump to Menu 2
The user makes the seventh selection.
9. Goto 35 if (GPRM 0 = 7)
35. copy SPRM 8 to GPRM 1
36. div GPRM 1 ,4
This again shifts the bits 10, 11, 12, and 13 to 8, 9, 10, and 11.
37. add GPRM 3 ,GPRM 1
Adds our third quadrant to GPRM 3.
38. Jump Menu 2
The user makes the final eighth selection.
10. Goto 39 if (GPRM 0 = 8)
39. Copy SPRM 8 to GPRM 1
40. mul GPRM 1 ,4
Remember, we are shifting bits to the right, and those have higher values so we multiply. This shifts 10, 11, 12, and 13 to 12, 13, 14, and 15, which is our final quadrant.
41. add GPRM 3 ,GPRM 1
This adds the final 4 bits into the fourth quadrant of GPRM 3.
42. Jump Menu 3
This time we do not jump to Menu 2. Instead we jump to Menu 3. This is because we do not want any more selections. The maximum we can store in this project is eight and we now have eight.
Let's quickly recap what we have. We have GPRM 2 and GPRM 3 each loaded with four different user selections. We BitShifted the SPRM 8 results of their selections into eight unique areas spread across two GPRMs. We know exactly what order they went in as well. We know that the first quadrant of GPRM 2, which are bits 0, 1, 2, and 3 is the user's first choice and that bits 4, 5, 6, 7 are the second choice. Bits 8, 9, 10, 11 are the third, and 12, 13, 14, and 15 are the fourth choice. The fifth choice is in the next GPRM 3 starting with bits 0, 1, 2, and 3. The sixth choice are 4, 5, 6, and 7 and the seventh choice is 8, 9, 10, and 11. The final eighth choice are bits 12, 13, 14, and 15.
So we have stored eight selections in two registers. Now it's time to think about how to play them back and get them out of our storage GPRMs. To do that, let's move to where we left off, which is where we are sent when we make the maximum eight track selections. This brings us to Menu 3.
[Top]
[ Part II ]
[ Menu 3 ]
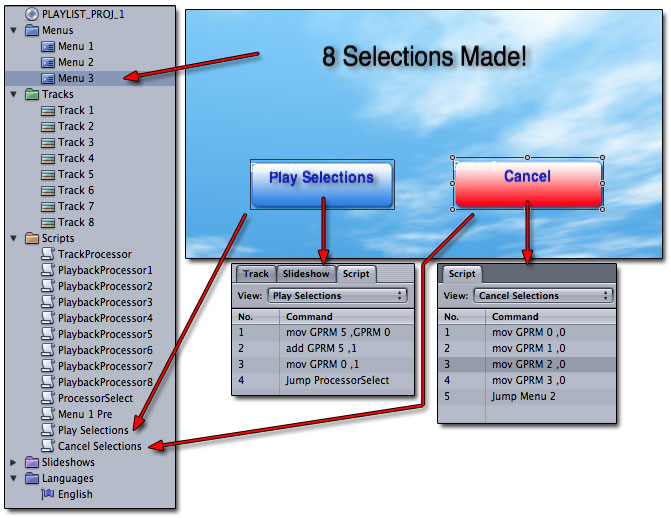
Menu 3
Menu 3 simply has two choices. You can either play the choices made, which we know we made eight of them or we can cancel. Two scripts are involved here. The red cancel button is pointing to a script called Cancel Selections while the blue Play Selections button is pointing to a script called Play Selections.
Let's go over the easy one first, which is Cancel Selections.
[ Script: Cancel Selections ]
- mov GPRM 0 ,0
- mov GPRM 1 ,0
- mov GPRM 2 ,0
- mov GPRM 3 ,0
- Jump Menu 2
All this script does is clear the counter we used when running the script TrackProcessor. That counter is GPRM 0, which up to now was holding the value of 8. Line 2 clears GPRM 1, which is our temp counter. This is technically not needed for this particular project, but it's a good idea to clear it anyway because you may want to re-use this GPRM somewhere else. Line 3 and Line 4 are our storage for the eight selections made. Remember, the mov command replaces one value for another. Using the command mov GPRM 2 ,0 replaces all 16 bits with 0 [zeros]. The same happens to GPRM 3, our secondary storage area. Line 5 of course will take us back to Menu 2 where selections can be made again or the user can simply go back to Menu 1 from Menu 2.
Let's look at the Play Selections script now.
[ Script: Play Selections ]
- mov GPRM 5 ,GPRM 0
- add GPRM 5 ,1
- mov GPRM 0 ,1
- Jump ProcessorSelect
In order to explain this script, we need to talk about where it goes. This script is sort of a counter-set and launch for another script. We need to set some counters up for the script that follows, which is ProcessSelect. Because the user may choose less than eight tracks, we need a way to know which tracks have been loaded into our storage GPRMs for playback. We don't want to go looking for stored track selections that didn't exist in the first place.
Line 1 takes the value of the GPRM 0 we used in the TrackProcessor script counter and copies it to GPRM 5. GPRM 0 is the counter that counted how many times a track selection was made and ultimately was also used to store the track selections in a predictable place. Had less than eight selections been made, we would need to know that information now, as we are about to determine through the use of scripts what to play-back and in what order.
Line 2 takes the value of GPRM 5, which is the value of GPRM 0, which is the count of how many tracks were selected, and adds the value of 1 to that number inside GPRM 5. Since eight tracks were selections, GPRM 5 now holds a value of 9.
Now that we have successfully learned how many tracks were selected, we are going to re-purpose GPRM 0 for use as an extraction counter in the scripts PlaybackProcessor1 through 8. This is what we used to count how many tracks we selected. We are changing the value from 8 to 1. The reason for this is, we are about to play tracks back in the order they were selected. We know how many were selected, now stored in GPRM 5, which will subtract 1 for each playback of a track and we now have a counter started that will add a value of 1 to GPRM 0 each time a track plays. GPRM 5 will subtract 1. GPRM 0 will add a 1 not to count what is played, but this time, to act as a selection tool. We are now going to use GPRM 0 starting with a value of 1 to pick the first track selection stored in the first quadrant of GPRM 2 and extract and play that selection.
Had only five selections been made, GPRM 5 would have copied a value of 5 and we would add 1 here, then subtract 1 as we play back selections to the ProcessorSelect script. GPRM 5 counts backwards and stops this process when it runs to zero.
Script: Play Selections sets counters and executes script: ProcessorSelect
[ Script: ProcessorSelect ]
Take a look at the script ProcessorSelect. You can see how this interacts with the counters we have just setup in the script: Play Selections. Line 1 states that we will subtract a value of 1 from GPRM 5. Remember, GPRM 5 copied the value of GPRM 0, which was the original count of how many tracks were selected. In the prior script Play Selections, we added a value of 1 right after we copied the value. We do that because the next script will run many times. Each time it runs it subtracts a value of 1 to the play count so that it will trigger a stop when it runs out. Had we started with the original value of 8, we would always be a value of 1 too short. So adding the value of 1 right after we copy the value from the original count is needed to offset this issue. Line 2 says Jump Menu 1 if (GPRM 4 = 1). You may have forgotten this by now, but when we selected tracks in the script: TrackProcessor, we kept stating that GPRM 4 = 0. We did that as a signal that the tracks are being played back through the use of our selection Menu 2 and not Menu 1. Menu 1 has a pre-script that we will go over later that changes GPRM 4 to a value of 1. It remains a value of 1 always, unless the user goes to Menu 2 and starts the track selection process. Only then is this value cleared. This is exactly what allows us to integrate this into an existing project. Because we did use the TrackProcessor script to store track selections, we have a value of clear or 0 [zero]. Line 2 is therefore false and the script continues.
Line 3 checks to see how many times this script has been executed. Note that in line 1, each time we run this script we subtract from GPRM 5. Had only two tracks been selected this script would only run twice because GPRM 5 would only start this script with a value of 3 and it would subtract a value of 1 just for starting the script. That leaves two more executions of this script. We started with a value of 9, which comes from the value of 8 we got from the original count, plus the value of 1 we added from the Play Selections script which calls this script. Ouch, that's a lot to think about! You see now how we know how many tracks are selected. When all the tracks have played, GPRM 5 will have a value of 0 and is instructed to go to line 12 where all the values are cleared and you are returned to Menu 2.
Line 4 says if GPRM 0 = 1 then Jump PlayBackProcessor1. This is true. Though GPRM 0 was a value of 8 when used in the prior script, remember that we reset it to a value of 1 in the Playback Selections script. GPRM 0 is now used to choose which quadrant to extract. As it adds values each time this script executes, it uses that new value to extract the next quadrant in the sequence. The counter used to detemine how many times to extract is now GPRM 5 and it counts backwards so as not to allow the playback of more selections than were actually made. When we start the script ProcessorSelect, we do a countdown in GPRM 5. If eight tracks were selected, then GPRM 5 counts down how many times to run this script and GPRM 0 is used to extract the values in GPRM 2 and GPRM 3, which are our storage registers. We need to extract them in order from 1 through 8 or any number less than 8.
Let's say for example that only one selection was made. The original GPRM 0 would only equal 1. The Play Selections script would run and copy that value of 1 to GPRM 5, which is our countdown register. GPRM 5 adds another value of 1 in the Script Play Selections, so now it is 2. Play Selections executes the script ProcessorSelect, which right in line 1 subtracts a value of 1 from the countdown register that GPRM 5 is used as. GPRM 0 has been started with a value of 1 and so line 4 is true and only one track is played back. That track is the track stored in the first quadrant of GPRM 2. The next script, which line 4 calls called PlaybackProcessor1, has the sole job of extracting only the first track selection stored in the first quadrant of GPRM 2.
Look at lines 4 through 11. Each of these calls PlaybackProcessor1 through 8, and each of these scripts does only one thing. Script PlaybackProcessor1 extracts the track selection made the first time from GPRM 2. PlaybackProcessor2 extracts the track selection made the second time from GPRM 2 and so on and so on until PlaybackProcessor5. PlaybackProcessor5 extracts the track selection held in quadrant one of GPRM 3. Remember that we spread the eight selections made into two GPRMs. GPRM 2 and 3 hold the combined eight selections.
Let's now look at a few of these PlaybackProcessor scripts to see how we extract the tracks and play them. We will also cover the process of the track and its End Jump so you will see how we are made to repeat this process over and over.
[ Script: PlaybackProcessor1 ]
This script uses a bit-wise operation to extract the quadrant. Remember that at the start, we said that SPRM 8, our track selection register, held the value starting with bit 10 and up. Through some BitShifting we were able to shift those bits and store up to four unique track selections in a single GPRM register. We allowed 4 bits for each track selection, thus the use of the name quadrant. We now need to extract only 4 bits at a time to gain access to that information and play the track back as it was originally selected.
Again, there are eight scripts like this one. Each one is designed to extract one of the eight quadrants. These are always extracted in sequence starting with PlaybackProcessor1, which extracts the first selection, and ending with PlaybackProcessor8, which extracts the maximum of the eighth stored track selection. That means if eight tracks were stored, we extract using PlaybackProcessor1 through 8 in that order. If only three tracks are selected and stored, then the countdown GPRM 5 value on lets us go as far as PlaybackProcessor1, 2, and 3 before the script is told to stop extracting what is obviously not there.
Bit-wise functions are used to look at specific areas of a register. We create what is called a mask so that we only see part of the register. In this case, each of these eight scripts can only see the part of the register that it needs to see. PlaybackProcessor1 for example can only see the first 4 bits of GPRM 2, which are 0, 1, 2, and 3. PlaybackProcessor2 can only see the second set of 4 bits, which are 4, 5, 6, and 7.
Let's look at line 1 first. Line 1 states; add GPRM 0 ,1 and this of course adds a value of 1 to a counter so that next time we run ProcessorSelect we know not to extract this same section of the register again. Next time ProcessorSelect is executed, it will jump to PlaybackProcessor2 as long as the countdown GPRM 5 value doesn't equal 0 and prevent it from running again.
Line 2 is where the fun starts. Line 2 states: mov GPRM 1 ,GPRM 2. This copies the whole register of GPRM 2 which is holding four quadrants of bits for us. All of this is copied into GPRM 1, which we use as a temporary register.
Line 3. and GPRM 1 ,15
This is one of our masks and what this does is block 12 bits from view. We are looking now at only bits 0, 1, 2, and 3. Let's talk briefly about how this works because as you will soon see, we adjust this mask often.

The mask works by adding the bit values of the bits you want to see and that blocks all the other bits from view. By leaving the other values out of this addition, we do not see them. Let's start with the easiest one first. Look at bits 0, 1, 2, and 3. The second row in our mask key image above shows that bits 0, 1, 2, and 3 have a value of 1, 2, 4, and 8, respectively. If we add all those values together, we get sum total value of 15. So 15 is therefore our mask value.
Let's look at the two lines this applies to in our PlaybackProcessor1 script.
2. mov GPRM 1 ,GPRM 2
3. and GPRM 1 ,15
You can see here, we copy the GPRM 2 register to GPRM 1, which is our temp register in line 2. In line 3 we applied a bit-wise and function with and GPRM 1 ,15. This applies the mask to GPRM 1; our temp register now only sees the first 4 bits or quadrant one of four of GPRM 1.
When we issue the bit-wise and command we focus only on the first 4 bits. We loaded these bits with shifted bits from SPRM 8 in the first part of this article. As stated then, bits 10, 11, 12, and 13 may be used to store choices of Track 1 through 8. When we used the div command with a value of 1024, we shifted all 4 bits from 10, 11, 12, and 13 to 0, 1, 2, and 3. If Track 1 was selected, that would be bit 10 in the on position. div 1024 shifts that to a value of 1, which we see as bit 0 in the on position. Because of that, we now know what the potential selections are. They range from a value of 1 through 8. We have eight jump statements here, and only one of them is true. What ever the user selected for the first selection originally will now be played back through true jump statement.
4. Jump Track 1 if (GPRM 1 = 1)
5. Jump Track 2 if (GPRM 1 = 2)
6. Jump Track 3 if (GPRM 1 = 3)
7. Jump Track 4 if (GPRM 1 = 4)
8. Jump Track 5 if (GPRM 1 = 5)
9. Jump Track 6 if (GPRM 1 = 6)
10. Jump Track 7 if (GPRM 1 = 7)
11. Jump Track 8 if (GPRM 1 = 8)
Now we need a way to get back to script that determines if more tracks need to be played back as per the user selections. To do that, we set the End Jump of each of the eight tracks to jump back to the script ProcessorSelect.
The first time ProcessorSelect is executed, it is done through the use of a button that runs the script Play Selections and Play Selections created a counter with GPRM 5 that subtracts as ProcessorSelect runs. We said that we would run ProcessorSelect several times, once for each time a track was selected in Menu 2. ProcessorSelect has the job of deciding which of the eight PlaybackProcessor scripts is executed. Each PlaybackProcessor script will only see one quadrant and inside that one quadrant is the answer to playback one track. We don't know what the user originally selected, so we have eight Jump statements in each PlaybackProcessor script since one of those will be true.
So the proper track has played, and now that track has an End Jump to ProcessorSelect.
In line 1 we can see our GPRM 5 counter is subtracting a value of 1. Line 2 checks to see if this track came from Menu 1 or not. It has not come from Menu 1 so we continue. Line 3 checks to see if this script has run as many times as selections were made. We made eight selections and played this script twice, including right now, so this value is false and we continue.
Notice the Jump statements. When we ran the PlaybackProcessor1 script, we did add a value to GPRM 0. It was 1 last time, it is now 2. As a result the script skips line 4 and executes the statement on line 5 that states, Jump PlaybackProcessor2 if (GPRM 0 = 2).
PlaybackProcessor2 is almost identical to PlaybackProcessor1. The difference is where it looks in our storage GPRM 2 for its answer. We add a value of 1 to GPRM 0 again so as to signal we are going to extract and play another one of the eight selected tracks the user made in Menu 2. Again in line 2 we take the whole register of the storage register GPRM 2 and copy it to our temp register, which is GPRM 1.
Look at line 3, however: and GPRM 1 ,240. Here we apply a different mask, which in this case is designed to look at the second quadrant which is bits 4, 5, 6, and 7. Look at the mask key below. You can see 240 is the mask used for the second quadrant of bits just as 15 was the mask value for the first quadrant of bits extracted.
By adding values of bits 4, 5, 6, and 7 we get a value of 240. No other bits are looked at when we use this value as our mask. This is a bit-wise function, which has now just focused on the second quadrant.
Look at lines 4 through 11 of the PlaybackProcessor2 script. Note how we play-back Track 1 if GPRM 1 equals 16 and Track 2 if GPRM 1 equals 32 and so on. These again are the shifted bits originally taken from SPRM 8 at the beginning of this article. Again, each possible track selection has a Jump statement, and since we have the bits stored here, one of these statements is true and will play the correct track that was chosen as the second track in the track selection stage.
So as you can see, we store the tracks in order and we extract them in order. This is why we know to use this particular mask on this GPRM 2 storage area. We know the answer is located here because we BitShifted the bits from the SPRM 8 selection to these 4 bits.
Once the proper track has played, it has an End Jump, as we said before, that takes us back to the ProcessorSelect script.
The rest of these PlaybackProcessor scripts work this same way. We simply adjust the Mask to focus at varying quadrants of bits inside the two storage registers: GPRM 2 and 3.
PlaybackProcessor3 uses the next mask in the key, which is 3840 in line 3. PlaybackProcessor4 uses a mask of 61440 in its line 3. PlaybackProcessor5 starts this over again because we are using the second GPRM storage register, which is GPRM 3. So PlaybackProcessor5 copies the value from GPRM 3 to GPRM 1 where the bit-wise and command is applied on line 3. Line 3 starts with the first quadrant just as we did here by using the mask of 15. PlaybackProcessor6 uses mask 240, PlaybackProcessor7 uses mask 3840 and finally PlaybackProcessor8 uses the Mask 61440.
Each time a new mask is used, we have a different set of Jump statements as you see in lines 4 through 11. Our first mask used 15. There we used 1, 2, 3, 4, 5, 6, 7, and 8 as values in the jump statements. When we used 240 as our mask, we used values of 16, 32, 48, 64, and so on. With a Mask of 3840 you will see we use 256, 512, 768, 1024, and so on where as with mask 61440, we use 4096, 8192, and so on.
So by now, you see how to shift bits and store them as we did in Part I. In Part II we extract those bits we stored and play them back. In Part III coming up next we are going to go over some miscellaneous information we had to skip over to get the big stuff out of the way. We are going to look at Menu 1 and its assigned pre-script. Menu 2 in addition to track selections features a Play Selections button as well as a Cancel Selections button, which can both be used before eight tracks are selected. This will be a fast section, and you may already feel like you have learned what you wanted to learn, which is BitShifting and Extracting.
[Top]
[ Part III ]
[ Menu 1 ]
Let's go over some of the behind the scenes things we missed earlier. Menu 1 is our First Play asset. Assigned to Menu 1 is a pre-script. Take note that line 5 sets GPRM 4 to a value of 1. The rest of these scripts set all the GPRMs we are using to clear bits. We do that so if you decide to go back to Menu 1 at anytime, you clear all the registers. We only want to run the track selections made from the Menu 2 or Menu 3 assets. The Menu 1 asset is designed to run only single tracks, and we intend that once that single track is complete, the track is smart enough to come back to Menu 1. We accomplish this by setting a GPRM 4 value of 1 so that other scripts watch and if they see this value of 1, they know that Menu 1 set that track selection in motion and so control must go back to Menu 1.
In the prior section we said that each time a track is played their End Jump settings jump to the script ProcessorSelect for further instructions. ProcessorSelect checks to see if the track was launched from the script TrackProcessor, which is our script that counts and stores the tracks selections made from Menu 2.
The script ProcessorSelect is either told to run specifically by the script Play Selections or by the End Jump setting on a track asset. In either case, look at line 2 of the script. See now how this script interacts with the Menu 1 pre-script. Menu 1 pre-script in line 5 sets GPRM 4 to a value of 1. ProcessorSelect in line 2 commands that we must jump to Menu 1 if GPRM 4 equals 1. This allows Menu 1 to play any track in its menu and have the track return back to Menu 1 when done playing. Now the other choice we have in Menu 1 is to go to Menu 2, which is what the button Play List does. So let's visit Menu 2 once more and look at what happens briefly when less than eight track selections are made. Remember, making eight track selections forces us to go to Menu 3. Menu 3 has two choices: Play Selections or Cancel Selections. We will never make it to Menu 3 if we choose less than eight selections in Menu 2. We do that to be using some of the other buttons in Menu 2 that we have not yet discussed. So back to Menu 2 we go.
[ Menu 2 ]
As we discussed at length already, each time one of the eight track selections is selected here, we run the TrackProcessor script. TrackProcessor is our script that takes the value of SPRM 8 and stores it into a temp GPRM 1 where the bits are shifted into a quadrant and stored in either GPRM 2 or GPRM 3.
Now we also have some buttons at the bottom of Menu 2. The user is allowed to go back to Menu 1 using the Back button for example. If the user goes back, everything is cleared via the Menu 1 pre-script we just went over. The cancel button points to a cancel script that is exactly like the Menu 1 pre-script with the sole exception that it returns back to Menu 2, not Menu 1. This is here in case the user makes a mistake and wants to clear the selections made, but still wishes to make selections in Menu 2.
Let's discuss the Play Selections button. Remember that if we choose eight selections we go to Menu 3 and the only buttons on Menu 3 are the Play Selections and Cancel Selelctions buttons. They are identical to these buttons here. All we accomplish by going to Menu 3 is locking the user out of making a ninth selection since that would go beyond what these scripts are designed to function with. Assume the user has made one or two selections and is ready to play those one or two selections now. The user selects Play Selections and that in turn executes the Play Selections script.
Play Selections is a small script designed to halt the current state of the TrackProcessor script and start a method of playback by setting up counters and then calling the ProcessorSelect script to pick which PlaybackProcessor scripts are needed to extract the stored selections in GPRM 2 and GPRM 3. This is exactly the same as what we discussed in Part II, except now we don't have eight track selections to extract from the GPRM storage. We only have two.
The TrackProcessor ran only twice since the user made only two selections. As a result, the TrackProcessor counter stored in GPRM 0 only made it to a value of 2. Therefore, only two tracks were stored in only two quadrants in GPRM 2.
In line 1 of the Play Selections script we copy the GPRM 0 counter value into GPRM 5, which is now a 2. In line 2, we add a value of 1 to that and make the new value equal to 3. The original GPRM 0 counter value from TrackProcessor script is now reset to 1 and we now execute the ProcessorSelect script.
ProcessorSelect is designed to run over and over until it no longer needs to run. We need it to run twice to extract the two track selections the user made. GPRM 5 held a value of 3 but as soon as we execute this script we see in line 1 that GPRM 5 is subtracted by 1, giving it a new value of 2. In line 2 we see that we check to see if Menu 1 had anything to do with us running this script. The answer is no, because TrackProcessor clears GPRM 4 every time it counts track selections. Line 3 checks to see if this script is done running. If the countdown GPRM 5 value is 0, we stop running this script. For now, we still have two tracks to extract so GPRM 5 has a value of 2. GPRM 0 holds a value of 1, which was reset to that value in the Play Selections script that triggered this script. So line 4 is correct that GPRM 0 does equal 1 and we will run the PlaybackProcessor1.
Remember that PlaybackProcessor1 adds a value of 1 to GPRM 0, then extracts only the first quadrant of 4 bits stored in GPRM 2, and then chooses one of eight tracks to play based on whatever was stored in that quadrant. What is stored there is the first track selection made. Once that track plays, its End Jump setting runs the ProcessorSelect script a second time and we are right back here.
The countdown GPRM 5 is subtracted by 1 again and now equals 1. Lines 2 and 3 are both false, and line 4 is false because PlaybackProcessor1 added a value of 1 to GPRM 0 when it extracted its track selection therefore letting us know here in this script not to return to that playback processor. This time GPRM 0 equals 2 and therefore PlaybackProcessor2 is now the proper playback processor to execute.
When we execute PlaybackProcessor2 it adds a value of 1 to GPRM 0, making it a 3 now. It then extracts the second quadrant stored in GPRM 2 and one of eight tracks is played based on the shifted bits stored in quadrant two. When that track is finished playing, its End Jump setting returns us to the script ProcessorSelect.
The countdown GPRM 5 is subtracted by a value of 1, making it zero and clear. That means there are no more tracks to play and so we do not need to run anymore track processor scripts. Line 2 checks to see if we came from menu 1, which is false, so we progress to line 3. Line 3 says goto line 12 if GPRM 5 equals a 0 and this time GPRM 5 does equal a 0. Because of this, we skip past all the playback processors left and go to line 12. Lines 12 through 15 all clear all the GPRM values we have been using. Line 16 jumps back to Menu 2 where the user was last.
The user is now back at Menu 2 and is free to go back to Menu 1 or make more selections and have those playback. Either way, we have concluded this article. Be sure to check out the scripts on your own and make use of these techniques. You now know how to store more than one value in a single GPRM and how to extract it later on.
©copyright 2004 Alex Alexzander
All Rights Reserved
|