|
   
| Tutorial: - adding glowing highlights to your video using Boris FX |
Oct 2001
Glow Video, Glow
-adding glowing highlights to your video using Boris FX-
This tutorial assumes
you have Boris FX6, or Red or Graffiti or thinking of buying
Boris FX6, or Red or Graffiti or just want to know something
about Boris FX6, or Red or Graffiti. In any event, if you read
this tutorial you are going to learn something pretty cool.
by Tim Wilson
A recent 2-pop post asked
about methods for applying glowing highlights to video, and I
offered a quick reply, which you can find here.
I wanted to offer more detail than that,
though, because adding glows to video is useful for so many applications.
I can say the same thing about the tools in Boris for creating
those glowing effects -- this is a specific use for two extremely
powerful tools that you'll be glad you know about: PixelChooser
and Apply Modes.
Although PixelChooser has been around
for a long time, Apply Modes are among the many new tools in
Boris
FX 6. That's where I'll begin, although the same features
exist in Boris
RED.
(They're in Graffiti, too, although you can generally
only use them on text and animated still images. That's because
of Graffiti's nature as a graphics tool, FX as a video tool,
and RED as a combination of FX, Graffiti, and more. For a full
look at all the Boris products, visit http://www.borisfx.com/products/.)
Choosy Pixels Choose PixelChooser
Pixel Chooser deserves its own
wacky devotional shrine website, piously and copiously cataloguing
every capability and sacred utterance, with the odd compendium
of sightings around town with mysterious escorts of indeterminate
gender. (As choosy as it is otherwise, Pixel Chooser is gender
neutral.) I may yet build such a site. For now, though, I'm going
to hit the barest of highlights on our way to adding highlights
to video.
M is for Channels
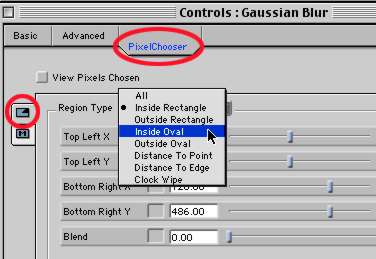
On first glance, the Pixel Chooser
doesn't look like much. The button in the upper left makes selections
based on Region - animatable garbage masks, if you will. This
ability to apply a filter to only a portion of a layer, and to
animate the size and position of that area, is one of the most
powerful aspects of Boris FX.
It's easy enough to build masks in applications
like Photoshop, but PixelChooser removes the need: it's simpler
and faster to perform the masking from within the filter. PixelChooser
also provides faster rendering by not adding another layer to
the render.
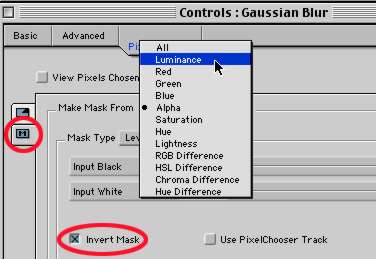
Good stuff, but I'm skipping this for now to make a selection
based on Channels. I'm assuming that the M on this tab stands
for Masks, but all you need to know is that M is for Channels.
The filter best suited to creating a
glowing effect is Gaussian Blur. But you can imagine that a high
level of blur applied to an entire layer wouldn't create a glowing
effect. It would create, well, a blur. By using the PixelChooser
to blur only the Luminance, I can create a very nice glow indeed.

Depending on the specifics of
the footage, though, I find that I can create an even more satisfying
glow by inverting the selection.

That's it! A couple of clicks to create
glowing highlights: apply a blur, and limit it to the Luma channel.
Before we move along, let me show you
a couple of other glowing highlights in PixelChooser.
Advanced PixelChoosing
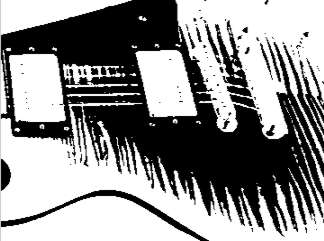
I can adjust my selection as
easily as I made it. For playing with the Luminance channel,
it can be easier to view the selected pixels. White pixels are
masked, black pixels are unmasked. I can adjust the area selected,
as well as blend the selected and unselected areas, simply by
tweaking the levels of black and white in the mask. I can also
build my mask on the threshold or range of the pixels selected,
each of which offers even more kinds of controls.
Even this is really only the beginning
of what PixelChooser can do. I can even use the channel-based
information from another layer to provide my mask! It's as simple
as selecting Use PixelChooser Track, and using the Media pop-up
menu to select another layer. Here I've used the alpha channel
from a Photoshop file to provide a mask for my blur.
Still not enough control for you? I can
go further and combine the two kinds of PixelChooser masks. I
could create an area-based mask, say, selecting everything within
180 pixels of a selected point, and combine it with a channel-based
mask to customize my selection any way I want.
This is getting a little scary, so I'll
offer a more practical PixelChooser tip before we move on. DV
footage tends to be very clean, which makes any noise even more
apparent than it would be in analog footage. Indeed, mixing analog
footage in with DV can sometimes be jarring. PixelChooser can
easily deal with this, too.
Noise is contained almost exclusively
in an image's Blue Channel, which you can see as you view each
channel independently. The pop-up menu for this is at the bottom
of the Composite Window.

Using PixelChooser to apply a blur in
the Blue channel is thus often all you need to reduce noise to
acceptable levels. If you find that this softens the edges in
your image too much, use PixelChoser to apply an Unsharp Mask
filter to the Green channel, where edge information is strongest.
(Just to spare you the sleepless nights
wondering, I'll tell you now: the Red channel contains your image's
contrast range.)
This is more than enough to give you
an idea that PixelChooser goes well beyond the range of any traditional
conception of masks and video filters. For more specific details,
check the Filters Guide PDF. It should have been installed in
your documentation folder when you installed Boris, and it's
also on the installation CD of course.
Detour to Dodge City
Remember that I told you that
you can't apply filters to video in Graffiti? It's mostly true.
In general, Graffiti is a text and graphics
tool, unlimited layers of 'em over a single layer of background
video. The manual will tell you plain and simple that you can't
filter the background video, which is why the first thing I tried
to do was exactly that. I selected the background track and added
a Gaussian blur.
While Graffiti couldn't apply the filter
to the background layer -- just like it told me in the manual
-- it DID add a filter layer to my effect. It just added it ABOVE
the background layer, And behold, the result was exactly the
same as if I'd applied the filter directly to the background!
You may have heard of adjustment layers,
and this is what they do: they filter the layers underneath them.
They act sort of like a lens that way. We don't call them adjustment
layers in Boris, though. We just call them filters. You can slide
them around anywhere you want to produce the desired effect.
In the example here, I took a very large
still image and animated its position and scale, documentary-style.
This is a small version of it, but honest, it's a large still.
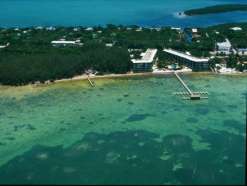
(You knew Graffiti could do animate large
stills, right? If not, get thee to the Boris website to learn
how. http://www.borisfx.com/timscorner/graffiti.php)
Take a look at the unflitered version.

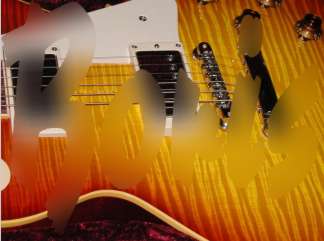
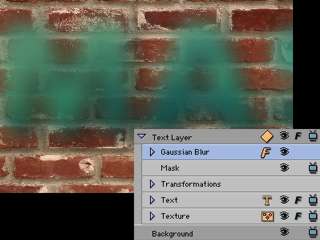
Then I used the animated still as the
texture track of some text. I'm going to take the same Gaussian
blur, and drag it to three locations.
This illustration shows you what the
blur looks like applied to my text layer. Eek. Not very nice,
but you can see that it's blurring the text.
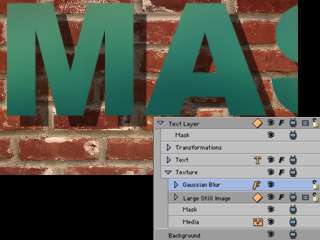
Next, I click and drag the blur layer
to the FACE of the text, but not the outline. The text itself
is nice and sharp, but the image IN the text is blurred.
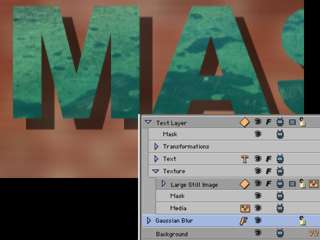
Finally, I'm dragging the blur to the
background layer. Pretty sneaky, eh?
There are limits to what you can do with
this dodge in Graffiti. You really can't add a second layer of
video, for example. Graffiti is a GRAPHICS tool, for building
effects with unlimited layers of text and still images, although
you can map video to the surface of 2D and 3D text. If you want
unlimited layers of VIDEO for your filtering pleasure, that's
Boris FX. Boris RED offers the ability to combine both unlimited
layers of text and unlimited layers of video.
For now, I'm going to continue showing
you Boris FX 6, where, for my next trick, we'll need two layers.
Apply Modes: Do the Math
Another way to add glowing highlights
is with Apply Modes. Boris applications are not the only ones
to offer compositing Apply modes, of course. Other applications
may use names like Blending modes, Compositing modes, or Transfer
modes, but the purpose is the same in all of them, to use the
mathematical values in two layers to control how those layers
are combined.
As a result, they're the key to compositing
layers, that is, controlling how the transparency of layers interact.
Apply modes are among the most important tools to grasp in at
least a general sense, if not in the daunting detail of the math.
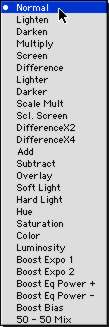
I'm not going to go into detail on all
27 Apply modes that Boris offers, including the 6 new ones that
the current generation of products adds. For that, I'll direct
you to Appendix B in the User Guide. There you'll find descriptions
of the specifics of operations with names like Multiply, Add,
Subtract and Difference. (See? I told you it was about math.)
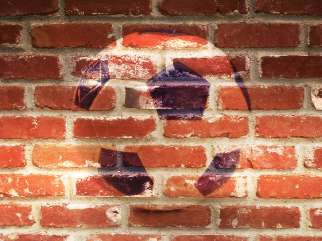
Better still, let me direct you the Keyframer,
and its famous (or infamous) ball and brick wall images. Keyframer
is a standalone effects creation utility that allows you to build
effects outside of FCP. You don't even need video: we've provided
two files, images a ball and a wall, to stand in as proxies for
video tracks in FCP.
Aside from being handy, these two files
offer an excellent way to learn Apply modes. The contrasting
luminance and hue values of the two images also provides an excellent
approach to quickly seeing the effects of each of the Apply modes,
without the unpredictable results (nothing at all, or complete
black) that can come from mixing unsuited images and modes.
Apply modes: Mix and Math
You might surmise from the word
"mode" that Apply modes are, well, modal. That is,
they're either off or on. That is indeed the case with most applications,
but not in the world of Boris. A true animation application,
FX allows modes to be animated in a variety of ways.
The ability to animate, even combine
apply modes, as well as the ability to adjust things like brightness
and contrast within those modes -- these are all among the features
that make Boris's approach to apply modes unique.
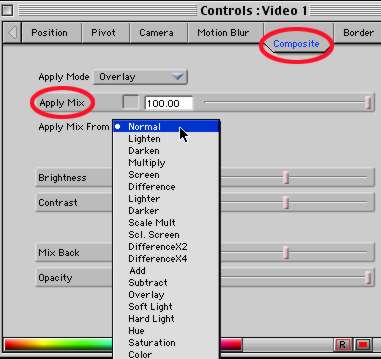
Go to the Composite tab for Video 1 and
set the Apply mode to Overlay. It does pretty much what the name
describes: it overlays the luminance values of the top layer
on the one below.
Note, for example, that you no longer
see the background of the ball layer, and that the brightest
parts of the ball image have been overlayed on the layer below,
making the wall much brighter in those areas.
Hmmm.you think the Overlay apply mode
might somehow be useful for creating glowing highlights?
One of the tricks that compositors use
with Apply apply modes is to apply them to copies of the same
layer, so let's do that now to get a practical example of mixing
modes. I'm going to use the Media pop-up menu to switch Video
2 to Video 1, and you can see the results. By overlaying the
image on itself, the highlights and shadows are both exaggerated.

That's good for adding highlights, but
the highlights and shadows areboth stronger than I'd prefer.
Fortunately, the Apply modes in Boris FX are far from modal:
I can adjust Apply modes, even animate them, in ways that other
applications simply don't allow. In this case, I'm going to slide
the Apply Mix between Overlay and Normal back to 60%. (Needless
to say, I could be mixing between ANY two modes - not just between
a mode like Overlay and Normal. But that's another tutorial.)
At this point, we have the highlights
we want, but not the glow. That's easily added with a Gaussian
Blur. You can flavor yours to taste, but in this case, I found
that a blur of 60 got me where I wanted to be.
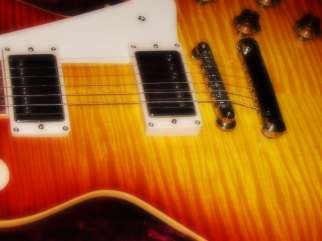
This particular recipe (Apply mode of
Overlay, 60% mix with Normal) works well for footage with more
emphasis on highlights than shadows. This is the recipe that
I applied to the same guitar footage I used earlier, for example,
and it works fine here. But you may need to experiment if your
footage varies.
For example, this cityscape required
a different approach.
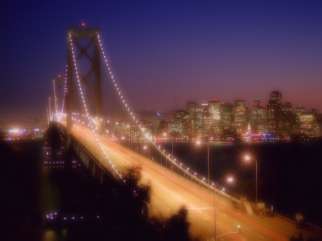
I used an Apply mode of Screen, which
effectively doubles the highlights without affecting the shadows.
I like the Apply mix of 60, which did a nice job of lightening
the image while preserving the detail. (This is much less destructive
than a typical Lighten filter, and the controls in the Composite
tab also offer much, much more control.) Since the highlights
are already quite bright at this point, a soft blur (Gaussian
Blur, 15 pixels) gave me a very pleasing result.
It's strictly a matter of preference
which method will work best for you, and it will vary from footage
to footage. While the apply modes are unquestionably more flexible,
the PixelChooser method is faster to both create and render,
because there's only one layer instead of two.
Glowing Highlights
The ability to animate Apply
modes is an exceptionally powerful tool for building dramatic
compositing effects, and it bears much more discussion than I
give it here. As with PixelChooser, I've only touched on a few
glowing highlights.
These are just a very few of the reasons
why Boris FX makes such a compelling addition to the already
very powerful compositing in Final Cut Pro. It takes the powers
of FCP and extends them.
I know that thousands of you have already started to explore this combination, and I know you'll enjoy exploring some of the possibilities I've opened up for you here. Look for more tutorials here soon, and if you can't wait, swing by http://www.borisfx.com/timscorner to take a look at some others.
Copyright©2001Tim Wilson
Tim Wilson, Man About
Town™, is the Director of Marketing for Boris FX. Before that, he used Boris daily in the production company that he owned for the past ten years. He's a frequent poster in many 2-pop forums, and speaks regularly at Final Cut Pro user groups around the country.
|