|
   
| Tutorial: - Title Creation
and Animation with 'Title 3D' and 'Title Crawl' |
April, 2002
Boris
Calligraphy: Text Generators for Final Cut Pro 3
Title Creation
and Animation with 'Title 3D' and 'Title Crawl'
By Ken
Stone
Final Cut Pro 3 ships with Boris Calligraphy,
two Text Generators, Title 3D and Title Crawl. Although they're
two separate generators, they share a number of common features,
most notably, a full-featured text entry window. Together they
help fill one of the biggest needs that FCP users have had, better
text tools.
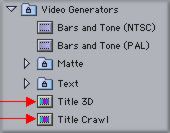
Title 3D generator is vector graphics,
the Title Crawl generator is bitmapped. When installing FCP 3
you will have the option of installing these two generators into
the Effects Browser during the FCP install process.
Title 3D
 The Boris Text Generators are used in the same manner as the
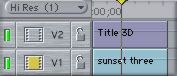
other items in the Effects Browser. You can drag the Title 3D
generator to the TimeLine on V 1. This will give you text on
a black background. You can place video or a still image on V
1 and then the Title 3D generator on V 2 to superimpose the text
over V 1.
The Boris Text Generators are used in the same manner as the
other items in the Effects Browser. You can drag the Title 3D
generator to the TimeLine on V 1. This will give you text on
a black background. You can place video or a still image on V
1 and then the Title 3D generator on V 2 to superimpose the text
over V 1.
Double click on the 3D generator
on the TL to load it into the Viewer and then click on the Controls
tab. The Boris Text window will open automatically. The "Title
3D" box at the top of the Controls Panel (shown below) can
be clicked at any time to return to the Boris Text window to
further edit your text. There are two areas where you work on
text. You set your text and apply effects, like Bevel, Glow,
Skew, in the Text window. You fly the text through space in the
Controls tab. Text window effects are not Keyframable. If you
want to Keyframe a drop shadow you would do that in the Motions
tab.

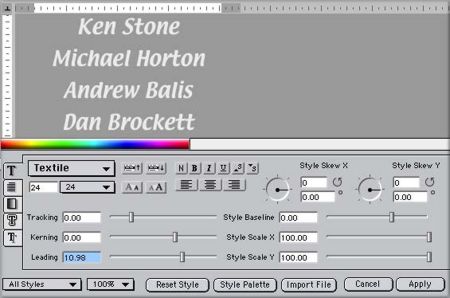
The Boris Text window is shown below with some text set and with
the text selected. Please note that for this article I have made
the text box much smaller than it actually is for better download
times. In the bottom half of the Text window, on the left hand
side, are five tabs.
The Style (Text) Tab is where you set and control your text (Red
arrow below).
- Font selection. To the right of the
Font selection box are two buttons for scrolling through the
fonts list.
- Font size, you can enter a custom font
size by typing a numeric value into the size box. Two size buttons
(Aa - aA) that increase/decrease font size by 10.
- Six Style buttons. Text can be set as
normal, bold, italic, underlined, superscript and subscript.
- Flush left, centered and flush right
text alignment.
- Tracking, which adds equal amounts of
space between each letter globally.
- Kerning, which is used to adjust the
space between individual letters.
- Leading, which controls the amount of
space between each line of text.
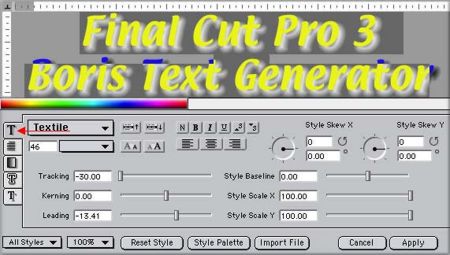
Additional controls for horizontal and
vertical skewing of the text and horizontal and vertical scaling
of the text. With the Baseline control you can raise or lower
any selected letters in relation to the non selected letters.
At the bottom of the box is an 'Import File' button. This is
for importing text that has already been typed in a word processor
application like 'simple' text. This saves you from having to
retype your text into the Text window. Imported text retains
its formatting and is fully editable in Boris. One caveat, for
Credit Rolls and Text Crawls imported text does not retain it's
full formatting. You will have to do the formatting in Calligraphy.
In order to edit text in the Text window
you must always select the text or letters of the text first,
then make your changes.
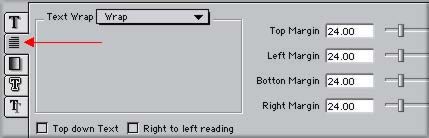
The Page Tab allows you to set the page margines as well
as control 'text wrap'. The default is to 'Title Safe', so no
adjustments are necessary if you want 'Title Safe' to be your
page size. The Text Wrap pop-up is where you set whether or not
to use the page size. If "wrap" is off, the text will
extend off to the right as far as you want, this is what you'd
do if you want to create a Title Crawl.
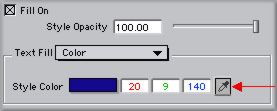
The Fill Tab is used to set the color of your text, apply
a gradient and control the opacity of your text.
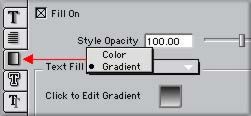
When in the color mode clicking on the
Style Color button will produce a color wheel for color selection.
You can select the color picker (eyedropper) and pick a color
from the Rainbow color bar found between the text box and the
lower portion of the window. If you click on the Rainbow with
your cursor it will turn to Black and White, you can then use
the eyedropper to sample grayscale. Interesting to note, you
can use the eyedropper outside of Boris, it will sample color
from the Canvas window or anywhere on your screen. The easiest
way to create outline text is to first turn out on 'Outlines',
then uncheck the 'Fill On' box.

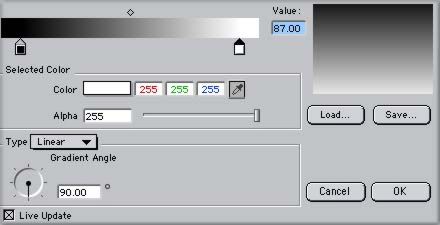
The Gradient box shown below. Linear and Radial gradients are
available.
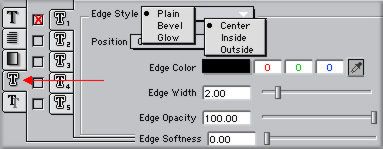
The Border (Edge) Tab allows you to Bevel or Glow/Outline
your text. You also have the option of setting the position of
these effects to Center, Inside and Outside. In Edge Style you
can apply five different effects to your text. Think of this
as five layers, each layer independent of the others. Just to
the right of the Tabs is a column of five check boxes. A box
must be checked to make that layer active (Red X). To the right
of these check boxes is yet another column of tabs, each one
for a different applied effect (T1, T2, T3, T4, T5). To switch
between effects you must click the tab of the effect you want
to work on. You can control the Edge Color, Width, Opacity and
Softness.
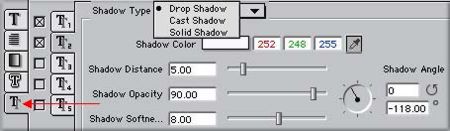
The Shadow Tab
enables you to add a Drop, Cast or Solid Shadow. As with the
Border tab above you can apply five different settings to your
text.
There are a row of buttons along the bottom of the Text window.
First on the left is the Styles button, 'Basic' shows only the
text in the window with no effects applied. This speeds up the
process when making changes. 'All' styles shows all effects but
takes a moment to render when changes are made. The next button
'Size' controls the viewing size of the text in the window, but
has no effect on the actual size of the text. 'Reset Style' returns
the settings to default, no effects applied. The 'Style Palette'
is where you name and save your settings. You can even choose
which attributes of your style you want included in your 'favorites'.
'Import File' for importing text. The 'Cancel' button closes
the Text window and returns you to the control tab in the Viewer
with none of the changes that you made since opening the window
applied. The last button, 'Apply' closes the Text window and
applies the effects to the clip which can be viewed in the Canvas
and NTSC.

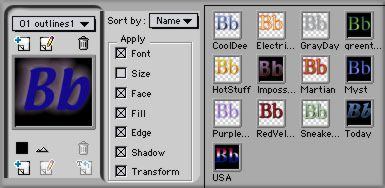
The Styles Palette, shown below, pictures
some of the 125 styles available from Boris
Calligraphy as a free download for FCP 3 users. At the Boris
Home page click on 'downloads' at the top of the page. These
styles are fully editable. As you can see below, when you save
a Style you can chose which attributes you want saved and which
ones you don't.
The Text window is where text is set
and effects are applied. This is where you create the look of
your text. You can return to this window at any time to make
additional changes. Remember that the text must always be selected
to make changes.
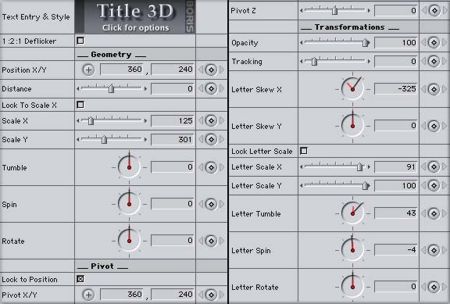
The Controls Tab
So what makes this a 3D generator?
It's the ability to fly your text three dimensionally through
space. This is accomplished by using the settings in the Controls
tab and Keyframing motion over time.
The first setting in the Controls
tab is the '1:2:1 Deflicker'. This setting is used to remove
flicker on vertically scrolling text and works by applying a
very slight one pixel blur to the text.
In the Geometry section
you can set the position of the text numerically or by using
the '+' button and clicking in the Canvas widow for placement.
The Distance control moves the text further away/closer to you.
I set some text in 48 pt. with very soft drop shadows and used
the Distance control to push it all the way back at the start
of the clip and then all the way out at the end of the clip.
I dropped this on to a sunset. The text flew out at me passing
overhead. The soft drop shadows were like wisps of clouds shooting
by. The motion was superb, smooth . . . but I digress. You can
change the Scale of the text both the height and width proportionally
or independently of each other. The Tumble, Spin and Rotate move
the text as a single unit.
The Pivot control is like
an anchor point around which the text can Tumble, Spin and Rotate.
At least one of these effects must be applied for the Pivot control
to work. Click on the '+' button in the Pivot setting and then
click and drag in the Canvas window to change the Pivot point.
The Transformations section has some of the same controls
that are found in the Text window. The difference here is that
in the Controls tab these effects are Keyframeable. The last
three items; Letter Tumble, Spin and Rotate are applied to each
letter of text.
Title Crawl
 Well, doing Title Rolls and Crawls can not be any easier than
this. No Keyframing required. Drag the Boris Title Crawl generator
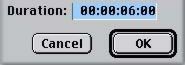
to the TimeLine. Select the generator on the TL and from the
Modify menu select Duration. Set the duration that you want and
click 'Okay'. Now double click on the generator on the TL to
load it into the Viewer. Click on the Controls tab.
Well, doing Title Rolls and Crawls can not be any easier than
this. No Keyframing required. Drag the Boris Title Crawl generator
to the TimeLine. Select the generator on the TL and from the
Modify menu select Duration. Set the duration that you want and
click 'Okay'. Now double click on the generator on the TL to
load it into the Viewer. Click on the Controls tab.
The Title Crawl Text box is identical
to the 3D Text box. All controls, tabs and effects work in exactly
the same manner.
Once you have set your text click on the Apply button, which
will return you to the Controls tab. In the Controls tab, the
first Animation setting, Animation Style, offers the choice of
None, Roll (up and down) and Crawl (from one side to the other).
The next two settings, Mask Start and End allows you to place
a mask at either the top and bottom or on both side of the screen
so that the text does not appear at the edges of the TV screen.
This might be used when your Project is in a Letterbox format.
You would not want the text to appear in the black borders of
the Letterbox.
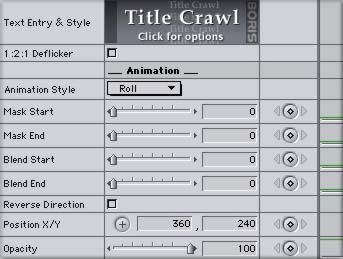
The next two settings, Blend Start and
End causes the text to fade in and out at the top and bottom
of the screen (see below). Reverse Direction does just that.
Position X/Y is for repositioning your text in the Canvas window.
You can use the '+' button and then click in the Canvas for text
placement. The last setting changes the Opacity of the text.
I said that using the Title Crawl is
easy. It is. Set the duration of the clip generator and set your
text. The generator will automatically apply the motion to your
Credit Roll. If you make changes after you have set the text,
Boris will recalculate everything for you. BTW, it now seems
that FCP 3 generators are no longer restricted to 2 minutes,
you can give a generator any length you want.
 There is an
excellent PDF document on these two Title generators that can
be found in the Extras folder on the FCP 3 CD. There is a Boris
FX support button at the bottom of the Text box which will take
you to the Boris web site for free technical support. Both of
these Boris Text generators are excellent. A real nice and much
needed addition to the Effects Browser. There is an
excellent PDF document on these two Title generators that can
be found in the Extras folder on the FCP 3 CD. There is a Boris
FX support button at the bottom of the Text box which will take
you to the Boris web site for free technical support. Both of
these Boris Text generators are excellent. A real nice and much
needed addition to the Effects Browser.
Enjoy,
--ken
copyright © Ken
Stone 2002
This article first appeared on www.kenstone.net and is reprinted here
with permission.
All screen captures and
textual references are the property and trademark of their creators/owners/publishers.
|