|
   
| Tutorial: - Basic
Capture Techniques for DV |
May, 2001
Basic
Capture Techniques for DV
NOTE: As of 5/01, this article
is appropriate for FCP 1.2+.
Any changes for v2.0 will be added at a later date.
By Gretta Wing Miller
Don't call it
Digitizing!
If you are shooting DV, it's already
digital. What you need to do is 'CAPTURE' the digital footage
onto your HD.
As with everything FCP, there are
at least a couple of methods to accomplish this. The methods
seem to parallel certain personality types, so read the following,
and pick the method that works best for you.
There is one rule that is not subject
to discussion or personality type:
YOU MUST LABEL EACH REEL OF TAPE
CLEARLY AND DISTINCTLY, AND YOU MUST ENTER THAT NAME INTO THE
'REEL...' FIELD IN THE LOG and CAPTURE WINDOW.
No ifs, ands, or buts. A cassette
without a label might as well be blank, and if you are the stubborn
personality type that must learn by experience, soon you will
record over a very important tape because you didn't label it.
Luckily, FCP won't let us get by
without entering a reel number, but it will let us get by with
using the default 'Reel 001' for every tape. Please be vigilant
and enter a unique reel number every time.

The
default Reel 001; use this only for your Reel #1!
A note on methods:
I prefer to use and teach a two-handed,
keyboard in the left hand, mouse in the right approach to editing
in FCP. If you are more comfortable using the mouse alone to
begin with, here is a substitution chart:
| Keyboard |
Mouse |
| Space Bar |
Play button |
| Letter 'I' |
Mark In |
| Letter 'O' |
Mark Out |
| F2 |
Log Clip |
| cmd-S |
File > Save |
Preparing to Capture:
Put your first tape in deck/camera.
Open Log and Capture under the File menu.
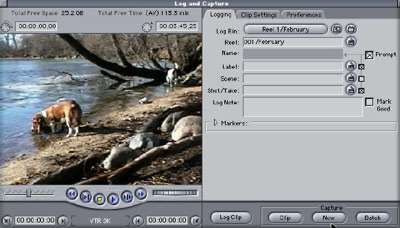
The
open Log Capture window
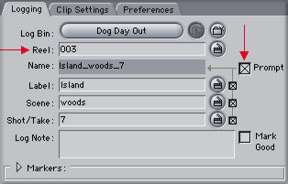
Enter the Reel name on the Logging tab,
and put a check in the 'Prompt' box.
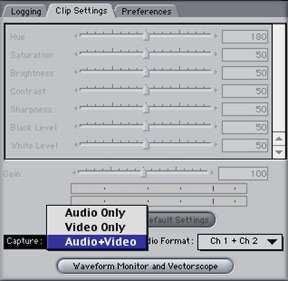
Click on the Clip Settings tab to define what you want to capture:
Audio and Video, just Video, or just Audio. The default, 'Audio
Video, ch1 ch 2' will be perfect for most situations.
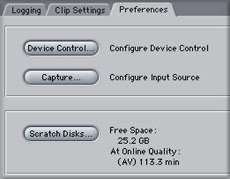
The buttons on the 'Preferences' tab are for verification of
the settings you have made earlier
when you set your Preferences (See "FCP:
An Ambitious Beginning"), or for making changes
to those settings without leaving Log and Capture.
Method 1: Classic
Log and Capture
Best for Slated, Multiple-Take
Narratives.
Spacebar to start the tape rolling, press 'I' at your chosen
In point. I would mark the In point after the slate to conserve
scratch disk acreage, using the slate as a reference for naming
the clip. When you come to the end of the take, press F2 (Log
Clip). Pressing F2 sets the Out point and opens the Log Clip
dialog.
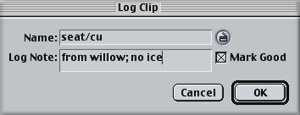
You
will get this dialog window after pressing the Log Clip button
(or F2)
if you have put a check in the 'Prompt' box.
Name it correctly, write any comment in the Log Note box, and
check the 'Mark Good' box for the takes you like best, then OK.
The tape should continue to roll, and after the next slate, mark
the next In point; F2 at the end of the take, name this take,
or allow FCP to increment the take number automatically if it
is another take of the same scene.
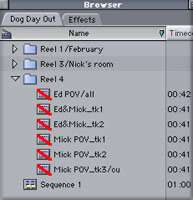
The
red line through the clip icons indicates that they are 'offline'
(not captured yet).
This method doesn't capture any clips to the HD; it creates a
comprehensive LOG, in the Browser, of all the shots on your reels.
When you have finished Logging,
you can select the takes with which you want to begin editing,
and Batch Capture only those (see below). All the takes you have
marked as good will have a check mark by them in the 'Good' column
of the Browser for easy reference.

Some
of FCP's many Browser columns. Good takes can be marked during
or after logging.
Batch Capture
With clips selected in the Browser,
go to File>Batch Capture. Choose 'All Selected Clips', and
OK.
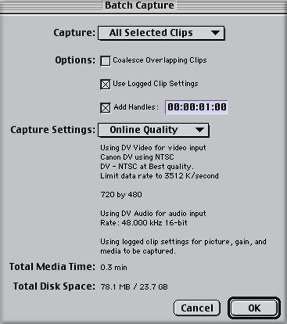
All
the information about the clips you want to capture is presented
in this Batch Capture dialog.
Handles

Specify extra seconds to be added to
the head and tail of each clip as it is captured. This makes
up for reaction time as you press your In and Out points. Your
logging should be fairly loose anyway, with at least several
extra seconds at head and tail.
On to Page Two
This article first appeared on www.kenstone.net and is reprinted here
with permission.
All screen captures and
textual references are the property and trademark of their creators/owners/publishers.
|