|
   
|
How to Create a Custom Transition in Final Cut Pro with BCC
|
March, 2004
How
to Create a Custom Transition in Final Cut Pro with BCC
Boris Continuum Complete (BCC)
Boris Continuum unlocks
the power of your NLE or compositor with an expansive plug-in
filter set that lets you create effects from the practical to
the inspired directly in your native host interface for unprecedented
workflow. Over 160 filters include advanced keying, matting,
compositing, image processing, distortion, temporal effects and
motion tracking. These filters provide the creative freedom to
animate your graphical elements or video at any speed, acceleration,
or position you want. Boris Continuum Complete works with Final
Cut Pro 3 and 4 running on the minimum spec system for the version
of Final Cut Pro that you are using.
Continuum Complete 2.0 - $595.00
By Darrin
Sayewich
It is a distinct possibility that during
an edit we may have a specific requirement for a transition.
It is also very likely that we do not have that transition available
for us to use. The simple reason for this is that it probably
does not exist. Using Final Cut Pro's powerful effects creation
and compositing capabilities, we can build practically all of
the custom transition effects that we want. If we combine this
feature with the unique and equally powerful Continuum Complete
filter plugins from Boris we have endless possibilities for effect
creation.
Custom Transition Creation
1. Create
a Cross Dissolve transition, as you would do normally in Final
Cut Pro. Between two adjacent clips drag a Cross Dissolve transition
from the Effects tab in the Browser OR: select the cut between
the two clips that you want to have a transition then go to the
Effects menu in the task bar, pull down to Video Transitions
then choose Dissolve and finally choose Cross Dissolve.
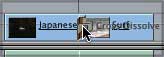
2.
Select the Range Select tool from the tool bar. (ggg on your
keyboard) Highlight a range in the Timeline starting slightly
before the transition on the outgoing clip and extending slightly
after the transition on the incoming clip.
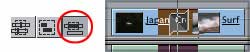
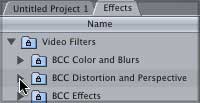
3.
Go to the Effects tab in the Browser. Click on the disclosure
triangle beside Video Filters. Inside the Video Filters bin you
will find all the BCC effects installed with a Boris Continuum
Complete installation. The best filter selection to use is the
Distortion and Perspective bundle. Many of the filters in this
bundle are easy to manipulate and generally work well in a transition
scenario. In my example I am going to use the BCC Ripple filter.
Many times we may find filters that replicate many of the transitions
that Final Cut Pro already has, but many of the existing transitions
do not have the same extensive adjustment controls that a filter
does.

4.
Drag and Drop the Filter on the selected range in the Timeline.
If your playhead is parked over the selected range, you should
see the filter effect appear in the Canvas window.
5.
Double click on the outgoing clip. (The outgoing clip is the
one with the transition at its end.) The outgoing clip will open
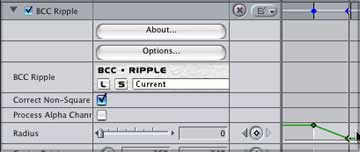
up in the Viewer. Click on the Filter Tab.
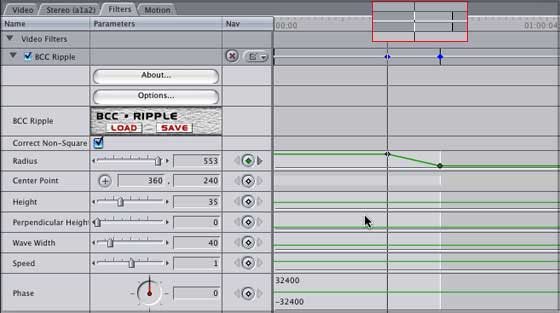
The BCC Filter will be loaded into the
Video Filters section of this tab. Notice the filter title field.
The range that you selected in the Timeline is represented in
this window by a light gray bar bounded by two black lines. This
is also the only area that the filter you applied to this clip
is actually active.
6.
Most specialized transitions are a derivative of two standard
transition types: dissolve or wipe. In this example, the cross
dissolve is actually the effect that is major part of this custom
transition. The Ripple filter is allowing for further image manipulation
that the Cross Dissolve can't give us. In the Radius field of
the BCC Ripple apply a keyframe at the beginning of the effect
(start of the light gray). Change the Radius to 0 so that the
effect starts at nothing. Go to the last frame of the clip (filter)
and change the Radius to 600 so that the image is very distorted.
(A keyframe will automatically apply because you already have
one. Any change that you make will be automatically applied.)
7.
Go to the Timeline and move your Playhead over the incoming clip.
(The clip with the transition at the beginning.) It is best to
have the Playhead close to where the transition is so you can
see a preview of what you are creating. Double click on the incoming
clip and it will load into the Viewer replacing the outgoing
clip. Click on the Filters Tab. Notice that the filter title
field is showing the selected range of this clip and thusly the
only area where the filter is active. The selected range is exactly
the same colour but at the beginning of the clip instead of at
the end. In the Radius field of the BCC Ripple, apply a keyframe
at the beginning of the clip. (Start of the light gray) Change
the Radius to 600 so that the image starts very distorted. Go
to the last frame of the selected range and change the Radius
to 0 so that the effect ends at nothing. (A keyframe will automatically
apply because you already have one. Any change that you make
will be automatically applied.)
View the finished QT Movie 80k.

Darrin Sayewich
is a Toronto based Freelance Editor/Compositor and Apple Certified
Trainer in Final Cut Pro, DVD Studio Pro and Shake. He has worked
on several corporate features, commercials, independent features
and recently consulted on a Lions Gate Films feature: Cube Zero
copyright © Darrin
Sayewich 2004
This article
first appeared on www.kenstone.net and is reprinted here
with permission.
All screen captures and
textual references are the property and trademark of their creators/owners/publishers.
|