|
   
| Tutorial: - How
to provide a link within DVD Studio Pro 2 to a File |
September, 2003
Understanding
DVD@CCESS or
How
to provide a link within DVD Studio Pro 2 to a File
Project Outline: Provide access to a file within
a DVD link. a.k.a. DVD@CCESS
Requirements: DVD Studio Pro 2
by Alex Alexander
Preface:
This project covers a simple sample of DVD@CCESS and DVD-ROM
file storage within your DVD project. If you wish to author a
DVD and provide a file or files and/or web links such as web
page or email link, this tutorial will help clear up the DVD-ROM
and DVD@CCESS functions in DVD Studio Pro 2.0
Summary:
This project will focus on providing a link within a DVD to a
PDF file that we will embed into our DVD video. A link from the
main menu will spawn the embedded PDF files to launch on a PC
or Macintosh computer that supports the DVD@CCESS function. Other
needed items such as testing your DVD through the Build and
Format functions image feature will be detailed at the end
of the project. We will also cover preference settings required
in the DVD player application for DVD@CCESS functionality on
the Macintosh. A brief detail of how the DVD@CCESS application
works on the PC is also covered.
Outline:
Our project contains two background PICT files and two PICT overlay
maps for button use, a sample track for track 1 (provided by
you), and a PDF file that will be embedded into the DVD. We will
create two menus. One for the main menu, which will play the
track 1 video and one that enters a second menu, which contains
the DVD@CCESS support.

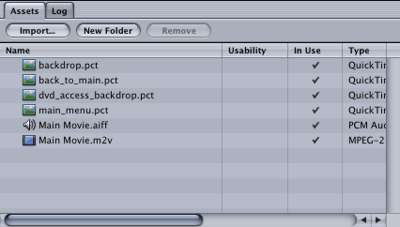
You can see from the
outline, the DVD is named, DVD and has two menu assets.
The two menus are named, main menu and pdf. The
single track for video is named main movie. DVD@CCESS
relies on the knowledge of where a file will be located on the
DVD. for that reason, it is important to note the name of the
DVD itself, as that will be part of the path link to the file
we will add later on.
Assets:
Our assets are two backdrops, one for each of the two menus,
and two PICT overlay maps, one also for each of the two menus.
I use the track element from the tutorial provided on the tutorial
DVD that came with DVD Studio Pro 2. You can use any track you
like, it simply doesn't matter for this brief lesson.
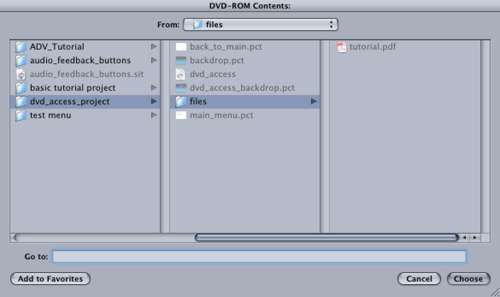
The pdf file we will
include is not an item that needs to be part of the assets, instead
it is a setting in the DVD properties section described next..
You can use any file you like, but for the purposes of this tutorial,
I use a PDF document called tutorial.pdf, which is is simply
a copy of this tutroial in PDF format.
DVD Property:
From the outline, I have
named my DVD, "DVD". Under the general tab I have selected
a DVD-ROM function and chosen a file folder which contains a
single PDF file at that folder's root. When this DVD is burned,
it will contain a PDF file called tutorial.pdf, two folders
named VIDEO_TS and AUDIO_TS as well as a folder
called DVDaccess. The URL for the tutorial.pdf file, which
will link later on is exactly file:///DVD/tutorial.pdf.
That is derived from the path of the DVD after burning. Name/file
or Name/folder/file.
In this case, the PDF
file will be at the root level of the final DVD, so the proper
URL is file:///DVD/tutorial.pdf. I have also selected
Joliet Extension Support. This is support for PC based file support.
Once we have the DVD-ROM file property created, we can move on
to creating our two menus and track asset assignments.
Track 1:
Label track 1 as main movie and drag your track asset
(.m2v file) to the track tab.
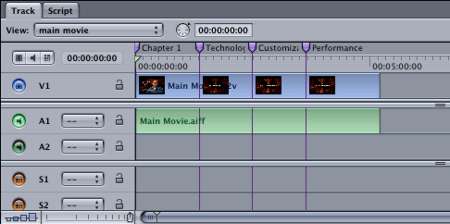
Menu 1:
Name the first menu, main menu.
Use backdrop.pct as
the background of the main menu, and select main_menu.pct
as the overlay menu.
Set the color settings
to make the overlay pct map appear. It is default black, so you
will not be able to see where to draw the buttons. I set normal
to white, level 9.

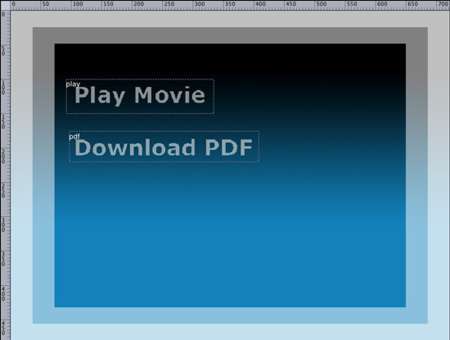
Create the two buttons
and label them, play and pdf for button 1 and 2.
Set the play button to
play the track, main movie.
Set the track main
movie to return to the menu main menu when finished.
Menu 2:
Create menu 2 and label it pdf.
The background
of the pdf menu uses the asset dvd_access_backdrop.pct
and the overlay of back_to_main.pct as the button
map.
Set the color once again
so you can create a button to go back to the main menu,(color
settings).
Under the menu tab
of this pdf menu property, you will create the link that sets
the file launch. Select the DVD@CCESS check box and provide
a name and a URL. The name can be anything you
like. It is simply there to remind you the author what the link
is for. The URL section is a case sensitive URL that uses the
created DVD as a source. Since you have not created the DVD yet,
this might be confusing. You are pre-telling the DVD where the
file will be. The DVD name itself is always in caps and I named
this DVD the confusing name of "DVD". The tutorial.pdf
file comes from the DVD-ROM settings we created on the DVD property
at the start of the project. My correct URL is file:///DVD/tutorial.pdf.
Create an option to return
to the main menu.
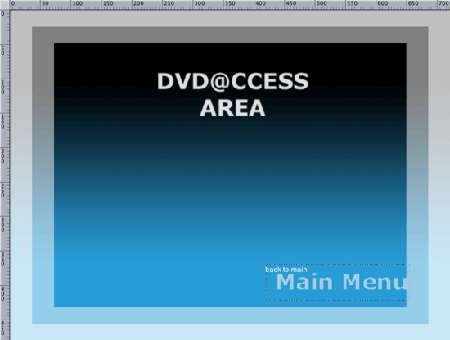
The overlay PICT file,
now visible with your color settings shows my return overlay.
Create a button over the words, main menu. Name the button
back to main, and set it to jump to main menu.
Once anyone goes to this
menu, they will automatically launch the PDF named tutorial.pdf.
You can use this area to describe the file that will launch if
you like.
Testing:
DVD@CCESS is confusing to some, so let me show you a handy way
to test your project without making lots of coasters. We will
be using Build & Format to create an IMG file
of our DVD rather than creating a real DVD. This is exactly like
burning a DVD, except an IMAGE file is created. You can then
mount that DVD image and play it with your DVD player software
and test your project.
Build & Format:
Save your project.
Select Build / Format.

You can see here the
name of the DVD is DVD.
Under Current Build,
choose where to create the VIDEO_TS and AUDIO_TS folders.
DVD-ROM Data will be
pre-filed in for you.
Output Distination is Hard Drive, not your
SuperDrive.
Output format is .img.
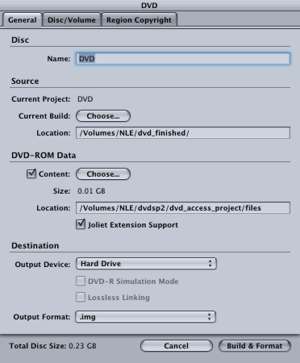
Select Build &
format.
You will then be asked
for a file name. This is for the name of the IMG file itself.
You can name it anything you like. I named mine DVD.img
DVD Player Preferences:
Once the build
is complete and you have your DVD.IMG file, its a good idea to
check your preferences on the DVD player software to make sure
DVD@CCESS is activated. Otherwise, you might believe the file
doesn't work, when it does.
Load the player software,
select Preferences and under tab Disc, Features, make
sure you have checked, the Enable DVD@ccess Web Links
option.
Mount IMG:
You can mount
the IMG file simply by double clicking it.
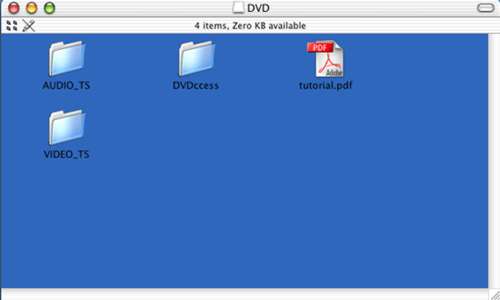
As expected, my tutorial.pdf
is at the root along with the DVDccess folder.
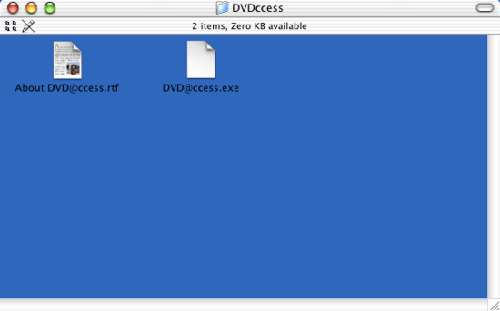
The DVDccess folder is
automatically added by DVD Studio Pro 2.0 when you add this function
to your DVD. In it is a copy of the DVD@ccess.exe program for
the PC. Be sure to read the included About DVD@ccess.rtf
file for installation and instruction information.
Final Test:
With the DVD.img mounted, play the DVD. You should see the first
menu with the two buttons. You can play the track or select the
Download PDF button. When you select the Download PD,
you should go to menu 2, i.e. pdf spawn a PDF viewer with the
tutorial file.
Closing:
You can use DVD@ccess with files or web links such as email links
or web pages on the internet. I chose to detail a file because
it is the most complex of the DVD@ccess functions. If you would
like to use a web based URL, you will not need the DVD-ROM functionality
at all. You can also use the DVD-ROM fuction without DVD@ccess.
This is handy if you simply want to provide someone with video
and file data on a single DVD.
Have fun!
© copyright
2003 Alex Alexzander
|