|
   
| Tutorial: - From Final Cut Pro to the Web |
May, 2001
From Final Cut Pro to the Web
By Ken
Stone
You have been working in FCP and
now the movie on the Timeline is finished. You want to convert
this full quality DV movie into a much smaller QT movie for the
web. Using FCP and Media Cleaner EZ that came in your FCP package
we will make a QT movie for the web. So how do we get it from
FCP to the web?
Well ... not so fast. Let's take
a look at what we are trying to do here. We want to take our
DV quality movies, which happen to be rather large in size, and
somehow squeeze them down through the telephone lines, at the
other end we want our movies to look really good. Not easy but
we have some good tools to work with.
We use a tool called a 'codec',
which is short for 'compress/decompress'. A codec is a mathematical
formula that compresses large video files down into very small
ones and then opens them back up again. Sorenson, MPEG-1, and
Cinepak are often used. These codecs work by throwing information
away, they are called 'lossy' codecs.
So how small do you want your QuickTime
file to be? Depends on how much information you are willing to
throw away. It's a trade off, the smaller the file the greater
the quality loss. While 56K is the defacto modem of today, faster
bandwidth (DSL and Cable) is here and this means that soon we
will be able work with larger files - higher quality QuickTime
movies. So how do we get it from FCP to the web?
It's a two step process. (Isn't everything)
The first step is to get the movie
out of FCP at maximum quality. The second step will be to compress
it into a small QT movie for the web. There is a very important
point to be made here. Regardless of how you export from FCP,
either as a FCP movie or a FCP 'Reference' movie, you must always
export with no compression. "Recompress All Frames"
will be UN Checked. All of the compression work will be done
in the second step using Media Cleaner EZ.
I just mentioned that there are
two types of FCP Movie. A long time ago, back when our Grandfathers
were cutting in FCP, back around 1999, there was only one type
of Final Cut Pro Movie. These FCP movies were fully self contained
versions of the Timeline movie. Media and all. Exporting several
minutes of movie will make for some rather large files. This
process does work, the quality is the same, but now we have an
easier way to export.
Since FCP version 1.2.5 there is
the ability to export as a Final Cut Pro 'Reference' movie. A
FCP Reference movie contains all the information about the movie
but none of the media. The FCP Reference movie does just that,
it references the actual media on your Hard Drive. As a Reference
movie contains no media it's file size will be very small, this
saves disk space. A FCP Reference movie also exports more quickly
then a FCP movie. There still are some reasons for exporting
as a FCP movie rather then a FCP Reference movie. The obvious
one is that it is self contained so it would be excellent for
portability or archival purposes.
Exporting from Final Cut Pro - Final Cut Pro Reference
Movie - Step One
You have to decide what you want
to export. If you want to export an entire Sequence you can simply
select the Sequence in the Browser window and export, if you
want the whole sequence, you need to make sure you have deleted
any 'in and out' points in the sequence. But this may not be
what you want. Often in our Sequences we have at the start, a
black header, FCP countdown, and 'bars and tone'. There may be
material at the end of the Sequence as well. We really don't
want to include all this material in our web movie. There will
be times when you want to export only part of your movie.
We can be more selective by setting
'in and out' points in the Timeline.
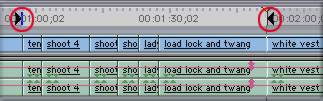
With 'in and out' points set and the Timeline active go to the
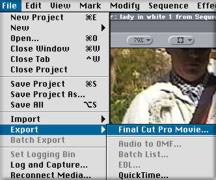
File menu > Export > Final Cut Pro Movie. If the Export
button is grayed out this means that you have not unlocked QT
Pro. To unlock QT Pro enter the QT serial number that came with
your FCP package. The serial number will be on the same piece
of paper as your FCP serial number.
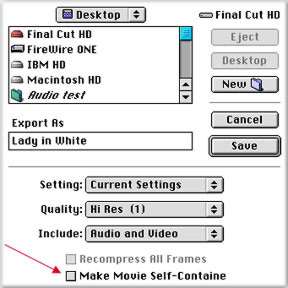
The 'Save' dialog box is set to 'save' to the Desktop. Settings
are at 'Current Settings', which means that they will be exactly
the same as your Sequence setting, this is a FCP Reference movie
after all. The Quality is at 'Hi Res', and both Audio and Video
are included. At the bottom of the box is the "Make Movie
Self-Contained" box. Leave this box UN checked. The "Recompress
all Frames" option will be grayed out. Click on Save and
your Reference movie will be exported to your Desktop. Notice
that the FCP Reference movie has the 'clap stick' icon.

Media Cleaner EZ for QuickTime - Step Two
Now that we have exported the movie from FCP it's time to compress
it for the web. Open Media Cleaner EZ and drag the FCP Reference
movie on to the EZ interface. Your video will show in the EZ
interface. First, click on your video in the EZ interface, this
will open a new window that will allow you to crop your movie
or set new 'in and out' points. Often there is a need to crop
as the edges of the video can have thin black borders or funky
pixels at the edges.
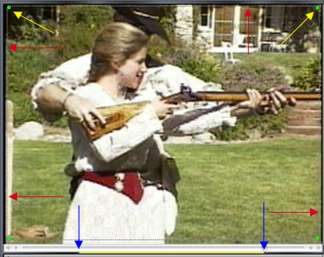
In the 'crop' window the red arrows point to the black edges that border the video, you can also see ragged pixels at the very edges. The yellow arrows point to the corners of the bounding box that you click on to drag and crop your image. The blue arrows show the 'in and out' points that you can set. Most often we set the 'in and out' points in FCP.
Once you have cropped your video
go back to the Media EZ window, shown below. From the Settings
pop up menu select "Settings Wizard" and click start.
The "Settings Wizard" will walk you through a set of
steps by asking questions and showing examples. At each stage
you will be able to pick different settings that will effect
the quality of your audio and video, all in the name of smaller
files - shorter download times.

The first Wizard box asks us what delivery medium will be used
for this movie. As this article is about the web we want WWW.

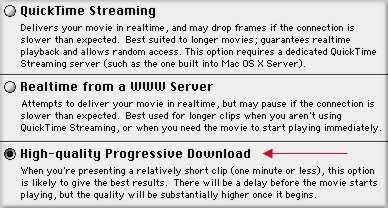
The next Wizard box asks about Delivery Style. I have chosen
"High-quality Progressive Download". My clip is short,
just about a minute and this method delivers a bit higher quality
than the other two options. If your clip runs more than several
minutes you may want to consider using "Realtime from a
WWW Server".
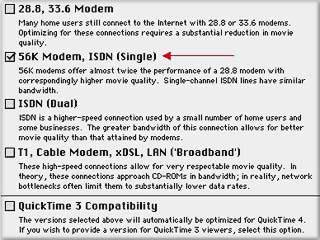
Pick the speed of the modem for your target audience. It would
be great if everyone were on DSL or Cable, but most aren't. The
majority of people are on 56K.
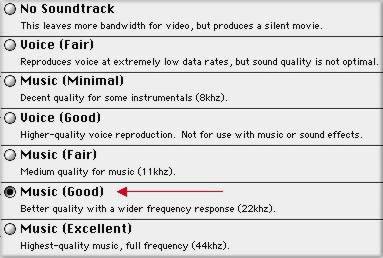
The Wizard's Audio Settings. This setting will determine which
Audio codec is used and the amount of compression that will be
applied to the audio. I always go with "Music (Good) as
I have found that it gives very decent sound. It seems that I
always have some music in my movies. If your movie is voice only
then you can use "Voice (Good), slightly smaller file size.
Video Codec. Now we chose a codec for our movie. This Wizard
box shows us samples of "H 263" and "Sorenson".
If you move your curser over the two little video boxes the demo
video will play. If you look carefully you can see the difference
between the two versions of the video. When you have made your
choice click on the codec name and the bar will turn green.

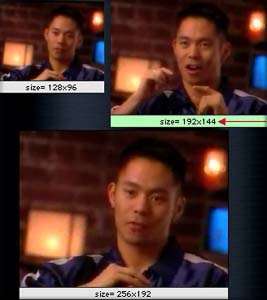
Set dimensions for your web movie. This setting, along with frame
rate below, really determine how huge your file will be. When
we were all running 28.8 modems anything larger then 128 x 96
took forever to download. (Everything took forever to download).
I think that 192 x 144 is a good compromise on frame size. Again,
if you move your cursor over the three options the video will
play a demonstration. Click on the one you want and the bar will
turn green.
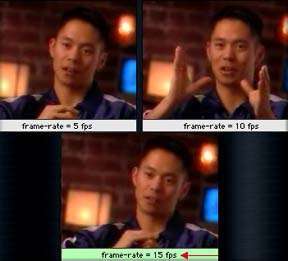
Frame Rate. Playing each one of these samples quickly demonstrates
your choice here. I have chosen 15 fps. To give you an idea of
what 15 fps looks like. With FCP running on a G3 without AltiVec,
the Canvas window plays at about 15 fps. The word choppy comes
to mind. If your movie does not have much movement you might
try 10 fps.
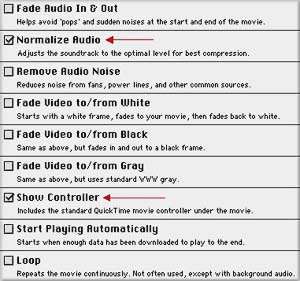
Option settings. This box is self-explanatory. I have "Show
Controller" checked, this is must. The other option I sometimes
use is '"Normalize Audio", when I feel that my audio
volume is a bit low.
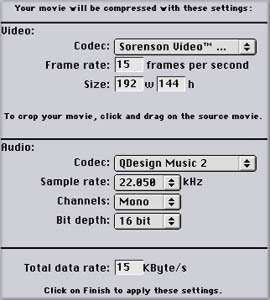
Summary. This is the last Wizard box that you can choose settings.
While it is a Summary box, each and everyone of the settings
can be changed right here. This is your last chance to fine tune
your movie.
You will now get a start box (not shown). At the bottom of this
box there will be a final summary of your settings. Click 'Start'
and you will get a Save Box. Name your movie and save it to your
Desktop.

Cleaner EZ now goes to work. You will get a message 'Initializing'
and then the 'Output' Box will appear. In the Output box you
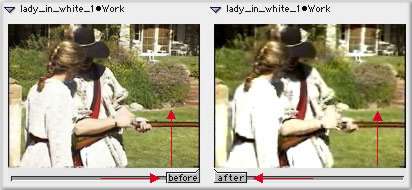
will notice a 'before' and 'after' slider.
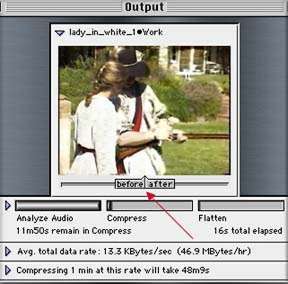
While Media Cleaner EZ is doing it's work you can move this slider
to preview what your movie will look like after it has been compressed
(shown below). Note the loss in quality in the bushes in the
background. You can see that much of the detail in the girls
dress has been lost.
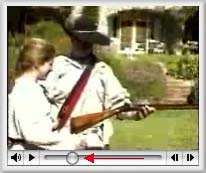
When Cleaner EZ is finished you will get a Play window in which
you can run your finished web movie.
And here is what you get. One QuickTime movie for the web and
the html tags required to place the movie on your web page.

Some thoughts.
If you are running a version of FCP older
than 1.2.5 you will not be able to make a 'Reference' movie.
It's okay. Export as a FCP movie, it will be self contained,
so your files size will be large. Just remember to UN check "Recompress
All Frames".
If you only make a few QT movies for
the web then Cleaners EZ is a great and easy tool to use. You
will need to test the process and I suggest that you work with
very short movies (15 seconds or less) for your tests. Set 'in
and out' points in your TL to test video that is typical of your
movie. Try several different settings in EZ and then play the
finished QT movies, side by side, and compare the results. You
will find a combination of settings that will work the best for
you.
If you find that you are making more
then just a few QT movies for the web or if you want more control
over the compression process, for better quality, then you will
want to move up to Cleaner 5. Cleaner 5 is the full version of
EZ. It offers much more control, flexibility, additional codecs,
and the ability to test your setting choices before you actually
compress for the web. There is a full review of Cleaner 5 at
my site (www.kenstone.net) under 'Software and Plug in Reviews'
and there are also several 'Tutorial Reviews' of products that
teach you how to use Cleaner 5.
If you do not have Cleaner EZ you can still export from FCP and compress for the web using QuickTime in a 'one step' process. There are several good QuickTime resources: "The Little QuickTime Page". Peachpit Press has QuickTime 4 and will soon be releasing a QuickTime 5 book.
Hope that this has been a help.
Enjoy.
--ken
copyright
© Ken Stone 2001
This article
first appeared on www.kenstone.net and is reprinted here
with permission.
All screen captures and
textual references are the property and trademark of their creators/owners/publishers.
|