|
   
| Tutorial: Mattes
and Masks in Final Cut Pro |
June, 2001
Mattes
and Masks in Final Cut Pro
By Ken
Stone
As you know, in FCP anything that is on
a higher Video Track (V track) will block out anything that is
on a lower V track. So why does FCP offer 99 V tracks if all
we can see is the highest V track?
Welcome to the world of 'Compositing'.
In FCP we composite (add to each other) V tracks one on top of
the other. We can make any part of a V track transparent or invisible,
and use just that part of the image that we want. We Matte or
Mask out those parts of the image that we do not want. So it
is possible to have many V tracks, each with video or images
on them and take bits and pieces from each different V track
and add them together for our final composition. We can also
apply any video effects or filters we want, keyframe, and in
general work each V track independently.
FCP is a very powerful compositing
editor with a number of tools to help us. Mattes, Masks, Color
Key, Luma Key, Borders, Text Generators, and others.
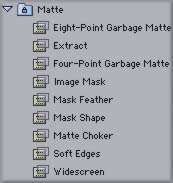
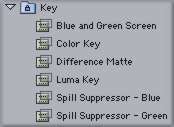
Mattes and Masks
Please note that the terms Mattes,
Masks, and Keys are often interchangeable. They produce the same
end result but work differently to achieve that result.
Mattes, Masks, and Keys are tools
in FCP that enable us to select that part of an image we want
to be seen and the parts of an image that we want to disappear,
become invisible (transparent).
To the Mattes.
For this example we will use a graphic
Landscape still image as our background on V 1. We have a video
clip of clouds moving across the sky, V 2, and want to composite
the two clips together. I have chosen Matte > Mask Shape to
do this work but there are other Mattes that would work as well.
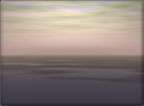
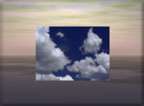
Landscape on V 1 |

Clouds on V 2 |

Completed Composition |
A graphic Landscape was placed
on V 1, a video clip of Clouds was placed on V 2.
Select the Clouds clip on V 2. Then from
the Effects menu > Video Filters > Matte, select Mask Shape.
The default setting for this Mask is Rectangle and is positioned
in the center of the screen. In the Canvas window we can now
see the effect that the Matte produces. Now we will resize and
reposition our Clouds Matte then feather the edges.
Double click the Clouds clip in the TL to load it into the Viewer.
Click on the Filters tab. There are four options for the shape
of your Mask from the Shape drop down menu: Diamond, Oval, Rectangle,
and Round Rectangle. Horizontal and Vertical Scale will size
the Matte. Click on the 'Center' button (+) then click in the
Canvas window where you want your Matte to be centered. You also
have the option to Invert the Matte.
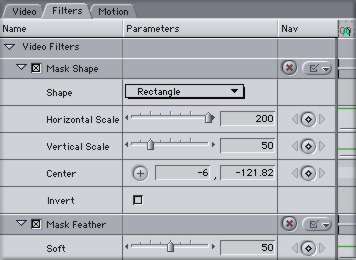
First the Horizontal Scale was set to 200 to spread the Matte
shape horizontally from edge to edge. The Vertical Scale of 50
is just about right. Double clicking the V 2 clip in the TL loads
it into the Canvas window where 'image + wireframe' is selected.
The Clouds video clip and Matte are then moved up so that the
bottom of the Clouds start at the horizon of the graphic Landscape
image on V1. You can also use the 'Center' button in the Mask
Shape box to move your Mask. Click on the Center button and then
click in the Canvas window where you want to position your Mask.
The Clouds are now positioned but there is a very hard edge between
the Landscape horizon and the bottom of the Clouds as shown in
the left picture below.
To soften the edge of the Clouds Matte,
select the Clouds clip on the TL and from the Effects menu >
Video Filters > Matte, select Mask Feather. Double click the
Clouds clip on the TL to load the Mask Feather into the Viewer
and click on the Filters tab. In the Filters box shown above
you see the Mask Feather filter below the Mask Shape filter.
As a very soft edge is desired the 'soft' slider was set to 50.
Looking at the center picture below we
can now see the effects of the Mask Feather. Looking at the horizon
in the Landscape the feathering is obvious. What is also obvious
is that the Feather effect extends downward into our Landscape
clip. Not what we want. With the Clouds clip loaded into the
Canvas window and 'image + wireframe' selected, the clip is moved
upwards until the desired effect is achieved.

Shape of clouds Mask
changed and Mask moved |

Mask Feather applied
to clouds Mask |
Clouds Mask repositioned
upward - Done |
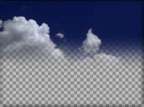
You can preview what is going on with your Matted clip at any
time by loading the clip, V 2, into the Viewer and clicking on
the 'video' tab. This will show you the V 2 clip with the Matte
and Feather applied. You can also see the area of the V 2 clip
that the Matte has turned transparent as noted by the gray checkerboard
pattern, shown below.
Now we're all done, well not quite. You will discover that first,
you can go on forever tweaking your composition and second, that
the possibilities for adding additional Mattes are almost endless.
What bothers me about my composition is that the dark blue of
the sky is too stark in contrast to the rest of the composition.
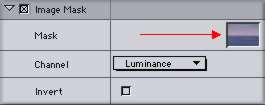
I want to replace the dark blue of the sky with a sky that I
have in a different graphic Landscape. So I will add another
Matte to the two I'm already using; Mask Shape and Feather. With
my Clouds clip, V 2 selected, from the Effects menu > Video
Filters > Matte, select Image Mask. Now I'll drag my new sky
graphic and drop it into the 'Image Well' in the Image Mask box.
Select Channel 'Luminance' from the drop down. The new sky image
will pass through and be shaped by the other two Mattes that
have applied; Mask Shape and Mask Feather. It will be sized,
positioned, and feather by these other two Mattes.
Composition with
dark blue sky |

New image dropped
into Image Well |

Composition completed with
new sky added |
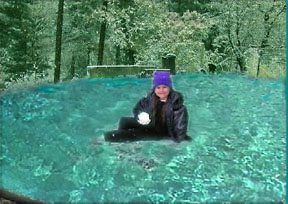
Color Key
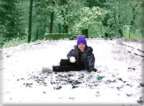
Here is Danit sitting in the snow,
which she loves, but she also loves being in the pool. Gonna'
help her out. We are going to use the Color Key filter to select
the snow (white) and turn it transparent. With the water shot
below it on V 1 we will now be able see through where the snow
was to the water below.
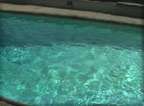
Two shots to composite, video of
water in a swimming pool on V 1, Danit in the snow will go on
V 2.
Select The Snow clip on V 2 and from the menu > Effects >
Video Filters > Key > Color Key. Now double click on V
2 to load it into the Viewer and open the Filters tab.
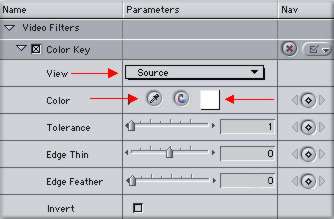
In the Color Key box the first thing we do is set the color for
our Key. Mine is set to white, for the snow. Select the eye dropper
icon and then click in the Canvas window on the color that you
want to 'key' or make transparent. Using the eye dropper you
may need to sample several times until you see that you are getting
as much of the image as possible. What is not picked up by the
eye dropper sampling with have to be added to by using the other
adjustments in the Color Key box.
The main adjustor is the Tolerance slider.
When we set a color for our key, either using the eye dropper
tool or by clicking on the color box (which produces a color
wheel or allows us to set a numeric color value), we have selected
an exact color for our key. As you know, in any field of color,
all the pixels will not have exactly the same color. There will
always be pixels that are slightly different then the color we
sampled. This is due to lighting and textural differences in
the area that we are sampling. To include more of these slightly
different colored pixels in our key we increase the Tolerance.
As the tolerance is increase more and more pixels will be included
in the key sample. As you increase the tolerance you will see
in the Canvas window that more of the area you want to key will
be included.
The Edge Thin slider will adjust the
width of the edge between what has been keyed and the image surrounding
the keyed area. You will use this adjustment to close the gap
between the two. The Edge Feather slider will soften this edge
and blend the two parts of the composited image together.
 Of real interest is the View
drop down menu offering four choices. Source, shows us our original
clip. Matte, a black and white view of the transparency layer,
black representing what is transparent. Final, which shows us
the resulting image with the key applied. And fourth, all of
the above plus the background clip on V1, all in one neat box.
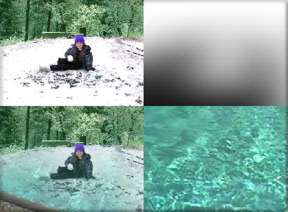
Below we see all four views, shown before any adjustments have
been made to the Color Key filter. Using this four up View is
very helpful while making adjustments in the Color Key box, however
when you are close to being done you might want to change the
View to Final which will show, in the Canvas window, a larger
and more detailed View of your composition for your final adjustments. Of real interest is the View
drop down menu offering four choices. Source, shows us our original
clip. Matte, a black and white view of the transparency layer,
black representing what is transparent. Final, which shows us
the resulting image with the key applied. And fourth, all of
the above plus the background clip on V1, all in one neat box.
Below we see all four views, shown before any adjustments have
been made to the Color Key filter. Using this four up View is
very helpful while making adjustments in the Color Key box, however
when you are close to being done you might want to change the
View to Final which will show, in the Canvas window, a larger
and more detailed View of your composition for your final adjustments.
The composite is finished. Of course when you color key you will
be using white paper for your background. BTW, you may have noticed
that the white snow ball in Danit's hand stayed white. Well it
really didn't. It turned to water just like the rest of the snow.
To make the snow ball white again I placed a copy of the original
snow clip (with white snow ball) on the next higher V track.
I then placed a Matte > Mask Shape filter on it, Oval shape,
sized the Matte around the snow ball, making the entire clip
transparent except for the white snow ball. As I said, Matte
upon Matte upon Matte.
There are many Mattes, Mask, and Keys in FCP and so many ways
to use them. In addition to what these Video Effects can do for
us, there is the ability to keyframe these effects and add any
of the many additional filters found in FCP to these effects.
The variations of what you can achieve are endless.
Enjoy,
--ken
copyright © Ken Stone
2001
This article first
appeared on www.kenstone.net and is reprinted here
with permission.
All screen captures and
textual references are the property and trademark of their creators/owners/publishers.
|