|
   
| Tutorial: Motion
Paths and the Bezier Handle in FCP |
January, 2002
Motion
Paths and the Bezier Handle in FCP
Note: This article
was written using FCP 2.0 It is also relevant to 3.0
By Ken
Stone
We have seen images move across and around
the screen in curved paths, speeding up and slowing down in graceful
motion. This animation process can be done in FCP. We can create
flowing motion with speed changes by working with motion paths
and Bezier handles.
Before we can sculpt our motion
paths we have to create them so we will animate a video clip
to work with. We will accomplish this by changing the position
of the image over time by setting Keyframes.
Animation
I am going to use a video clip
for this example but I can use any image from any source like
Photoshop. My art can be a photo, text, or anything I want.
I drop a clip onto the TimeLine
and double click on the clip to load it into the Viewer, I then
select motion tab in the Viewer. In working my example I will
use both the motion tab to set Keyframes and the Canvas window
to position my image by dragging the image to my desired position.
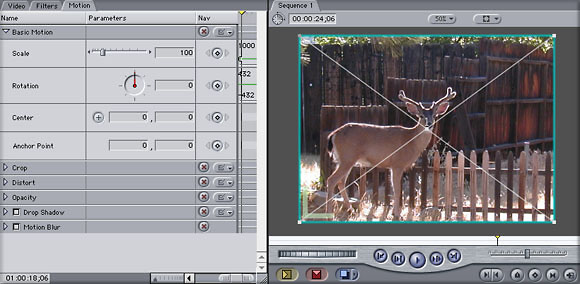
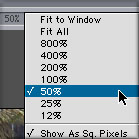
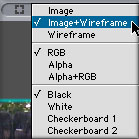
In my Canvas window I set my drop down menus to image size 50%
and 'image + wireframe'.
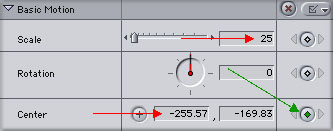
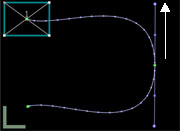
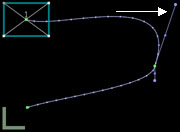
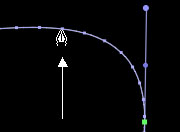
I have started by using a full video clip at 720 x 480 but in
order to be able to move it around the screen I am going to have
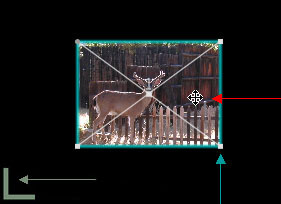
to reduce it's size. I move my playhead to the first frame of
the clip. Clicking on the image in the Canvas activates the 'image
+ wireframe'. I click on one of the four corners of the blue
bounding box (Blue arrow) and drag in until I have reduced the
image to the size that I want. Placing my cursor on the image
turns it into a move tool (Red arrow). The First frame marker
also shows (Green arrow). You can size your image by entering
a numeric value, like 25%, in the scale box in the Motion tab.
You will need to set a Keyframe by clicking on the Keyframe button
in the scale section.
With my Move tool I click and drag my image to place it in it's
starting position.

Looking over at my motion tab I can see that my image size has
been scaled down to 25%. Looking at the 'Center' section I can
see the numerical value for the new position that I have given
my image. With my image scaled and positioned and my playhead
at the first frame I set a keyframe in the motion tab in the
'Center' section, the Keyframe button turns green (Green arrow).
This will be the starting position for my animation.
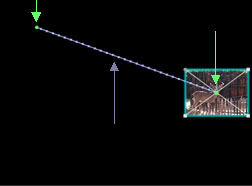
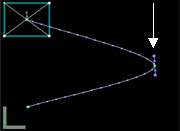
I know that half way through the clip I want my image to move
across the screen and down. In the TL I place my playhead at
the mid point of my clip. In the Canvas using the Move tool I
click and drag my image to it's second location. As I drag my
image a purple 'motion path' is being drawn (Purple arrow). When
my image is in position I release the mouse button, FCP sets
a new, second Keyframe for me (Green arrows mark first and second
Keyframes).
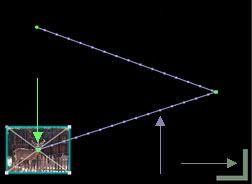
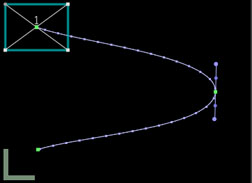
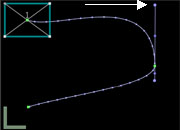
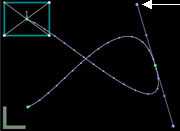
I want one last movement for my image so on the TL I move my
playhead to the last frame. Again using the Move tool I drag
my image back across the screen and position it at the bottom
of the screen. When I release the mouse button my third Keyframe
(Green arrow) is set for me. We can see that a second motion
path has been drawn between the second key frame and third Keyframe
(Purple arrow). Lower right hand corner is the last frame marker.
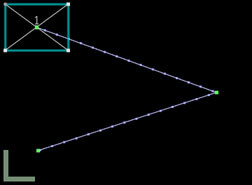
Hey, this looks a lot like Picture
in Picture without the background picture.
Motion Paths and the Bezier Handle
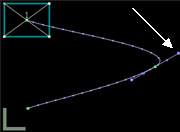
Okay, my motion path is in place, now
I can get down to the subject of this article motion Paths and
the Bezier Handle. To do this work I have changed my Canvas from
'image + wireframe' to 'wireframe'. I have my motion path but
look at it, it's ugly, no finesse. If played, the image would
start out at full speed, when it got to the end it would stop
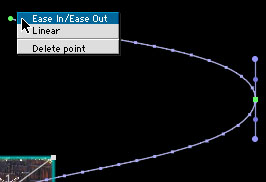
instantly. Not very real world. We will change both the shape
of the motion path and the speed of the image as it moves from
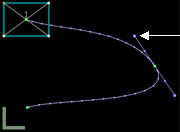
Keyframe to keyframe. Control clicking on the second Keyframe
will produce a contextual menu. From this Menu select 'Linear'.
There is our Bezier handle. You can see that the shape of my
paths has been changed from a hard angle to a curve. Better already
but still not what I want to end up with.
Shaping motion paths
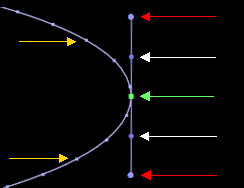
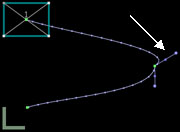
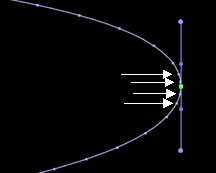
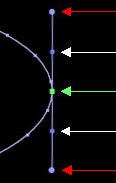
Let's look at this thing called the Bezier handle. This long
shaft is centered on the Keyframe (Green arrow). At the ends
of the handle are purple dots which I call the 'shape control'
dots (Red arrows). Closer to the center of the shaft are two
smaller purple dots that I call the 'velocity' dots (White arrows).
On the motion path are still more, even smaller purple dots (Yellow
arrows). Don't know what to call these things, Apple calls them
'ticks' but I think that 'speed bumps' would be more appropriate,
more on this later.
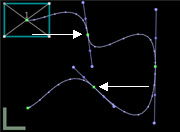
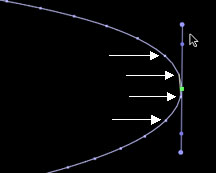
When I place my cursor on either one of the two 'shape control'
dots (Red arrows) on the Besier handle it turns into a crosshair,
I can now click and drag the shape control dot left or right.
Doing this changes the angle of the curve. I can drag the shape
control dot up or down the shaft, this changes the depth of the
curve. Think of it as being a joy stick. As you move the shape
control dot you will see the other shape control dot, at the
other end of the handle, moves equally. This enables you to shape
the motion path on both sides of the Keyframe at the same time.
Shape Control moved to left |
|
Shape Control moved to right |
Shape Control dragged up |
|
Shape Control dragged down |
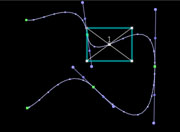
If I want to reshape only one side of the Bezier curve I can
hold down the Shift key and drag. To change the angle of only
one side of the Bezier curve hold down the Command key and drag.
To change both the shape and angle of only one side of the curve
hold down the Shift and Command key then drag. If I want to remove
a Bezier curve and it's associated handle Control click on the
Keyframe and from the Contextual menu select 'make corner point'.
This will return your Keyframe motion path to it's original shape.
Shift drag to lengthen
only one handle |
|
Command drag to change
the angle of one handle |
|
Command shift drag to change
the
length and angle of only one handle |
Clicking on the shape control dot and dragging around in a circle
one full revolution will cause the motion path to turn into a
loop, like a rollercoaster. I can also set Bezier handles on
both my starting and ending Keyframes. This will produce a one
sided Bezier handle but the controls will work the same.
Dragging the Shape Control
in a circle creates a loop |
|
Control click on last Keyframe
sets
Bezier handle on ending Keyframe |
|
Changes the shape of the
path
running to the last Keyframe |
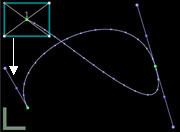
You can see that I can really create almost any shape I want
for my motion path. I can further enhance the shape of my motion
path by adding new Keyframes anywhere along the motion path.
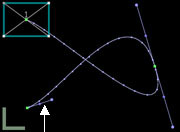
If I place my cursor on any of the small purple dots on the motion
path that I call 'speed bumps' my cursor will turn into a Pen
tool. When I click with the Pen tool a new Keyframe will be added
with Bezier handles. To remove a Keyframe from the motion path
place your cursor on the Keyframe, control click and choose 'delete
point' from the contextual menu. At any time you can place your
curson on any Keyframe and click and drag the keyframe to a new
location. As I work I often want to preview my motion path. As
I am in 'wireframe' only there is no image for FCP to redraw
to the screen. This means that if I hit 'Option' and 'P' from
the keyboard (turn snapping off) FCP will play my wireframe from
start to finish in real time without the need to render.
Cursor turns into a Pen
tool when
placed on a 'speed bump' |
|
Two new Keyframes added
to
the motion path |
|
To preview motion 'Option
P'
from the keyboard |
Changing the Velocity of the clip
When I play my clip the image will move along the motion path
at a fixed rate of speed. The clip will jump to full speed when
starting out and will come to an instant stop when it hits the
last Keyframe. I want to be able to control the acceleration
and deceleration as it approaches a Keyframe.
This is where those small purple 'speed
bumps' found on the motion path come into play. When these speed
bumps are spread out evenly along the motion path the clip will
move at a constant speed. When the speed bumps are closer together
the clip will move more slowly as it now has less distance to
travel between each bump. If the speed bumps are moved further
apart the clip will speed up as it now has a greater distance
to travel between each of the speed bumps.
Speed bumps evenly space
out
Constant speed |
Speed bumps closer together
Slower speed |
|
Speed bumps further apart
Faster speed |
I can change the speed of the clip as
it travels along it's motion path. I can accelerate or decelerate
the clip for better looking motion. But these speed changes have
to be taken in context. If my clip is 8 seconds long, then no
matter what I do with my speed, the clip will still be 8 seconds
long. If I have 3 seconds between two Keyframes the duration
will remain 3 seconds. There is no change to the duration of
the clip or the time between Keyframes. The speed changes that
I am talking about happen between Keyframes. If I start my clip
out slowly at first then further along the motion path before
the next Keyframe the clip will speed up to compensate for the
slow start. If my clip decelerates before coming to the last
Keyframe then somewhere on the motion path between the last Keyframe
and the second to the last Keyframe the clip will run faster.
For every slow down there is an equal speed up. Both events will
occure between two Keyframes.
In FCP there are two different ways to
alter the distance between speed bumps, two different ways to
change the speed of a clip. The first way is a simple 'pre-set'
that is normally used on either the starting or ending Keyframes,
or both. This is called 'ease in/ease out'. What this does is
start a clip out moving slowly at first then picking up speed
as it moves down the motion path, or slowing down when it comes
to the last Keyframe. It is available by control clicking on
the starting or ending Keyframes and selecting 'ease in/ease
out' from the contextual menu. To remove ease in/ease out control
click on the Keyframe and select 'make corner point'.
Ease in/Ease out from the
contextual menu |
Speed bumps closer together
at start |
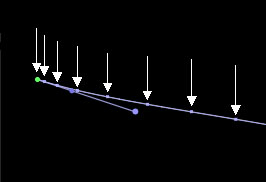
While 'ease in/ease out' from the contextual
menu is used for motion paths and can be applied in the Canvas
window we can apply this same effect to the other attributes
found in the Motion Tab. By Control clicking on any Keyframe
in the right hand side of the Motion tab and selecting 'Smooth'
from the contextual menu we will get Bezier handles for; Scale,
Rotation, and other Keyframable-able attributes.
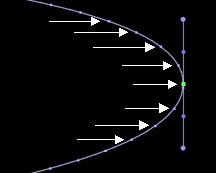
The second way to change the speed of
a clip is to use the 'velocity' control dot on the shaft of the
Bezier handle (White arrows). Placing my cursor on the velocity
dot turns it into a crosshair. If I drag up the speed bumps will
move further a part which would cause the clip to move faster,
if I drag down the speed bumps will move closer together causing
the clip to slow down.
Velocity control
White arrows |
|
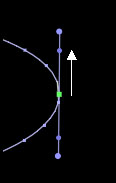
Velocity control up
bumps far apart |
|

Velocity control down
bumps close together |
I know that all this can seem a little daunting at first but
I promise you it's not rocket science. Set up a clip, create
a motion path and play with the Bezier handle, shape and velocity,
once you get the hang of it you'll have fun. Remember that you
can play your 'wireframe' in real time (Option P from the keyboard)
without rendering so you will be able to see how it looks as
you work, well, in wireframe anyway.
Enjoy,
--ken
copyright © Ken Stone 2002
This article first appeared on www.kenstone.net and is reprinted here
with permission.
All screen captures and
textual references are the property and trademark of their creators/owners/publishers.
|