|
   
| Tutorial: Line your own Nest: Basics of Nesting in Final Cut Pro |
August, 2002
Line
your own Nest: Basics of Nesting in Final Cut Pro
By Charles
Roberts
Although nesting is arguably one of the
most useful and necessary components of any compositing application,
its always shocking to find how many people really don't understand
it in a fundamental way. This is largely because nesting isn't
an effect or plugin in a filter menu. It is rather a procedural
element, a part of your workflow that makes things possible which
could not be accomplished otherwise. FCP, After Effects (where
it is called Pre-Comping), Commotion (where it is called Grouping),
and many other applications leverage the ability to build another
dimension of control into composited effects workflow.
What is it?
First, what is nesting? At least
as far as FCP is concerned, nesting is simply a sequence that
acts as a clip inside another sequence. How do you nest a sequence?
There are two ways to do this that only differ in the manner
of execution. The resulting nested sequence is precisely the
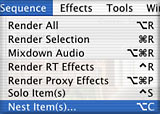
same in functionality. The first way is to select a number of
clips in a sequence and go Sequence>Nest Item(s). On this
command, FCP will ask you to name the new nested sequence, choose
a sequence preset for it (since the nest will be a true sequence)
and allow you to mixdown any audio tracks that might cause the
nested sequence to exceed the number your Mac is capable of doing
normally (you should generally do this anyway).
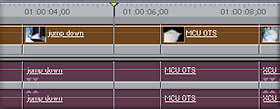

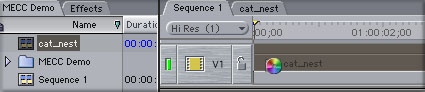
After doing this, the selected clips
will form a single clip (the nested sequence) on the Timeline
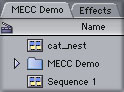
displaying the name you just used in the dialog box. An icon
for this new sequence will also have appeared in the Project
tab of the Browser window bearing this name. Want to get access
back to the clips you just nested inside this sequence? Simply
double click the nested sequence-in-a-sequence, or double click
the nest sequence in the Browser to open it in the Canvas/Timeline.
Since a nest is simply a sequence, you can always load it to
get to its contents.You can also Option-double click a sequence
to load it into the Viewer window, if you want to apply effects
to it like a clip.
The second way to create a nested sequence
is almost too easy. Simply drag one sequence from the Browser
(or Viewer if you have loaded it there) into another one in the
Timeline. There you have it; a sequence is nested in another
sequence. It is now being treated as if it were simply an individual
clip. In fact, you can do anything you would do to a clip to
the sequence, such as loading it in the Viewer and applying Motion
and Filter effects. But we get a little ahead of ourselves...
Why bother?
Once you have the concept down, its pretty
easy to put Nesting to work for you. There are two main reasons
for using nesting techniques: render order and render file protection.
Render order is of incredible importance to anyone engaged in
any sort of effects work. Remember that not all effects work
is light sabers and morphing! Something as simple as applying
a widescreen matte to a 4:3 picture or picture-in-picture effects
can be accomplished much more quickly and efficiently if one
uses the power of nesting rather than applying such effects to
clips individually.
If you have a range of clips to which
you need to apply the same effect, Nesting allows you to apply
any effect to the entire range of clips at one stroke. In addition
to speeding up your workflow from only having to apply a filter
once (and potentially remove it once if it doesn't do what you
want!), you also get the benefit of only having to change the
values of one filter to affect all the clips in the nest the
same way.

To make a bad analogy, say for instance
you are watering plants. If they are scattered all over the house,
it might take you all afternoon to apply the same amount of water
to them all. However, if you move them all into the same location,
i.e. nest them, you could probably hose them all down in less
than a minute. Same goes for clips and sequences.
And let's not forget that it isn't just
about applying effects filters. While nesting might speed up
the process of applying one filter to many clips, it is an absolutely
necessary procedure for some types of picture-in-picture and
other motion effects. Say for instance you want a sequence of
video clips you have scaled down to thumbnail size to move across
the video frame. If you tried to line up all the clips and enter
all their individual motion settings to perform this simple visual
stunt, you would quickly find that it is impossible to figure
out such values. The motion would be flawed, jerky and uneven,
if you even managed to get close to the correct values. All you
had to do was line up the clips as you want them to play in a
sequence and nest it. Then apply the motion you want to the entire
nest. This is an example of something that really cannot be done
without nesting.
When to use it
But should you always apply your effects
to a nest? To effectively use nesting as a tool, you have to
have a correct understanding of render order. Some items can
and should be nested, while others should not. What determines
this? Ultimately, you work this out by evaluating how individual
and specific the effects settings will be for each clip that
you are considering nesting.
A good example of this consideration
would be the case of applying a widescreen matte to a 4:3 picture
and performing an Offset, or pan and scan, to move the area of
the 4:3 frame into the widescreen matte viewing area. Because
widescreen's aspect ratio is different from the 4:3 video rectangle
we are used to (shorter and wider), a 4:3 picture that is cropped
to imitate widescreen offers the editor the ability to move the
4:3 picture around behind the matte and focus on different parts
of the 4:3 frame. We don't see that the 4:3 picture has been
shifted around because the widescreen matte is blocking out its
true edges. It gives the editor one more chance to tighten up
a shot that the DP either couldn't or wouldn't compose tighter
in the frame.
The amount of up or down positioning
of the 4:3 picture behind the widescreen matte is called its
Offset. Since we have this freedom to focus on the specific areas
of the 4:3 frame, we will likely want to adjust the offset of
EVERY clip individually that we are widescreen matting, until
we have it all framed perfectly. If we apply the Widescreen filter
(Effects>Video Filters>Matte>Widescreen) to a clip and
look at its Filter control tab, we see that in addition to being
able to set the size of the crop by its aspect ratio, we also
have a control to manually set an offset for the clip to get
it lined up the way we want.


Unfortunately, applying the Widescreen
matte filter to each clip, then applying individual offset settings
to each clip would be painful and slow. The key here is render
order; knowing what is more efficiently accomplished through
nesting and what is not. In this case, we would be more efficient
if we edit all the clips in order, then nest them, and finally
apply the Widescreen matte filter to the nested sequence.
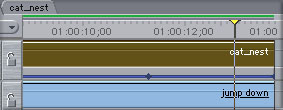
Of course we still haven't given the
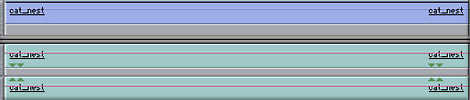
clips the individual offsets they require. Double click the nested
sequence and go back into the original nest contents. Then simply
reposition the individual clips using the good old Canvas and
Viewer wireframe tools and Motion tab settings. If you have both
Canvas tabs visible for each sequence, you will see the effects
of the motion settings of the nested sequence's contents ripple
forward and be displayed in the parent sequence tab.
To make this clear, here are the steps
in brief order:
1)
Start with a fresh sequence. Edit the clips in the order you
want them to appear.

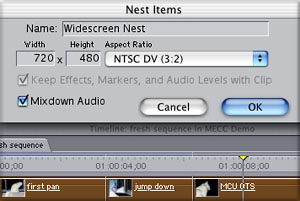
2)
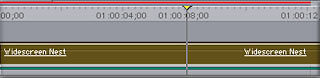
Select all the clips, then choose Sequence>Nest Item(s). Name
the nest "Widescreen Nest" and enable Mixdown Audio
3)
Select the "Widescreen Nest" sequence in the Timeline
and apply the Widescreen Filter (Effects>Video Filters>Matte>Widescreen)
4)
Double click the "Widescreen Nest" sequence in the
Timeline so that it loads into the Canvas. While it is loaded
there, tear away the tab and place it side by side with the Canvas
tab for the original, or parent, sequence so that you can observe
how the changes you make in the one window are reflected in the
next.
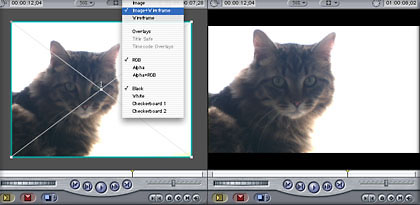
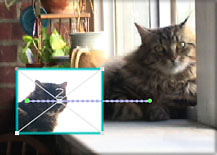
5)
Make sure that "Widescreen Nest" Canvas tab is set
for "Image and Wireframe", then make rough position
adjustments directly in the Canvas tab for "Widescreen Nest"
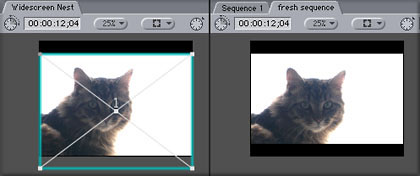
You should see the position adjustment
ripple up into the parent Canvas tab. Just make sure that you
are moving your playhead up with each clip you adjust. The best
part of this process is that if you are using an RT capable Mac
G4, the Motion tab settings for clips are RT-enabled. You won't
be able to play back the parent sequence that has the Widescreen
filter applied without rendering, but you can play back the "Widescreen
Nest" child, the offset of which is being corrected through
simple Motion tab changes that are RT-savvy.
The upshot is that we have used nesting
where it would save us an enormous amount of tedious work and
rendering, but not used it where it would have been irrelevant
or counter-productive.
The other benefit
There is another, less obvious benefit
to using nesting in FCP: Render File Protection. In FCP's media
management system, render files are maintained through their
links to a sequence. Each frame of rendered video is linked to
a specific frame in a specific sequence. This is why when you
copy a rendered clip and paste it into another sequence or project,
you have to render it again; it lost its link to the sequence,
and thus its render files.
All of us at some point or other while
working in FCP have accidentally committed an action that un-rendered
our video. Sometimes this is as simple an action as adding a
keyframe or edit point to a clip that has previously been rendered.
Even picking up a rendered clip and moving it on the Timeline
can lose the render files. When that red line jumps up on the
Timeline, our fingers go racing for the command-Z Undo!
But there is a way to make the render
file management system work for us rather than against us. When
you nest a group of rendered clips, you isolate these original
clips and their links to their render files from any form of
editing by linking their render files to the new nested sequence.
As long as you don't go messing around inside the child sequence,
the render links will remain intact. This makes it possible for
you to perform edits on the rendered material without un-rendering
it since you are really only editing the parent sequence and
not the rendered clips themselves! You can trim, keyframe and
cut away to your hearts desire, even move the nested sequence
around in the Timeline without ever jeopardizing the integrity
of the original rendered clips. Although it may seem like no
big deal, this saves tons of time-wasting renders when you experiment
a lot with clip order.
There's gotta be a catch!
That sounds just great, Chawla! Isn't
there anything negative about this powerful nesting procedure?
Well, as usual, great functionality comes at a cost. Nesting
does eat up system resources, so you have to be a little strategic
in nesting.
One of the most common issues with nesting
is that it bloats RAM usage and project file size. Every sequence
in use by a project loads into RAM. Each frame of a sequence
is actually a link back to a frame of video media on your hard
drive. As such, when a sequence is loaded into the Timeline and
Canvas, it takes up a big chunk or the available RAM, regardless
of whether you are playing the sequence back or not. Having thirty
sequences loaded up at a time can jack your RAM usage through
the roof.
In OSX, RAM allocation is performed behind
the scenes by the OS, which can result in Virtual Memory pageouts
kicking in and declining performance if you don't have enough
physical RAM to go around. In OS9, where you still have to assign
a RAM allocation to each application, having too many sequences
loaded can actually cause crashing, Type 1 and 2 errors or even
possibly project corruption. Although the conventional wisdom
is that FCP wants no more than about 200 MBs of RAM allocated,
you have to go much higher than this if you are using many sequences
simultaneously.
And the more complicated your nesting
gets, the more sequences that will have to be loaded simultaneously.
There is no real practical limit to the depth of the nesting
you can create. You can nest sequences inside sequences inside
sequences until its turtles all the way down, as the saying goes.
The problem is that all those sequences have to load into RAM,
and if you have RAM limitations, you can run into trouble.
Another problem that is common is the
speed issue. It can take a long time to load up the correct rendering
of a frame if its appearance depends on tracing its steps through
four or five nests. You will likely find that keyboard navigation
commands and device controllers like jog/shuttles and such get
a little (or a lot!) sluggish when you start getting deep into
the nests. If you don't like getting the "Preparing Video
for Display" message, well, your life isn't going to get
any simpler after you've nested eight layers deep!
Finally, the size of your project grows
with each added sequence. Each sequence you add through nesting
adds to this in project density and complexity. And if your sequences
are long as well as deeply nested, your project size can swell
all out of proportion. Sometimes the difference between a 10
MB project file and a 60 MB project file is a couple of two hour
long nested sequences. And although I don't have any hard physical
evidence, I have seen projects tank and exhibit strange errors
once they get super-bloated. Eliminating a few extra, unused
sequences usually clears up the problem.
So, you can see that some strategy has
to go into nesting. Its a powerful tool in the hands of a person
with vision and a deadline. But you have to use it where it will
help you and make sure you aren't letting it restrain you in
the process. As usual, the only way to really understand it is
to use it a few times. Practice, as always is the best teacher
there is. Have fun!
Charles Roberts teaches Video and Digital Media in the
Communications Media Department at Fitchburg State College in
Fitchburg, MA, and is the author of "Final
Cut Pro 2 for Firewire DV Editing", published by Focal
Press. He spends what little free time he has coming up with
ways to eliminate the little free time he has left.
copyright © Charles Roberts 2002
This article first appeared on www.kenstone.net and is reprinted here
with permission.
All screen captures and
textual references are the property and trademark of their creators/owners/publishers.
|