August, 2015
How To Upgrade Your Retina MacBook Pro With OWC’s
Envoy Pro SSD Kit
Solid State Drive and Envoy Pro Storage Solution
$369.99
Available HERE
For 2012-Early 2013 MacBook Pro with Retina™ Display
by David A. Saraceno
Other World Computing’s Envoy Pro SSD and USB 3.0 external drive enclosure is a unique dual-purposed upgrade for 2012 and early 2013 MacBook Pros with retina displays. The SSD and kit ships with the necessary tools to complete the upgrade process. This solution provides a faster internal SSD drive and a repurposed Apple SSD housed in a well-designed bus-powered USB 3 enclosure.
The OWC 480GB Aura Pro 6G was reviewed earlier this summer when it was tested for transfer speeds, build quality, and performance characteristics. It can be viewed here. This article recounts how to remove the Apple internal SSD drive in the MBPr, replace it with OWC’s 480GB Aura Pro 6G SSD, and install the Apple SSD in the Envoy Pro external USB 3.0 case. The process is straightforward, relatively simple, and all tools required to remove and install the drives are supplied with the kit.
The Storage Kit and SSD Drive. OWC’s kit consists of the Aura Pro 6G SSD, USB 3.0 bus-powered enclosure, carrying case, cable, installation manual, and two otherwise hard-to-find screwdrivers. The Pentalobe screw driver is specifically designed to remove the screws that secure the rear case of the MBPr. The companion Torx T-5 screwdriver is used to remove the screw that secures the MacBook Pro’s internal Apple SSD drive.
OWC hosts two installation videos at its website that demonstrate the process for replacing the Apple drive (http://eshop.macsales.com/installvideos/macbookpro_15_retinadisplay_mid12_unibody_ssd_h) and installing it in the external Envoy case (http://eshop.macsales.com/installvideos/enc_owc_envoy_pro_ssd_h/). Both are sufficiently detailed to guide the process from start to finish.
Removing Apple’s Drive. The process should take less than twenty minutes to complete. It consists of unplugging the MBPr and situating it on a soft surface with the back cover facing up. Using the supplied Pentalobe screw driver, carefully remove each of the ten (10) screws holding the back plate. Keep two caveats in mind. First, carefully remove each of the screws. The Pentalobe screwdriver is specially designed to work with these screw heads, and care should be taken not to strip any of the heads when removing them or screwing them back in. Secondly, the bottom plate of the MBPr come in three different lengths. As they are removed, separate each screw by group and remember that each must be reinstalled in the specific hole from which it originated.
Once the bottom plate has been removed, carefully remove the tab that covers the battery plate, and use your finger tip or a soft pry tool to disconnect the battery plug. The installation video indicates that should be done using a nylon pry tool, which it assumes is part of install kit. However, my installation kit did not include one I talked with OWC about this issue, and was told that the nylon pry tool no longer ships with the kit. However, my fingernail was an adequate substitute to remove the tab and battery plug.

Locate the Apple SSD drive in the middle left of the case, and using the supplied Torx T-5 screw driver, unscrew the holding screw, and slide the drive out to the left, and set it aside for a moment.
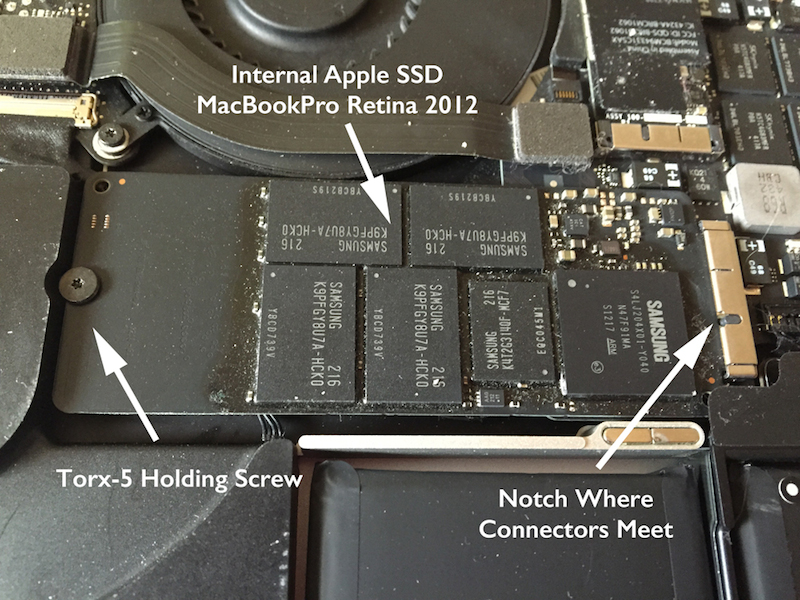
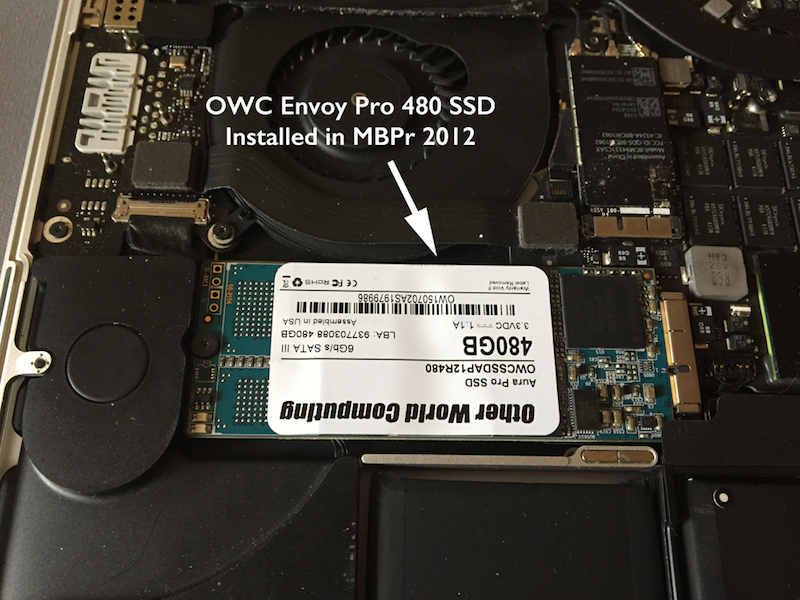
Remove OWC’s SSD drive from its anti-static bag, and carefully align the notch of the drive with MBPr’s SSD connector and slide it in. Reinstall the holding screw that was previously removed. Note that the OWC drive is covered with a paper label, and a soft cushion is attached to the bottom side of the drive. I asked OWC whether the label should be removed, and the purpose of the soft cushion. I was told that there is no need to remove the paper label, and that the soft cushion is actually a thermal pad used to dissipate heat from the drive. For this reason, do not remove the thermal pad.
Reattach the battery connector and its cover tab. Refasten the bottom plate using the Pentalobe screw driver taking care to carefully fasten the screws in the exact holes from which they came and not to over tighten them.
Installation of Apple SSD in OWC’s Upgrade Enclosure. Remove the two Torx T-5 screws on the bottom of the enclosure, and separate the top and bottom halves of the drive. Locate the holding screw in the interior of the case, and remove it. Then align the notch of the Apple SSD to correspond with the notch in the OWC connector and gently slide it in. Secure the drive with the holding screw, replace the top half of the enclosure, and secure the two screws previously removed. OWC provides a small rubber foot with an adhesive backing that can be attached to the bottom of the drive.
You’re done.
Thoughts. As installation procedures go, this one is spectacularly simple. However, keep in mind that there are several checklist points that should be observed. First, discharge any static before starting the process, and work on a soft, antistatic surface. Second, carefully remove the screws holding the bottom plate with the Pentalobe screw driver. Separate the three different length screws into groups, and replace them in the correct screw holes when you have finished installing the OWC SSD. Make certain to align the notch of the OWC drive with the internal connector. Do not over tighten the case screws when replacing the backplate.
OWC provides an excellent library of installation videos for all of its user installable products. The two that correspond with these products are both done fairly well, and each includes written instructions (PDF) with corresponding photographs.
The Envoy Pro SSD carries a five year warranty, incorporates some excellent performance enhancing protocols as detailed in the earlier review, and offers a well-built, fast, stylish external USB 3 enclosure for repurposing the Apple SSD. In this case, it is definitely a win-win-win.
copyright © David Saraceno 2015
David Saraceno is a video editor based in Spokane, Washington and contributes articles to various on line videography centric sites such as lafcpug.org and dvxuser.com, where he moderates. He has written for DV Magazine, AV Video, MacHome Journal, and many local, state and national legal technology publications.