|
   
| Sizing and Scanning
Photographs in PS for import into FCP |
August, 2001
Sizing and Scanning
Photographs in PS for import into FCP
By Ken
Stone
They say that a photograph is worth
a thousand words, true, but photographs also come in a thousand
different sizes, shapes, and aspect ratios. So how do we get
all these differently formatted photographs to fit into a 720
x 480 box for FCP? Well....it takes a lot of work.
Photographs can have three different
formats (aspect ratios). 'Landscape' which is wider then it is
high, 'Square', and 'Portrait' which is taller then it is wide.
Of the three, Landscape comes the closest to the 720 x 480 shape
and is the easiest to work with. So lets start with a Landscape
shot.
Prepping for the Scan
While I am starting off with the
scanning process, the steps of sizing and cropping photos in
Photoshop for FCP will still apply even if you already have the
images in your Mac.
We have to look at the photograph
and decide what part of the image we want to use and how we are
going to scan it to provide us with an image that we can fit
into a 720 x 480 space.
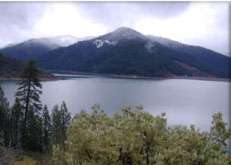
Looking at my 8 x 10 landscape
below I have decided that there is too much foliage in the foreground,
it pulls my eyes down from the mountains and lake. I don't want
to use this part of the shot, the part below the red line. I
placed the red line in the photograph to illustrate the approximate
place that I want to crop.
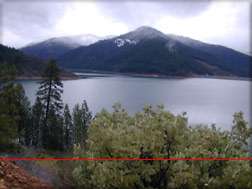
I place a ruler on the photograph and measure from the top down
to the red line which is 7 inches. Since we are working in pixels
we might as well convert to them now. There are 72 pixels in
an inch. 7" x 72 pixels = 504 pixels . I am working with
DV FireWire. I am sure that you know that our first height target
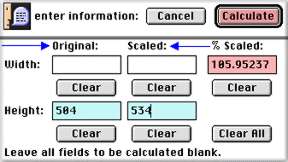
size for DV FW is 534 pixels (Photoshop to FCP article). But we only have 504 pixels, so we are going to have to enlarge the photograph while we scan. To calculate the % to use in the scanning process I have a great little tool for you. Proportions, it's Freeware for the Mac.
When we calculate the % figure for a
scan we work with only one dimension, height or width. In this
case we are using the height. In the Proportions box in the 'Original'
Height box I am going to enter 504, the actual size. In the 'Scaled'
Height box I am going to enter my finished size of 534. Clicking
on the 'Calculate' button produces the % increase that I need
to use for my scan: 105.95237%. Well....... we don't need to
be that accurate. In fact you always want to overscan just a
bit to give yourself a little room to maneuver. I would scan
at 108%.
Ready to Crop
With the photograph scanned at 108%,
72 dpi and open on the screen, from the PS File menu, open a
new file and enter it's Width as 720 and Height as 534. Click
on the photograph to make it active and then from the keyboard
'command + a' to select all, 'command + c' to copy it to the
clipboard. Now click on the new, empty file to make it active
and from the keyboard 'command + v' to paste the photograph into
the new file. Yes, I know that it is too big to fit, that's the
point.
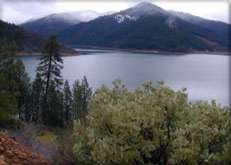
What you may see |
|
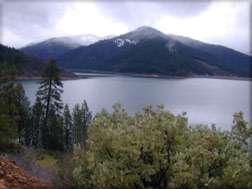
What is actually there |
After you have pasted the photograph into the new file, the photograph
will not be in the right position, that's okay. You can move
it around to position it (the whole point of this exercise).
You can use the arrow keys on the keyboard to move it; up, down,
left, or right. Each time you hit the arrow key the image will
move one pixel. Hold down the 'shift' key while using the arrows
and the image will shift in 10 pixels increments. You can also
select the 'Move' tool from the PS Tool palette, click in the
image and drag to the desired position. In this case I shifted
the photo down to crop out some of the foreground and show the
complete sky. I also moved it to the left to crop out the brown
area at the bottom left of the photo. Because the scanned image
is bigger then the 'window' we see it through (720 x 534) we
have extra image to work with and can position it for the best
crop.
Save the file (saving the file will perform the crop). Now from
the Menu > Image > Image Size. Uncheck the 'constrain proportions'
box and change 534 to 480 in the Height box. Hit okay - Save.
Your photo should now be squashed down and ready for import into
FCP.
Square peg in a round hole, or prepping Portrait formatted
photographs for FCP.
Unlike the Landscape format which has
about the right shape for FCP, the Portrait format is completely
wrong. The Portrait has height when we need width. By the time
we enlarge the narrow width out to fill 720 pixels the image
is way too tall for our 534. This always calls for major cropping
top and bottom.
For my Portrait formatted example I have
picked a portrait. This is about the hardest subject to work
with.

When dealing with Portrait format we need to measure the width
of the photo, convert it to pixels and then using the Proportions
tool, enlarge it out to 720 pixels, plus a little extra for overscan.
Repeat the process above, open a new file in PS at 720 x 534
and then paste the scanned image into the new file.

What you may see |
|

What is actually there |
Using the Move tool or the arrows on the keyboard to move the
image into it's final position.

Save the file. Now from the Menu > Image > Image Size.
Uncheck the 'constrain proportions' box and change 534 to 480
in the Height box. Hit okay - Save.
There is no simple or easy way to do
this process. Each photo is unique and therefore each photo will
have to be measured, sized and cropped according to it's needs.
In this article we have been working at 72 dpi. If you plan on
enlarging the photo or doing a 'pan and scan' in FCP, your image
will need to be worked from the start at 300 dpi, but everything
else will be exactly the same.
If you are working with images that are already in your Mac you can turn on Rulers (you can set the Ruler to pixels in PS Prefs - Units) which will help guide you or you can use this neat little Mac Freeware Screen Ruler to measure your photos. The Screen Ruler only works at 72 dpi.

Enjoy,
--ken
copyright © Ken Stone 2001
This article first appeared on www.kenstone.net and is reprinted here
with permission.
All screen captures and
textual references are the property and trademark of their creators/owners/publishers.
|