Preface
The purpose of this tutorial
is to illustrate how to create a setup menu that allows the user
to activate varying audio streams and subtitle streams as well
as to turn off subtitles. In addition, our setup menu will feature
a special resume function. The special feature here is that our
resume play is going to first check to see if a track can be
resumed, and if so it will resume play of that track; otherwise,
the resume function will simply take the user to the main menu
from the setup menu.
Selecting audio and subtitles
has been simplified in this tutorial so that scripting these
two aspects will not be needed. However, we will go over how
to script the special resume function in order to give your project
a more professional feel.
We'll go over three registers.
1. SPRM 8 (Menu selections
parameter).
2. GPRM 0 (User defined - menu selection processing and SPRM
8 conversion for GPRM-based menu buttons).
3. GPRM 1 (Used to determine whether the resume function will
resume play or go to a selected menu).
GPRM 1 will be used to
serve two functions:
1. GPRM 1 = 0 means a
track has finished playing or has not played.
2. GPRM 1 = 1 means a track is in progress, but has been interrupted.
Project Structure
Main Menu
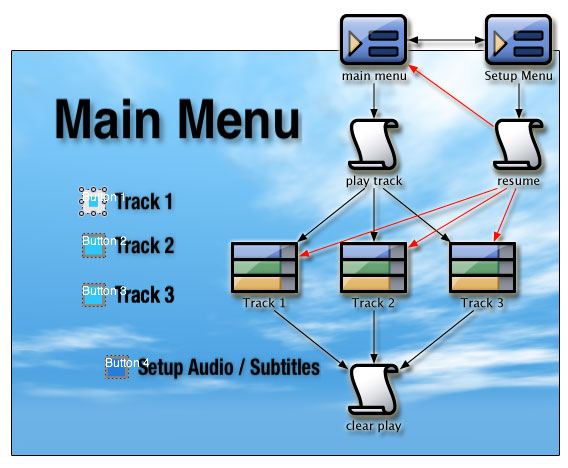
The Main Menu of this
project has been designed in such a way as to keep tabs on when
a track has been asked to play. We do this through the use of
scripts. Take a look at the image below. You will see that the
Main Menu points to a script called "play track" as
well as the setup menu called, "Setup Menu".
In turn, the script "play
track" points to three track assets called "Track 1",
"Track 2", and "Track 3".
As you can see looking
at the image of the Main Menu asset, I have four buttons. You
would correctly assume that the buttons labeled "Track 1",
"Track 2", and "Track 3" would lead directly
to those corresponding track assets.
In this project, we will
make use of a script which will accomplish a few tasks for us.
It sits between the Main Menu asset and each of the three track
assets. The job of this script is to set a value to GPRM 1, which
will serve as a marker that a track is in play, then play the
track that has been chosen by the user. We will later use this
information as part of our resume function in the setup menu.
Take note that the Main
Menu also links directly to the Setup Menu. Notice that in doing
so, the script "play track" is not used.
Setup Menu
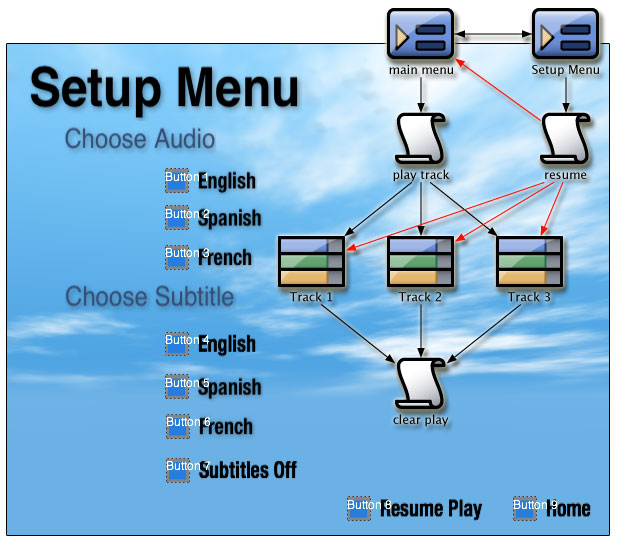
Here is our setup menu.
I have another image of the project structure over the setup
menu to help keep the structure of this project in mind. Notice
that the setup menu links to a script called "resume",
as well as the Main Menu.
There is a lot more going
on in this menu. These audio buttons and the subtitle buttons
all set up specific audio and subtitle streams. We'll go over
this in the second half of this tutorial.
Notice that the script
"resume" has four red arrows. One leads to the Main
Menu, and the other three each leads to one of the three track
assets. These red arrows are meant to illustrate that this resume
script will make a choice. It will decide if a track is in play
and eligible for the resume function. If it is, then it will
resume play of any of the three tracks that may have been in
play. If, on the other hand, no track was in play, then the resume
function is not eligible and the resume script will send the
user back to the Main Menu.
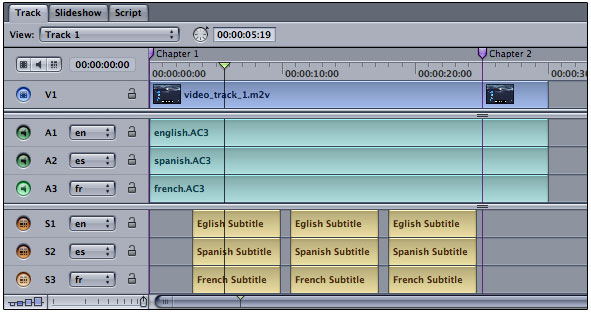
Track Asset
This is a sample of one
of the three tracks. This track asset has three audio streams
and three subtitle streams. This corresponds to the Setup Menu's
ability to set up these varying audio and subtitle streams.
Notice to the right side
of A1 and S1 that each of these audio and subtitle streams is
marked with their country code: "en" for English, "es"
for Spanish, and "fr" for French.
This is the basic structure
of the project. With that in mind, this project is broken down
into two sections.
1.
How to create a smart resume function that will resume only if
eligible.
2. How to, in
the setup menu, allow the user to choose between the available
audio and subtitle streams as well as resume eligible tracks
with the resume function.
-Section
1
How to create a smart
resume function that will resume only if eligible.
Look at the example image
below of a DVD project.
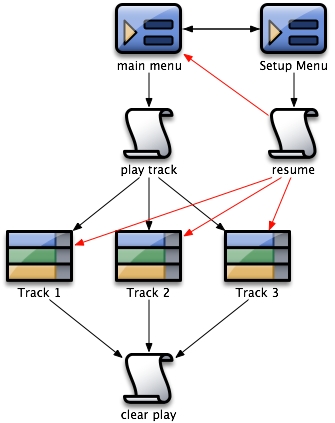
Take note again of the
main menu, which links to three tracks and a setup menu. That's
what the user sees, anyway. In truth, the main menu leads to
just a script to play track selections and the setup menu. So
we have four buttons on my main menu.
Buttons one, two, and
three appear to the user to go to tracks one, two, and three,
but each of these buttons is assigned to a single script called
"play track". The play track script processes which
of the three buttons have been selected and adds a numeric value
to a register as a marker before processing the user-requested
selection.
The fourth button on
the main menu goes directly to the setup menu. So again, if you
look at the image, you see that the main menu leads to a script
called "play track" and to the setup menu.
The purpose of this value
we have created is to act as a flag that a track has been requested
to play. So just before the track actually plays, we have set
a value. We will erase that value after the track is finished
playing using the track's End Jump property and another tiny
script. This way, if a user interrupts the full playback of the
track by hitting the menu button on the remote control, then
the value will not have had the chance to erase itself. The track
will remain "IN PLAY", so to speak. It is this "IN
PLAY" status that makes the track eligible for the resume
command in the setup menu.
Let's take a look at
the "play track" script and see how this functions.
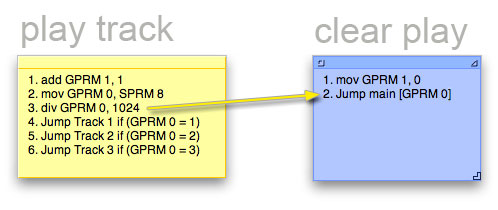
SCRIPT: play track
1. add GPRM 1, 1
2. mov GPRM 0, SPRM 8
3. div GPRM 0, 1024
4. Jump Track 1 if (GPRM 0 = 1)
5. Jump Track 2 if (GPRM 0 = 2)
6. Jump Track 3 if (GPRM 0 = 3)
There are three registers
in use here:
1. SPRM 8 is the last
button selected.
2. GPRM 1 is a counter that adds a value of 1 to itself before
a track is called.
3. GPRM 0 is a copy of SPRM 8, which we divide by 1024 to get
a value of 1, 2, 3 depending on which of the first three buttons
were selected in choosing tracks one, two, or three.
So basically, we are
setting up a flag in GPRM 1, which we will look for later on
in the resume script in the setup menu. I am using GPRM 1 to
say that the user has requested a track to be played. Before
that, the register GPRM 1 just equaled zero.
So a flag is set, then
we look at which button was selected to get to this script. It's
either one, two, or three since the button targets for buttons
one, two, and three are this script. The answer can never be
any other number.
In line 1, we use the
"add" command to assign a value of 1 to the register
GPRM 1. This is our flag that a track is about to be played.
Again, we will erase this value when the track is finished playing
by using the End Jump of each track in the project to execute
a script that clears the value. That script is called "clear
play".
In line 2 we copy the
value of SPRM 8 into GPRM 0. Remember, GPRM 1 is our flag register.
So we are introducing a whole new GPRM register. The job of this
register is to convert the track selection into a simple number,
such as 1024, 2048, or 3072.
In line 3, we convert
those longer numbers of 1024, 2048, or 3072 into a more easily
managed number by bit-shifting those potential values into 1,
2, or 3. We do this by using the "div" command.
If the SPRM 8 register
value is 1024, it is now simply 1. If it is 2048, it is now simply
2, and if it is 3072, it is now just 3.
In lines 4 through 6,
we launch the track that the user selected. It is either Track
1, 2, or 3.
We have now created a
situation in which if a track is in play and the user were to
hit the menu key on the remote control, GPRM 1 will hold a value
of 1 and we will know that a track has started to play but never
finished playing. This means that whenever we have a value of
1 in GPRM 1, the resume function is eligible to resume play.
Without that, we know we should not execute a resume function
because there is nothing to resume.
This is what happens
when a track is called to play. We said that when a track is
finished playing, we will erase this flag register in GPRM 1.
This is accomplished using a script called "clear play".
We call this script by setting the End Jump property of each
track to the script "clear play".
Let's take a look at
the "clear play" script.
SCRIPT: clear play
1. mov GPRM 1, 0
2. Jump main [GPRM 0]
Line 1 clears GPRM 1,
which is used as our flag register.
Line 2 is more complex.
GPRM 0 still holds the calculated value of the last menu selection
made when we asked a track to play, and so we are using a GPRM-based
button to call that last button highlight from the menu called
"main".
There are really two
ways to do this. The script "clear play" could call
each button specifically with commands such as Jump Main::button
1 if (GPRM 0 = 1). We could do that three times, once for each
of the three possible answers of 1, 2, or 3. A GPRM-based button
is basically like saying: Jump to main, and highlight the button
that corresponds to the value held in GPRM 0. It is a much shorter
way of saying essentially the same thing.
The GPRM-based button
is a function of the Jump command, as you can see here in the
script command builder.
Note the red arrow, which
points to the Command selection menu, is currently set to Jump.
The green arrow designates
the jump target which is the menu called "main".
The blue arrow designates
this Jump function as a GPRM-based button.
The yellow arrow designates
which of my own registers to draw the button value from.
When using a GPRM-based
button as we are, we want to jump to the button values of 1 through
36. SPRM 8 holds the values as 1024 for button 1, 2048 for button
2, and so forth. In the original "play track" script,
we converted the SPRM 8 values from 1024 for button 1 to just
1 for button 1, and so forth. This has allowed us to use this
simplified script to clear the track in play flag and return
to the proper menu and highlight in just two lines of scripting
code.
We are concluding the
first half of this tutorial. We see how to set a flag now that
we will use with a resume function that we have in our setup
menu. Our main menu goes to either the tracks or the setup menu.
What we have done so far is explain what happens when we go to
a track.
When the track is in
play and interrupted, we maintain the value set before the track
is played. This value is stored in GPRM 1. If the track finishes
its play, then the value stored in GPRM 1 is cleared using the
"clear play" script set by the track End Jump property.
That leads us to the
setup menu. From the main menu we can go to the setup menu to
various tasks. Let's now begin Section #2.
-Section
2
How to, in the setup
menu, allow the user to choose between the available audio and
subtitle streams as well as resume eligible tracks with the resume
function.
Our setup menu gives
the user the choice of audio streams and subtitle streams in
which to play. In addition to this, we want to give the user
the opportunity to resume play of an already playing track. That
means that if the user is in the middle of playing a track, then
decides to use the menu key on the remote control in order to
change the audio and/or subtitle, the user will have an option
to resume the play of the track where they left off.
Let's look over a track
asset with optional audio and subtitle streams to understand
how we will be tapping into these streams within the setup menu.
We have three basic areas
here.
1. Video
2. Audio
3. Subtitle
When we start to use
the Property Inspector for our menu, we will use the advanced
tab to set the streams for each button assignment. The streams
section will directly correlate with these three sections using
the following terms:
1. Angle
2. Audio
3. Subtitle, which as an optional check box called "View",
which forces the subtitle stream to activate.
Take a look at the graphic
above. Here we have the setup menu. Let's go over the basic method
in which this menu functions. We start with choices for setting
the audio and subtitle streams. We then have our Resume Play
button, and then the Home button.
Let's start with the
audio.
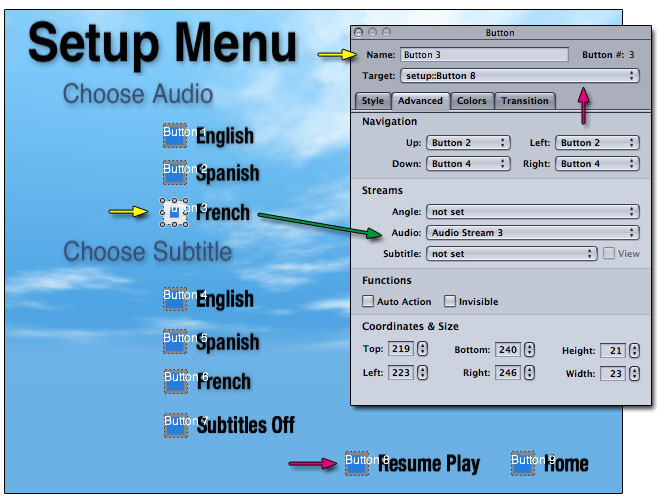
Note the yellow arrows.
There are two of them. One points to the menu button French,
and the other points to the Property Inspector's Name field.
You can see that the Audio French button is Button #3.
Look at the purple arrows.
There are two of those.
The one on top points
to the Property Inspector's Target field. It is pointing to "setup::Button
8". Now look at the second purple arrow at the bottom. That
arrow points to the setup menu's "Resume Play" button,
which is also button #8.
Now take a look at the
green arrow. This arrow is pointing to the Property Inspector's
Audio Stream field, which is currently set to Audio Stream 3.
Notice the French audio button is pointing to that setting of
Audio Stream 3.
From these arrows we
can see that the French button in the "Choose Audio"
section of the setup menu is to target the same menu we are in,
but a different button. When we press the French audio button
we highlight the Resume Play button and set the Audio Stream
to Audio Stream 3.
Audio Stream #3 is the
French audio stream we saw in the track outline graphic above.
What this method does
is allow the user to set the default audio stream and remain
in the same setup menu. This way the user is free to resume play
or to make another choice. With this setup menu, any track the
user now plays will use the default audio stream of #3.
The Spanish button and
the English button above the French button work exactly this
same way. They too target the Resume Play button at the bottom
of the menu, and they both set their respective audio streams
of 2 and 1.
Let's look at the same
menu, but this time let's look at the way we work with subtitle
streams.
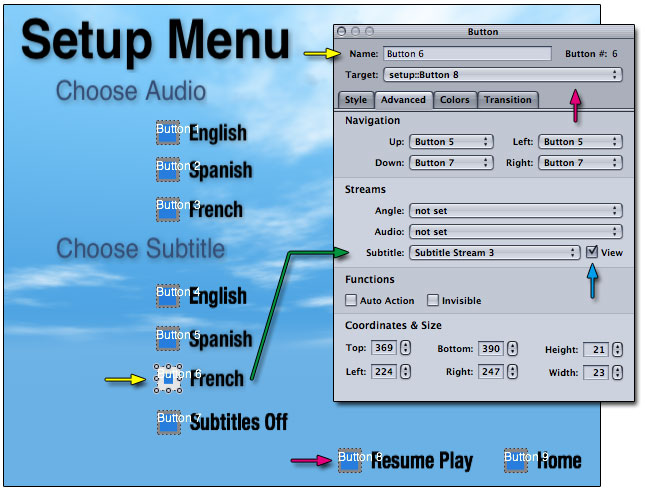
This is almost exactly
the same as the image and concept above with the exception that
we are now turning on a subtitle stream. The other difference
here is the blue arrow. Note that the blue arrow here is pointing
to the "View" check-box. In addition to activating
a subtitle stream, we are forcing the view of this subtitle as
well. When the user selects Button #6, which we have set in our
Advanced tab as Subtitle Stream 3 (On), the user will see the
subtitles on their television.
Note the purple arrows
again. Just as the example above we have set this button to target
to the same menu we are in now.
Note that this time,
the Audio Stream is set to "Not Set". This means that
we will not overwrite the user's current selection of the default
audio stream. That makes this function we have created an added
function to the current default audio stream. This means that
the user can set Spanish audio and French subtitles from this
same menu.
What if the user would
like to switch off the subtitles from this menu? Let's go over
that button next.
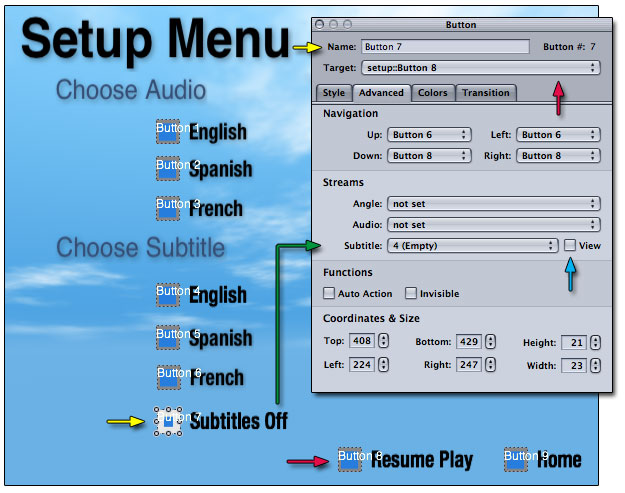
Here with Button #7,
marked by the yellow arrows, we are switching off the subtitle
view. Note that the blue arrow points to the same "View"
check box as before, but this time the box is no longer checked.
We are telling the DVD not to view any longer.
The Resume Function
Let's now talk about
the all-important Resume Play function we spent the first half
of this tutorials preparing for. The Resume function can be created
with a script that calls a single function, which is called "Resume".
What we did earlier was create a flag to help us later execute
a script that would not execute the resume function unless it
was eligible to resume a track that was interrupted in play.
With that in mind, let's
go over what is behind Button #8 of our setup menu. Remember,
this is what almost every button in the setup menu is pointing
to.
The "Resume Play"
button points to a script, which checks the value of GPRM 1.
If there is no value, then either a track was never in play or
has concluded play. Remember that in the script "play track"
we accept the user's button selection to play a track, then assign
GPRM 1 a value. We take that value away only when the track is
finished playing with the "clear play" script which
is the End Jump target of each track asset.
Since my project has
three tracks, that means each of these tracks is a potential
resume target. I have set up my resume script to go to the main
menu in the event that the resume function finds that there is
no eligible track to resume play for.
Looking at the project
overview above, we can see the potential targets of my resume
script.
Let's look at the resume
script now. It's a few more lines of code as you would guess.
SCRIPT: resume
1. Goto 5 if (GPRM 1
>=1)
2. Jump main
3. nop
4. nop
5. Resume
This script acts like
two scripts.
The first line checks
to see if GPRM 1 has a value in it. Remember, we set GPRM 1 to
hold a value of 1 when a track is requested to play. And we clear
that value when the track is done playing. So we are now checking
that register to see what the status is.
1 = a track was requested
to play, and has not concluded.
0 = no track is in play.
So if it is a value of
1, we should use the resume command to finish playing the track.
If it is a value of less than 1, which means zero or nothing,
then we should not use the resume command and instead go to the
home menu.
Line 1 says, if GPRM
1 is greater than or equal to 1, then goto line 5. Line 5 says,
let's resume play.
If line 1 is a true statement,
we resume play, and this script goes no further.
If no track is in play,
then GPRM 1 is less than 1 or zero, so the statement is false
and we continue to line 2.
Line 2 says, go to the
main menu.
Conclusion
So there you have it.
A very simple conditional resume function built into a Setup
menu. Your audience can now choose which audio to listen to,
which subtitles to read, and to resume play if they decide to
make these choices in interruption of any track that is in play.
If, on the other hand,
the user goes directly to the Setup menu, the Resume Play button
will not attempt to resume what isn't there. Instead, the Resume
Play button changes its task to return to the main menu so that
the user may choose a track to watch.
-Alex Alexzander
© Copyright
2004 Alex Alexzander
All Rights Reserved