|
   
| Tutorial: The Voice Over Tool in FCP 3 |
February, 2002
The
Voice Over Tool in FCP 3
By Ken
Stone
 Before FCP 3, if you wanted to add a Voice Over (VO) to your Project you had your work cut out for you. You could record the VO into an audio application like Peak DV, import the audio file and place it on the TimeLine. You could also record the VO into a DV camera, then do an 'audio only' capture and place that on the TL. Before FCP 3, if you wanted to add a Voice Over (VO) to your Project you had your work cut out for you. You could record the VO into an audio application like Peak DV, import the audio file and place it on the TimeLine. You could also record the VO into a DV camera, then do an 'audio only' capture and place that on the TL.
Not only was this time consuming
but getting the proper length VO to fit exactly where you wanted
was difficult. If the length of the VO was not correct or if
you were not happy with the 'take' then the entire process needed
to be done over again. This is no longer the case.
Enter FCP 3's Voice Over Tool.
Now we can capture Voice Overs directly to the TimeLine and it's
easy to do.
Getting Audio Into FCP
There are a number of different
ways that you can bring audio into your Mac. PowerBooks have
built in microphones. Older Macs have 'mic in' ports on the back.
Newer Macs accept USB audio in. A PCI audio card can be used
or you can use the microphone on your DV Camcorder. To use the
mic of a DV camcorder, from the 'View' menu turn 'External Video'
> off. The only requirement is that whatever device you use
be compatible with the Macs 'Sound Manager'. When your device
is connected, it will be recognized by the Voice Over Tool and
added to the 'Source' window of the Voice Over Tool dialog box
for your selection. This detection process can take up to 10
seconds.

 Newer Macs have neither a 'mic in' port on the back nor a built
in mic, so with these Macs you will have to use USB as the way
into the Mac. Typically microphones do not have USB plugs so
a USB device such as the Griffin iMic
Adaptor which sells for $35 will be needed to connect the
mic to the Mac. The iMic only has mini stereo ports for audio
'in and out' so you will need an adaptor for your mic. You should
also check the requirements of your microphone as the iMic does
not supply phantom power, some mics require phantom power to
operate. The iMic is both OS 9 and X compatible, works with Sound
Manager and requires no drivers. I'm using one, it works.
Newer Macs have neither a 'mic in' port on the back nor a built
in mic, so with these Macs you will have to use USB as the way
into the Mac. Typically microphones do not have USB plugs so
a USB device such as the Griffin iMic
Adaptor which sells for $35 will be needed to connect the
mic to the Mac. The iMic only has mini stereo ports for audio
'in and out' so you will need an adaptor for your mic. You should
also check the requirements of your microphone as the iMic does
not supply phantom power, some mics require phantom power to
operate. The iMic is both OS 9 and X compatible, works with Sound
Manager and requires no drivers. I'm using one, it works.
The Voice Over Tool
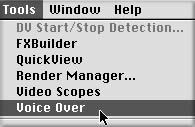
Open the Voice Over Tool from the Tools
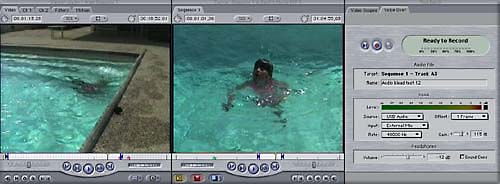
Menu. You can allow the Voice Over Tool dialog box to float over
your other windows, place on second monitor, or from the Windows
menu chose Arrange > Three Up. This will reduce the size of
the Viewer and Canvas windows and place the VO Tool at the top
of the screen with the Viewer and Canvas windows.
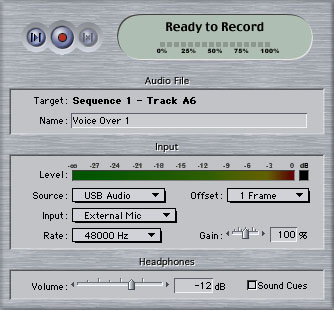
Let's look at the Voice Over Tool.
The first button top left is the 'Preview'
button. Clicking on this button will play the TL from your in
point to your out point. This will enable you to test the position
of your in and out points. The second button is the 'Record/Stop'
button The third button is the 'Discard' button. If after doing
a 'take' you are not happy with it, clicking on the Discard button
will delete the audio 'take' from the TL. The large oval button, called the 'Status' area displays
the different stages of the recording process. Ready to Record
indicates that everything is ready for the recording process
to begin. When the Record button is clicked the Status area will
change to 'Starting', displaying a five second countdown to the
start of recording along with a change of color from yellow to
red and accompanying audible beeps. After the countdown the button
turns to Recording and displays the amount of remaining time
left before the recording stops. When the recording is done the
button will display Finishing and then Saving. When Saving is
completed the new audio clip will appear on the TL. Below the
top row of buttons is the 'Audio File' section. 'Target' shows
the Sequence name and which audio track the VO will be written
to. 'Name' allows you to name the VO file. Below this is the
'Input' section. At the top is a linear VU meter which shows
the dB level (volume) of your input. This VU meter becomes active
when the 'Ready to Record' is displayed at the top. This gives
you a chance to test the volume of your input before you record.
Watch the VU meter as you speak into the microphone. You'll want
the peak volume to hit -12 dBs. 'Source' allows you to select
your audio device. For a USB microphone you will choose USB audio,
if you are using the mic on your camcorder, choose 'DV Audio'.
If you are using a different Sound Manager compatible device,
the device will appear in this drop down menu. 'Input' will let
you select between several different devices if more than one
is connected to your Mac. 'Rate' allows you to set the audio
sample rate of your new audio clip. You would want to set the
audio sample rate in this box to match the audio sample rate
of your Sequence. If you are using the build in mic in your PowerBook
you will find that the highest rate available is 44.1k. 'Offset'.
When the recording process starts it is immediate, however it
does take some time for the audio to enter through the mic, get
passed down to the USB device, processed (digitized) out to USB,
into the Mac and then finally into FCP. This delay is called
'Latency' and it can vary depending on the Source of your audio.
Most USB devices have a latency of about one frame, DV camcorders,
three frames. See page 87 of the 'What's New' manual for instructions
on testing and setting 'Offset'. 'Gain'. Use this control to
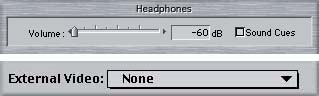
adjust the volume of your input audio. The last section 'Headphones'
controls the volume of the audio that plays through your headphone.
More on this below. There is also an option to turn off the audible
countdown Cues (beeps).
Setting up to Record
Open the Voice Over Tool and enter your
settings, you will know that the Voice Over Tool is enabled when
you see 'Ready To Record' in the large oval window at the top
of the box. Set your 'in' and 'out' points on the TL where you
want your audio to be added.

Before you begin recording there is one
area that we need to look at first. Often times you will be adding
a VO to the TL where there is already existing audio. During
the recording process, FCP will play any audio that is on the
TL. You can not have audio playing while you record as the microphone
will pick up this TL audio and it will be recorded into your
new VO audio track. Unless you are looking for a special echo
audio effect you will need to ensure that no TL audio can be
heard while recording. Newer Macs have an 'headphone' jack and
plugging in a set of headphones will cut off the audio to the
internal Mac speaker thus blocking any TL audio from reaching
the microphone. If you do not have headphones then in the headphones
section of the VO Tool you must set the volume to zero and uncheck
the 'Sound Cues' box.
Many FCP users monitor their audio from
external speakers that are attached to a camera/deck at the end
of the FireWire chain. You can turn the volume off on your external
speakers from the View menu > External Video > 'Off'. This
may throw the audio back to the internal speaker so you will
have to set the 'headphones' volume to zero to kill the audio.
This will also cause a loss of video output to your NTSC monitor,
however you can still view your video in the Canvas window while
recording your VO. If you have recorded multiple VO takes and
do not want their audio to play while doing additional VO takes,
select the VO clips on the TL and from the keyboard 'Control
+ B'. This will turn them off. To turn them back on, select and
again 'Control + B'. Another way to kill the TL audio while recording
is to turn off track visibility for any audio tracks on the TL.
There are many different audio configurations for FCP, and a
number of ways to disable TL audio playback during the recording
process, find the one that works the best for you.
Recording
Before you begin click on the 'Preview'
button to test. Ensure that your 'in and out' points are in their
proper location and check to make sure that you can hear no audio
from the TL. At this point your microphone is live. Speak into
the microphone and watch the VU meter in the Record Tool and
adjust your volume so that the loudest audio hits -12 bD. Under
no circumstances should you allow the volume to hit 0 db.

When you are ready, click on the 'Record'
button. The 'Ready to Record' oval button will display 'Starting',
turn yellow and a five second count down will begin, with audio
'beeps' if the 'Sound Cues' box is checked. As this countdown
is in progess the oval will turn from yellow to red. At the end
of the countdown the Oval will say 'Recording' and the recording
process will begin. During this process a percentage progess
bar will be displayed in the bottom of the oval.
15 seconds from the end of the allotted
time there will be a single beep and a new countdown will start
counting backwards from 15. At the five second mark there will
be beeps for the last five seconds. When the recording is completed
the oval will once again turn yellow and 'Finishing' will be
displayed. The oval will then turn gray saying 'Saving' and finally
'Ready to Record'. The VO clip will now be on the targeted track
of your TL. You can, at any time during the recording process,
click on the record button to stop recording. What has already
been recorded will be placed on the TL. If you do not wish to
keep this VO simply click on the 'Discard' button.
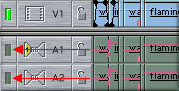
You can repeat this process as many times
as you like. The VO Tool will automatically target the next audio
track. If you are doing a long VO there maybe good parts from
a number of different takes. You can use the razor blade to cut
and save those parts of the VO you want to keep, 'shift' drag
the good audio clips into one audio track.

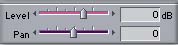 Each time you record a VO one audio track will be used. Normally
one audio track will play out of one speaker or the other, however
the VO Tool defaults the 'Pan' of the audio clip to '0' thus
playing the audio out of both speakers. You can, of course, change
the Pan if you so desire.
Each time you record a VO one audio track will be used. Normally
one audio track will play out of one speaker or the other, however
the VO Tool defaults the 'Pan' of the audio clip to '0' thus
playing the audio out of both speakers. You can, of course, change
the Pan if you so desire.
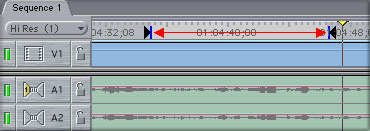
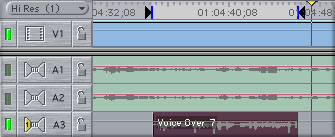
Pre-Roll and Post-Roll
While you target the area of the TL for
your VO using 'in and out' points, the VO Tool actually records
extra audio, five seconds of Pre-Roll audio and two seconds of
Post-Roll. This is to prevent words from getting cut off at either
the start or end of the VO. You can use the 'Slip' tool on the
audio clip on the TL to slip the audio so that the cut off words
are now within the 'in and out' points. You can see the Pre and
Post Roll audio by double clicking on the audio clip in the TL
and loading it into the Viewer and selecting the audio tab. The
Pre and Post Roll areas are shown below in red tint.

Conclusion
In FCP 3 for OS 9.2.2 the VO Tool stores
the recorded audio in ram, but it uses ram that is outside the
ram allotment that you gave FCP. 16 bit 48 kHz audio uses about
six megs per minute. You will need to ensure that you have enough
additional ram to hold the recorded audio. Once the VO audio
is placed on the TL it is saved to your Media drive and the ram
is released.
Using the Voice Over Tool in FCP 3 for
OS 9.2.2, I did about 60 VO recordings. It worked perfectly every
time. This is a very powerful new feature in FCP 3. It is easy
to use and works well.
Enjoy,
--ken
copyright © Ken Stone 2002
This article first appeared on www.kenstone.net and is reprinted here
with permission.
All screen captures and
textual references are the property and trademark of their creators/owners/publishers.
|