|
   
|
CGM DVE Vol.2+ Digital Video Effects for Apple Final Cut Pro - The Timewarp Filter
|
August 2002
CGM
DVE Vol.2+
Digital Video Effects for Apple Final Cut Pro
The Timewarp
Filter
By Ken
Stone
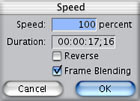 If we want to change the speed of a clip in FCP we
can select the clip in the TL and from the Modify menu choose
Speed. This will open the Speed dialog box which will allow you
to change the speed of the clip and also allow you to run the
clip backwards. This effect is very limited in that you can only
change the speed of the clip once. If you want to have the clip
change speed more that once like speed up, slow down and speed
up again you will have to razor blade the clip into three pieces
and then apply a different speed change to each of the pieces.
Not only time consuming but the speed shifts between the three
pieces can be a bit awkward. If we want to change the speed of a clip in FCP we
can select the clip in the TL and from the Modify menu choose
Speed. This will open the Speed dialog box which will allow you
to change the speed of the clip and also allow you to run the
clip backwards. This effect is very limited in that you can only
change the speed of the clip once. If you want to have the clip
change speed more that once like speed up, slow down and speed
up again you will have to razor blade the clip into three pieces
and then apply a different speed change to each of the pieces.
Not only time consuming but the speed shifts between the three
pieces can be a bit awkward.
Timewarp
The Timewarp filter is one of a
set of 35 Digital Video Effects Filters for Final Cut Pro by
CGM.
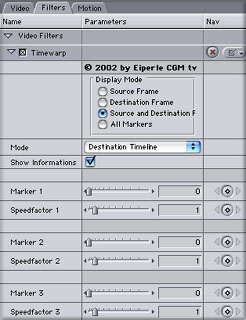
Drop the Timewarp filter onto your
clip, double click the clip to load it into the Viewer and select
the Filters tab. In the control window (below left) I have 'Display
Mode' set to Source and Destination. Mode is set to Destination
TL and Show information is checked. Below this are the Marker
and Speedfactor controls. While I only show three Markers below
there are actually nine different markers allowing you to change
the speed of a clip nine different times. Each marker can be
given a frame number and a corresponding speed factor. The frame
numbers have to be incremental. When the Display mode is set
to Source and Destination this setting will show up in the Canvas
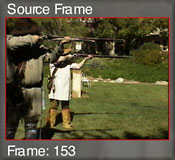
widow (below right). Set the Canvas window to 'image' only. In
my example, the playhead is set to the first frame of the clip
on the TL. If you will look at the Source Frame side of the Canvas
you will see that it shows frame '0', the first frame of the
clip. Just ignore the Destination part of the Canvas window.
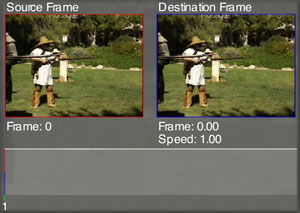
As you move the playhead through the
clip on the TL you will see in the Source side of the Canvas,
that the video frames update in the red box. The frame number
reflects the position of the playhead on the clip. You can scrub
through the TL to find each exact frame that you want to position
a speed change.

I want my clip to start at normal speed
and ramp up to five times normal speed at frame number 179. I
leave Marker number 1 at it's default setting (below left), frame
= 0, first frame of the clip and speedfactor = 1, 1 being normal
speed. Click on both Keyframe buttons for Marker 1. Now I scrub
through the TL to find the position for my speed change. The
frame I want is number 179. In the Marker 2 area (below middle)
I set the Marker (frame number) to 179, below that I enter 5
into the Speedfactor. When I hit the 'enter' key on my keyboard
the keyframes will be set. You can set new keyframes by using
the Keyframe buttons. Using the Keyframe buttons at every Marker
makes it easier to see your work as it progresses as the Keyframes
are visible in the timeline of the Viewer. The Source section
in the Canvas window will now show Marker 1 at the starting frame
with a normal speed and Marker 2 at frame 179 with the ramp to
five times normal speed, (below right). The red vertical line
(Blue arrow) shows the current position of the playhead in the
TL.


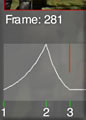
Now I want to return my speed to normal
so I scrub the TL til I find the frame I want, in this case it's
frame number 281. In the Marker 3 area (below left) I enter frame
number 281 and set Speedfactor back to 1 (normal speed), hit
enter. The Source (below right) now shows the third Marker at
frame 281 and speed ramped back to normal.

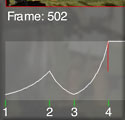
My last speed adjustment, Marker 4, will
be to ramp from normal speed at frame number 281 up to 10 times
normal speed at the end of the clip which is frame number 502.
Render and your done.

The Timewarp filter is not 'time mapped' to the TL. Let me explain.
Let's say that we have a clip that is 20 seconds long on the
TL. We use the Timewarp filter to do some speed changes and the
total duration of the speed modified clip is now 10 seconds.
Even though the clip will play for 10 seconds, the clip on the
TL is still 20 seconds long. The length of the clip on the TL
is not redrawn (time mapped) to reflect the new running time.
After render, when we play the clip, the clip will play out in
10 seconds. However, the playhead will only be half way through
the clip and will continue to play for the remaining 10 seconds.
Okay, so what plays for the remaining
10 seconds? There are two possibilities. If there is no extra
video material past the out point of the clip, no handle, then
the very last frame of the clip will become a freeze frame and
will remain on screen for 10 seconds. If there is material past
the out point of the clip, then this material will be used until
it is used up and then you will get a freeze frame. In either
case this is probably not what you want. Place your playhead
on the clip in the TL and find the last frame before the out
point or where the freeze frame starts playing. Get out your
razor blade, cut at that point and delete the section that is
to the right of the playhead. Now the length of the clip on the
TL will match the playing time of the clip.
For clip speeds slower than normal, set
your Speedfactor to less than 1. '0' equals full stop. If somewhere
in your clip you bring your video to a full stop it will be necessary
to razor blade the clip at that point and reapply the Timewarp
filter to the second part of the clip as Timewarp will not start
back up once 0, full stop has been instituted. With the Timewarp
filter 'Frame Blending' is applied automatically if the speed
is set to less than 1 (normal speed).
For flicker free 'slow motion' videos
add the FCP Flicker-Filter; Video Filters > Video > Flicker
Filter. Be sure to place it below the Timewarp filter. For best
results set the Flicker filter to maximum.
Enjoy,
--ken
You can purchase CGM DVE Vol.2+ from the lafcpug
store.
copyright © Ken Stone 2002
This article first appeared on www.kenstone.net and is reprinted here
with permission.
All screen captures and
textual references are the property and trademark of their creators/owners/publishers.
|