|
   
|
Making
Video Look Like Film
|
April, 2001
Making
Video Look Like Film
by Shawn
Bockoven
August 4,
2001
Article update (see end of article)
by Joel Peregrine
  I
have been trying to make my video look like film for about eight
years now. I shoot short movies on video with two other partners
in my spare time. Collectively we are known as "The Three
Bald Guys". I had what could be classified as an epiphany
one-day when I was told Star Trek TNG was shooting film at 30
FPS to reduce the headache of Telecine and 3/2 pull down. I still
don't know if this was true, but it gave me the incentive to
try. I wondered if I could simulate 30-FPS film using video.
When I use the term "Film Motion Look" I am referring
to a simulated progressive picture rather than an interlaced
image. I have had it explained to me that 60hz video is a lot
like how the human eye sees the world. This could be why we feel
like voyeurs when watching a soap opera or these so called reality
shows. Maybe this is why film has that fantasy look I am after
at 24 FPS. Quite a few maybes here huh? There are other arguments
about gamma, resolution and color, but heck I even like the look
of 8mm film. First of all it is the motion of film I am after,
then come the colors and gamma: These play no small role of course.
With good lighting and care taken with camera movement I set
out on my quest to make video look like film. I
have been trying to make my video look like film for about eight
years now. I shoot short movies on video with two other partners
in my spare time. Collectively we are known as "The Three
Bald Guys". I had what could be classified as an epiphany
one-day when I was told Star Trek TNG was shooting film at 30
FPS to reduce the headache of Telecine and 3/2 pull down. I still
don't know if this was true, but it gave me the incentive to
try. I wondered if I could simulate 30-FPS film using video.
When I use the term "Film Motion Look" I am referring
to a simulated progressive picture rather than an interlaced
image. I have had it explained to me that 60hz video is a lot
like how the human eye sees the world. This could be why we feel
like voyeurs when watching a soap opera or these so called reality
shows. Maybe this is why film has that fantasy look I am after
at 24 FPS. Quite a few maybes here huh? There are other arguments
about gamma, resolution and color, but heck I even like the look
of 8mm film. First of all it is the motion of film I am after,
then come the colors and gamma: These play no small role of course.
With good lighting and care taken with camera movement I set
out on my quest to make video look like film.
At this point some of you are probably
asking "Why not shoot film"? Well, my reply is cost.
I am not saying video is film, but if I can fool the eye for
the cost of a DV tape (Maybe $6.00) I will continue to do so.
My target with this process is television or videotape. I don't
own a film camera, I don't own the audio recorders with sync,
not sure what I have on film when I shoot it, don't call attention
when we are shooting without permits, don't have Telecine costs
and I can DP my own short. I have almost complete control over
my color correction and look with this method. Most of our local
film festivals or screenings call for video, not film projection.
Just to name a few things.
A little history of my quest: I
first started this process using a Panasonic MX-50 Digital SEG
removing one field with the fastest strobe speed. I would reintroduce
the discarded field with a 30% lap dissolve. This was a pretty
good look, but had aliasing (Stair step look on edges) that was
very evident when projected for a large audience. There was also
a lot of frame lag when panning or tilting were practiced. I
had better success when I purchased a Fast Video Machine and
version 3.0 Plus was released. I will include the Video Machine
process at the end of this article for those who may have access
one. VM uses a proprietary MJPEG. This makes export of the digital
media to another program almost impossible, notice I said almost.
There are a few correction filters included with the Ulead plug-ins,
but outside of the native FX VM takes forever to render. I tried
to use these filters with little luck regarding quality or speed.
My latest attempt at this Film
Motion Look has involved the use of Apple's Final Cut Pro (FCP).
I am very happy with the look and quality using FCP and QT5P2
(QT5P3 is now available). There are a few basic steps to this
technique, but other than that it is guesswork and good shooting.
No real hard science is used with this technique. I guess I would
call it an art more than a rule or fact. Well enough history
here is how you do it.
If you already have the video shot
you can simulate progressive scan video or "Film Motion
Look" by doing the following with Final Cut Pro.
Note:
When you export the video with audio you should delete the audio
associated with one of the video tracks. It does not matter which
audio you delete they are identical at this point. You could
also just export the video without the audio and re-sync the
video and audio when you import. Take your pick there are no
hard rules here you just need to do what will work for you.
 Place the same clip on the timeline (Sequence)
twice directly above and below each other. This is easier if
you have snapping turned on. Place both clips against the beginning
of the sequence. Place the same clip on the timeline (Sequence)
twice directly above and below each other. This is easier if
you have snapping turned on. Place both clips against the beginning
of the sequence. |
|
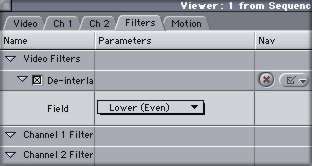 De-interlace the first clip (The bottom clip).
In the USA NTSC world select lower field not sure about PAL. De-interlace the first clip (The bottom clip).
In the USA NTSC world select lower field not sure about PAL.
|
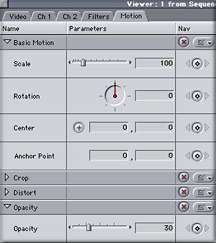 Second clip (Top Clip), turn the opacity to 30.
You are introducing a 30% lap dissolve of the two-field video
back into the de-interlaced video. Second clip (Top Clip), turn the opacity to 30.
You are introducing a 30% lap dissolve of the two-field video
back into the de-interlaced video. |
|
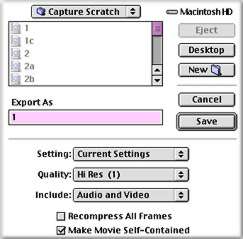 Export or render these clips as one clip and
import it into your project. Export or render these clips as one clip and
import it into your project. |
Play the video and you will notice a
really good imitation of a film motion look. This is also good
for reduced jitter slow motion. Render your new clip with the
playback speed of choice. This should eliminate some of those
slow-mo jitters. You can change the opacity of the upper clip
to reduce frame lag by scene or by movement within the scene.
This can be done using key frames or by cutting up the clip.
I have even fooled a few DP's with this technique.
Try this for easy/fast gamma and color
change: You can either use a captured clip, or export your entire
movie from FCP for this technique. Open QuickTime Pro provided
with your FCP software. Open your movie or clip with the QTPRO
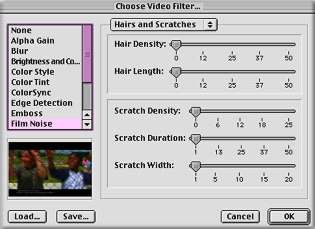
player. Select export in QTPRO, click on options, click on filter
settings (Do not change the video or audio settings), inside
the filter window select "Film Noise", "Hair and
Scratches" will be visible at the top, but first turn off
all of the artifacts using the sliders. Next open up the "Hair
and Scratches" window and change it to "Dust and Film
Fading", inside this menu select "1930's Color Film"
and turn all Dust Settings to zero. Click on OK and export your
clip by clicking on save movie. If you want a few artifacts this
QTPRO filter does a really good job for a free plugin. Play with
these settings and use them with care.
 |
|
 |
The result will be better whites and
blacks and some nice improvements to your color. I was able to
bring out rust again on a white bridge and all of the cloudy
sky shots are awesome now. This export is very fast unlike using
Cinelook for gamma. I did not time the four-minute music video
on export using QTPRO, but I would guess it only took about 12
minutes. Please don't hold me to that:-) This would have been
an overnight render using Cinelook.
For the other filters like stock match
and good gamma, I have been using Cinelook with great results.
I use the Cinelook filters to achieve the film texture. Do not
use a lot of grain unless that is the EFFECT you are after. We
have been using a setting of 1 or 2. The only real disadvantage
to using Cinelook is long render times, but the quality is very
good. Cinelook is a wonderful program and I am not bashing it
in any way. Let's just get a speed plugin for the new G4 chips
Digieffects. There are far more settings for stock match and
correction using Cinelook. Using QTPRO is easy, fast and down
and dirty for a really good film texture look.
At www.kenstone.net/fcp_homepage/eureka.html
hosted by Ken Stone of 2-pop fame, you can pick up some free
Eureka FCP plugins that you may want to play with. Film Grain
and Silk Stocking could give that a look you are after.
 I have been asked
about using the Canon XL1 and the "Movie Mode" (Frame
mode on some cameras) to achieve the same type of results. We
have an XL1 here at the station and have used it at times for
its Movie Mode. I like to shoot with a better camera like the
DSR-300 and apply the above technique (PLEASE DON'T TAKE THAT
AS A DIG ON THE XL1, I like the XL1 for what it is). With the
Film Motion Technique I have control over how much opacity I
use to control things like frame lag. And, if the client wants
to go back to a video look I can't if I shot the video in Movie
Mode. I kind of live by the rule "Shoot it clean in the
field and play with FX in post". This was not always a rule
I lived by, but in a digital world things have now changed. Now
you will notice I did not say FIX it in post, things like good
lighting and acting can't be changed in post. I have been asked
about using the Canon XL1 and the "Movie Mode" (Frame
mode on some cameras) to achieve the same type of results. We
have an XL1 here at the station and have used it at times for
its Movie Mode. I like to shoot with a better camera like the
DSR-300 and apply the above technique (PLEASE DON'T TAKE THAT
AS A DIG ON THE XL1, I like the XL1 for what it is). With the
Film Motion Technique I have control over how much opacity I
use to control things like frame lag. And, if the client wants
to go back to a video look I can't if I shot the video in Movie
Mode. I kind of live by the rule "Shoot it clean in the
field and play with FX in post". This was not always a rule
I lived by, but in a digital world things have now changed. Now
you will notice I did not say FIX it in post, things like good
lighting and acting can't be changed in post.
A few more tips or techniques: If you
know your video is going to be used for slow motion you can shoot
with high-speed shutter for these scenes. Play with the shutter
settings on your camera and see what you favor. This should make
your video sharper with faster movement. If you have seen "Gladiator"
just remember the fight scenes, this is close to the look I am
referring to. Also works well for ramping from fast to slow motion.
Using HS Shutter is limited to outdoor shoots or very well lit
interiors.
Note: High-speed shutter should only
be used for the Slow Motion or high motion scenes. Looks too
different from regular video at normal speeds. I have noticed
a lot of country music videos using high-speed shutter for effect.
Getting that music video slow-motion
lip sync look. Think of the Police music video where Sting is
frolicking through a bunch of candles. We shot a music video
trying to recreate that look of singing and moving in slow motion
while the song is in real time. Here is the basic math. Speed
up your music in FCP to 150%, export it to CD and burn it. You
could just playback from a laptop (PowerBook/iBook) and pump
it through a PA or boom box. Have the artist lip sync and move
fast with the new faster music. In post you slow you video back
down to 66.7% and you should have that wonderful look with good
sync. This looks really good shot with a Steadicam or SC Jr.
I hope you enjoy these tips and can use
them in your productions. We all know that video is not film,
but it is getting closer. Most of these techniques are not rules,
the are observations, trial and error and guesswork. Please do
not repeat these techniques as film motion look commandments.
Creating Film Motion Look with the
Fast Video Machine
Set the DPR settings in a reel group
at 1 field, prefilter 2 and the best compression your drives
can handle, digitize a clip. Then copy the same clip (press the
control key, click, hold and drag the clip in the reel group
and you will have a (copy). Tag the copied clip, add a 2 after
the original name (so you can tell the clips apart), set your
DPR settings back to two fields, no Prefilter and the best compression
your drives can handle. Select Digitize Tagged Objects in the
digitizing menu. Note: it is not necessary to digitize the audio
for both clips. You will have two copies of the same clip in
the reel group. Put them both on the timeline lined up exactly
above and below each other. Expand the time line so that you
can see one frame at a time. Place a Hard-Cut Effect on the first
clip you digitized one frame before the clip starts (the clip
digitized with a single field and Prefilter). One frame later
on the time line place a cut-to the second clip (The clip digitized
at normal video resolution). Here is where the difference was
made. Double click on the second Hard-Cut Effect (the Hard-Cut
to the full resolution video) and enter the DVE editor. Set the
Fade Level at 30% in both windows. What will take place is a
30% dissolve to the clip with both fields digitized. I played
with a few different fade settings and found 30% gave the best.
Some of the clips may need more or less of the 2-field clip dissolved
in. Save the settings and exit the DVE editor. Highlight the
edit after the second cut and render the selected range. 3 to
1 compression gave the best results with little or no artifacts,
if your hard drives can handle that rate. Playback the rendered
clip and check your results. I used this on all of the beauty
shots in our movie and the scenes with a lot of lines, like in
a bathroom with tile. I was very happy with the results, this
process removed most of the aliasing and some of the jerky strobe
introduced with only one field digitized.
Note: This process will eat up your hard
drive space quickly at the 3 to 1 compression rate.
Note: I have not tested any of these processes with video to
film transfer.
August 4, 2001 Article
Update
Author's Note. There have been a few modifications to
the FCP Film Look technique since I wrote the article. This should
improve the quality of your final product.
Shawn Bockoven
Article Update
Highlight a clip, duplicate it and place
it directly above itself in the same way your technique is set
up. Set the V2 opacity at 50%. Now place the "de-interlace"
filter (with the "LOWER" setting selected) on the V1
clip. Next, place "de-interlace" (with the "UPPER"
setting selected) on the V2 clip. Thats it!!! No interlaced-induced
flicker. Full resolution, No strobing, No jaggies, just a subtle,
classy, non-video look.
Update by Joel Peregrine
copyright © Shawn
Bockoven 2001
 Shawn Bockoven manages METV/KMET and ACTS as station
engineer. He designed and built this educational television station.
Just an all around techno-geek type of guy. He can be contacted
at mbockoven@comcast.netor sbockoven@mcoe.org. And yes, the name of his company "Three
Bald Guys" really has to do with the amount of hair on he
and his partners heads. Has a beautiful wife who puts up with
him and three wonderful children under the age of twelve. On
a nice day you will find him tiling a floor or replacing fence
posts. His favorite TV shows are ER, The Invisible Man and Farscape.
Favorite movies are Blade Runner, The Matrix, Dune the extended
version and The World According to Garp. Shawn Bockoven manages METV/KMET and ACTS as station
engineer. He designed and built this educational television station.
Just an all around techno-geek type of guy. He can be contacted
at mbockoven@comcast.netor sbockoven@mcoe.org. And yes, the name of his company "Three
Bald Guys" really has to do with the amount of hair on he
and his partners heads. Has a beautiful wife who puts up with
him and three wonderful children under the age of twelve. On
a nice day you will find him tiling a floor or replacing fence
posts. His favorite TV shows are ER, The Invisible Man and Farscape.
Favorite movies are Blade Runner, The Matrix, Dune the extended
version and The World According to Garp.
This article
first appeared on www.kenstone.net and is reprinted here
with permission.
All screen captures and
textual references are the property and trademark of their creators/owners/publishers.
|