|
   
|
How to partition your hard drive
|
April 2001
How to partition your hard drive
1. With your Mac shut
down insert your Mac OS CD (don't use the restore CD) that came
with your Macintosh.
2. Start up your Mac
as you normally would but this time hold the "C" key
down and keep holding it until you see the "Welcome to Macintosh"
screen.
3. After boot up is successful,
open the Mac OS CD and look for the Utilities folder.
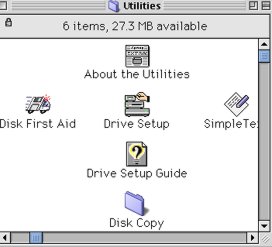
4. Open Utilities folder
and open DRIVE SET UP.
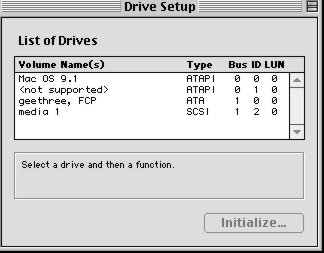
5. You should recognize
the name of your HD listed under LIST OF DRIVES.
6. Select that name by
clicking once on it.
7. The INITIALIZE button
should now be bold. (If it stays Gray then you have not booted
up your Mac with the CD correctly and will have to try again.)
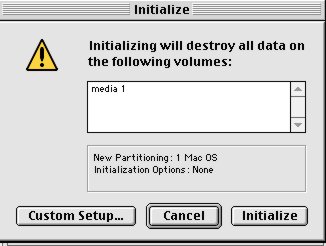
8. Click on the INITIALIZE
button.(You will be presented with a window that says you will
destroy all data.)
9. Click on the CUSTOM
SET UP button at the lower left of the window.
10. Now you can make
your decision(s) on your Custom Partition as you are now presented
with the CUSTOM SET UP window. (Notice the TOTAL CAPACITY. Make
sure that the total size of the 2 partitions equal that number.
For ex. TOTAL CAPACITY is 12 gigabytes. One partition can be
3 gigabytes and the other 9 gigabytes for a TOTAL CAPACITY of
12 gigabytes)
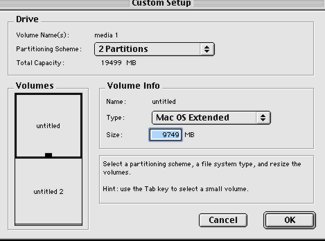
11. Point your mouse
to the PARTITIONING SCHEME pop up and click on it and Select
"2 Macintosh OS Extended" Note: There is some
debate on this but the conensus seems to be that with Mac OS
9 and above, Mac OS EXtended is the way to go.
12. After you selected
the number of partitions they will appear as UNTITLED 1 and UNTITLED
2. (Don't' worry as you can name your Partitions whatever you
want later on.
13. Click on the first
partition under VOLUMES and set your size in the little box next
to SIZE. Set your large partition size first. Give it everything
except for 3 gigs. After entering that number, hit the tab button
to completely enter it.
14. Once you have entered
that number with the tab button, you have now automatically selected
the 2nd partition. You do not need to enter Size here, it has
automatically inserted the remaining disk space for that number.
15. When satisfied that
this is what you want as your partitions then click on OK.
16. You will be presented
with a dialogue box saying that doing this will destroy all data.
17. Drive Set up will
now initialize and partition.
18. Once finished you
will see 2 icons of Hard drives called Untitled 1 and Untitled
2 on your Desktop. Rename them by clicking ONCE on the words
Untitled. Call them, say....Macintosh HD and the other FCP HD.
19. Now the only thing
left is to install your system software on each partition using
the System CD you booted up with.
20. And, of course reinstall
your application software into the appropriate new partitions.
Andrew B - Michael H
- Randy J
All screen captures and textual
references are the property and trademark of their creators/owners/publishers.
This
article first appeared on Kenstone.net and is reprinted here
with permission
|