|
   
| "Digital Alliteration: Panasonic, Progressive, Pulldown and "Pretty Darn Cool" |
November, 2002
"Digital Alliteration:
Panasonic, Progressive, Pulldown and "Pretty Darn Cool"
By Charles Roberts
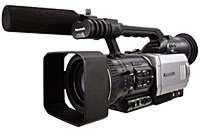
Ever since I saw the not-quite-complete, "no, you can't touch it..." Panasonic AG-DVX100 camera at NAB this year, I was waiting to get my hands on its footage. The unique claims made by Panasonic about the features of this camera are pretty interesting. It is the first consumer camera that images at 24 progressive frames per second that does not use film or High Definition. The fact that it is recording this 24P to NTSC or PAL interlaced DV means that many poor but ambitious filmmakers now have access to the particular look that 24 fps offers without the massive cost of film processing and transfer or rental of HD camera and posting tools.
 Now I'm not going to tell you that there aren't reasons why you'd want to use film or HD if you can (like for instance an exponential leap in resolution and control over depth of field). But if you can only afford a DV camera, this thing offers a pretty neat acquisition and post-production solution all one unit. The ability to shoot in 24P and retain that through post-production and finish is pretty staggering. Now I'm not going to tell you that there aren't reasons why you'd want to use film or HD if you can (like for instance an exponential leap in resolution and control over depth of field). But if you can only afford a DV camera, this thing offers a pretty neat acquisition and post-production solution all one unit. The ability to shoot in 24P and retain that through post-production and finish is pretty staggering.
Unfortunately, true 24P editing and post technically can't happen when you're working with the DV codec, which is always functioning at 29.97 or 25 interlaced FPS. But can you take advantage of the 24P you shot in and get that '24P look'? Sure, as long as you treat this DV camera's footage just like telecined film. For those who only want the film 24 FPS look and aren't concerned with delivering an HD 24P or film master can easily cut and even move it into After Effects and other applications for effects processing PROVIDED THEY TREAT IT AS THE ODDITY IT IS!
How DID they do it though, getting 24 progressively scanned frames recorded to 29.97 FPS video? The DV specification for NTSC video requires 29.97 frames per second, no more, no less. How does this 24 FPS get spread over the 29.97 FPS that is recorded to tape? The way Panasonic resolved this is really nothing new to folks familiar to the film posting process, but is important to understand if you are new to all this and are seeing sugar plums and drooling over the ads boasting it will "make you a filmmaker"
This article will not focus on the imaging section of the camera, rather what happens after the camera has begun shooting 24 frames per second of video. The camera performs a process called Pulldown, a process that has always been used to get film transferred to video. Remember that film, like our 24P camera is also 24 FPS, and to get film to play back at the right speed on video, you have to actually duplicate at least 6 frames per second so that the 24 FPS appear the same to the eye, but occur at 30 FPS (disregard the 29.97/30 discrepancy for the moment).
It sounds a lot more complicated than it really is. What happens is that 4 film or progressive frames are recorded over the course of 5 video frames. This happens six times per second, after which the extra six frames have been added to the original 24 FPS to make the 30 FPS. But how to get the 4 into the 5? Well, the 5 frames of video are actually 10 fields of interlaced video. That's right, the progressive video you just shot will still have to be interlaced in order to be recorded to NTSC or PAL video. Just like film, progressive video has to be converted to interlaced fields to work in our good-old 1950's technologically-challenged television sets.
"But, but, but..." you say. Why bother shooting progressive scan if it's just going to get interlaced anyway? Well, remember that interlacing is just scanning half the lines of a frame then scanning the remaining lines to complete the frame. Now if both fields are from the same originally progressive-scanned frame, you won't SEE the interlacing artifacts that we usually associate with interlacing from video cameras. Don't worry, the quality will be as good as the quality of any film you've seen transferred to video.
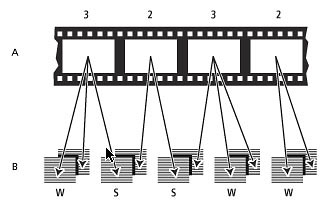
Print originated from the Adobe After Effects manual.
In order to spread the 4 into 5, you divide the 5 frames of video into 10 fields. Then you scan an extra third field for some of the film frames. This makes a 3:2 relationship in the scan. The first frame of film is scanned into 3 fields of video. The second frame of film is scanned into 2 fields. The third film frame is scanned into 3 fields again. Then the final fourth film frame is scanned into the remaining 2 video fields. Count up the video fields and you get 10, or 5 frames. This is how ya get 4 film frames into 5 video frames, and therefore 24 frames into 30 without seeing it speed up or become otherwise artifacted.
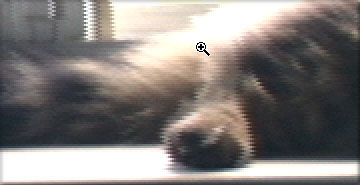
This obviously presents a problem though. If you wanted to edit this material, you would have to be very careful where you made your edits. This is because at least 12 video frames out of 30 per second now contain two fields from different film frames (two SPLIT frames in every set of five video frames x 6 sets equals 12 SPLIT frames per second)! In playback at real speed you won't see anything, but if you make a cut on such a frame (referred to as a SPLIT frame as opposed to a WHOLE frame), you would see a sixtieth of a second of a frame other than the one you really wanted to cut on. If you think that's not a big deal, then you haven't cut much film material! A 60th of a second is a long time in visual terms and can be a real heartbreaker, especially in action and motion footage.
This is the major function of the group of editing tools that offer a REVERSE TELECINE. The reverse telecine does one of two things; it either removes all the extra third fields from the pulled down footage so that you are actually working with true 24 FPS, or it simply keeps you from making a cut on a frame that has fields from two different film frames.
What does this mean to you? Well, a couple of things. For one thing, if you want to cut 24P footage in actual 24 frames per second from this camera in FCP, you are going to have to use something to remove this pulldown so that you can get at the actual 24 FPS divisions of frames. This may be tools like Cinema Tools, a special capture card, or some other magical tool I haven't discovered yet.
It is quite possible that in the next version of FCP, Apple will include some sort of pulldown feature for removing the pulldown and re-inserting it on the fly as you work. The word on the street is that Panasonic and Apple are hugging and kissing like old friends as of NAB 2002. But I always say, don't bank on features that ain't in the manual yet. So for the moment, there is no clean-cut solution to this issue for editors.
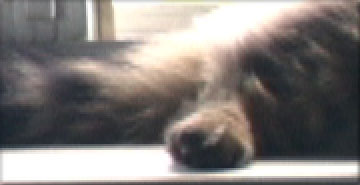
This isn't really the end of the world. If you want to cut this 24P footage in FCP without removing the pulldown, go right ahead. Just make sure that you are monitoring out to a DV deck/camera and video monitor. Remember that FCP doesn't show you both fields in the Viewer or Canvas window of the video frame you are parked on. If there is movement between fields in a frame you are parked on, the Viewer or Canvas will be rock solid, while the video monitor will be jerking back and forth showing both fields. Use this to your advantage to make sure that you never make a cut on a SPLIT frame that contains a field from two different 24P frames. If you see jerking on the frame you cut on, you will have to rethink which frame you are cutting on.
What about other uses? For editors in FCP, there are the issues described above. But some of us want the 24P for other reasons as well. Progressive scan video offers a great feature that you just can't get with interlace; the elimination of interlace artifacting on motion elements in the frame. With normal interlaced footage, any motion faster than a 60th of a second will show different information in the two different fields of the frame. This is because the two fields are scanned at slightly different times, 1/60th of a second to be exact. Only progressive scan or film can give true, clean motion blur on the level of the individual frame.
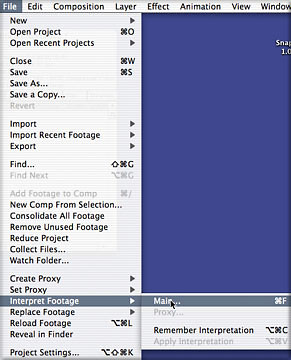
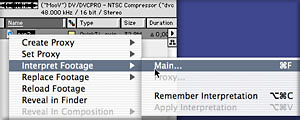
Now if you want to work with interlaced footage in After Effects, you have to perform an important operation: Interpret Fields (File>Interpret Footage or Control-click the clip in the Project window). With Interpret Fields, After Effects treats each field in an interlaced clip as an individual frame in a 60 FPS clip (rather than a half a frame in a 30 FPS clip). This is all done behind the scenes, of course. The user interface appears to continue to work at 30 FPS, but After Effects knows that each field contains unique motion and keeps the two fields separate. In the After Effects composition, you only see the frames, but you can actually look at the individual fields from a special clip-viewing window (Option-double click the clip in the Project window).
That much is pretty standard fare for folks working in After Effects with interlaced video. In fact, back in version 4.0, Adobe added a feature that automatically Interprets Fields in commonly encountered formats such as the Apple DV codec. When you bring DV codec material into After Effects, it automatically sets the field order for the footage as Lower (because all DV codec material is lower field in the field order). You don't even have to deal with it until you render your composition.
But here we now have this footage from the Panasonic camera that is: 1) DV, meaning it needs to have its fields separated if we want to use it in After Effects, but 2) it also has a pulldown, meaning that its frames-to-fields are actually staggered in a 3:2 system to add the extra frames necessary to make 24P work in 30 FPS. This complicates things, because if you simply break up the frames into fields, you end up with incorrect pairs of 'two-fields-equals-one-frame' arrangements.
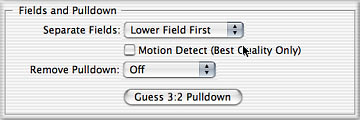
Thus in the same Interpret Footage dialog box that contains the Fields Separation control, After Effects has a button to Guess Pulldown Phase. Phase simply means which SPLIT or WHOLE frame in the 3:2 pulldown arrangement comes first in the 5 frame sequence of <4 film frames to 5 video frames>. This can differ depending on where in your original telecined or trimmed video footage the clip you imported to After Effects begins.
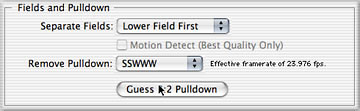
Don't sweat this; just hit the button and let After Effects figure out pulldown phase. When it does, it will also apply this to the clip. When it does so, you will see it announcing that it has an "effective frame rate of 23.976" This means that from here on in, After Effects will treat this clip as a true 24 FPS clip. The 23.976 number comes from the fact that After Effects is using a pulldown that is mathematically accurate to the 29.97 FPS, rather than the 30 FPS we've been rounding off to.
Now to keep this legitimate, your composition has to be 29.97 FPS, so that the actual clip's frames match the composition frame for frame. Remember that none of this is changing your clip. Your original movie file is still 29.97 FPS with a pulldown. The best part about this whole process is that After Effects is going to be doing this in the background. We don't have to think about it or render it until we are finished and ready to render the entire project. At that time, we will have After Effects re-insert the pulldown in the render queue and the footage will come out the render pipe with the same 3:2 pulldown arrangement it started with. Then you can return it to FCP just like you sent it out.
The good news about all this is that this pulldown removal works exactly the same for film telecine as for 24P footage from the Panasonic DV camera. This much works right out of the box right now, without the need for any sort of FCP add-ons or functionality. So if you are working with this footage captured in through Firewire, your workflow will be the following:
1. capture footage
2. edit the footage (making sure not to cut on any SPLIT frames)
3. export sections of footage you want to work in AE with
4. when the footage is in AE, go Interpret Footage>Main
5. make sure that the Separate Fields is set for Lower
6. hit the "Guess 3:2 Pulldown" button
7. after doing composition work (using a 29.97 FPS composition), render, enabling field render and re-inserting the correct 3:2 pulldown phase
8. replace in the FCP project
The only really import thing you have to remember about this workflow is that your FCP-exported clips CANNOT contain cuts from 24P clip to 24P clip from the FCP sequence. It MUST be continuous frames from the same 24P clip. If you do not have continuous frames, you will upset the regular pulldown phase of the 3:2 system you are asking After Effects to figure out, and will therefore upset the exact order of which fields it hides from view.
There you go. You can shoot 24P in the Panasonic camera, capture through Firewire, edit it all in Final Cut Pro, export any footage you want to clean up in After Effects and then send it all back to tape. As long as you aren't trying to get this footage into any other "native 24" formats like HD or film, you shouldn't have any problems at all. And if you are contemplating cutting film telecined to DV tape (or even mixing film and 24P DV footage, an intriguing idea, Stevie Soderbergh!), the process is precisely the same, provided you aren't headed back to a film print with any of it. If that ain't Pretty Darn Cool, I don't know what is...
Charles Roberts teaches Video and Digital Media in the Communications Media Department at Fitchburg State College in Fitchburg, MA, and is the author of "Final Cut Pro 2 for Firewire DV Editing", published by Focal Press. He spends what little free time he has coming up with ways to eliminate the little free time he has left.
copyright © Charles Roberts 2002
This article first appeared on www.kenstone.net and is reprinted here with permission.
All screen captures and textual references are the property and trademark of their creators/owners/publishers.
|