|
   
| Tutorial: - 10 MORE Things wish I knew the first time I opened FCP |
November, 2010
10 MORE Things wish I knew the first time I opened FCP
by Clay Asbury
 1) Setting Preferences - Final Cut assumes you are going to customize your settings for how you work. 1) Setting Preferences - Final Cut assumes you are going to customize your settings for how you work.
The shortcut for Preferences is Option + Q, or you can make a button and put in your browser. (same goes for system settings and audio/videos settings)
I have added a custom button bar you can download to get started.
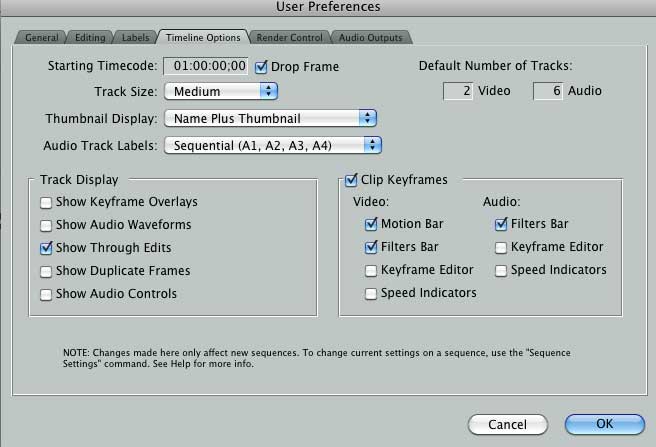
Timeline Options Tab - If you are changing your timeline settings often, customize your settings here.
Here is my standard configuration.
I change video tracks to 3, as I put interview talking head footage on track 1, b-roll on 2, and titles on track 3, and Audio to 8 tracks (narration, nat sound, music, sfx).
Change track size to medium, and then when I need to change this when I am working in the timeline, shift + T will toggle through the track sizes.
For Clip Keyframes I only turn on Video Motion Bar, Filters bar, and Audio Filters Bar.
This way I can see in the timeline what clips have filters/motion effects applied to them.
***Note - When you change the timeline Options in Preferences, this will Only effect any new sequences you create, not existing ones.
If you want to change settings for an existing sequence, double click it in the Browser to open it in the Timeline, and then go to Sequence>Settings (Command key + zero or make a button) to modify the settings.***
Part 1
http://vimeo.com/17031317
Part 2
http://vimeo.com/17031470
2. Navigation Shortcuts (memorize these)
Up Arrow - Moves to Previous Edit or, or use the shortcut ; (beside the L key, so you can quickly go move scrubbing a clip to moving to the next clip)
Down Arrow - Moves to Next Edit or use the shortcut ‘
Shift + Right Arrow - Moves the Playhead 1 second to the Right
Shift + Left Arrow - Moves the Playhead 1 second to the Left
Option and + or - key - Zooms timeline in/out
http://vimeo.com/17036061
3) Making a Favorite Filter or Filter Pack.
I often reuse the same combination of Effects on clips to create looks.
This helps out in deadline situations where you have created your own “template filter”, and you can then tweak the effect for the specific clip.
Apply a Filter or Filters to a Clip in the timeline.
Hit Option + F to make the filter a favorite. ( It now appears in the Effects Tab in the Favorites Bin.)
Rename the favorite something descriptive, and then drag to any clip(s) you want to apply it to.
http://vimeo.com/17036348
4. Effect Availability - this goes hand in hand with working with effects.
There are going to be a lot of effects to sort through, and this list will get very large if you add third party filters.
To manage this I go the Effects Tab in the Browser and check the Effects/Filters that I use in the “Preferred” column.
Then go to Effects>Effects Availability and select “Only My Preferred Effects”.
http://vimeo.com/17036811
5) & 6) How to Work without Constantly Rendering (QuickView/Ram Preview)
5) You apply a Filter to a clip and you get a Red Bar (Means you Need to Render).
To avoid rendering until you have something you like, select Quick View from the Tools Menu.
Put your playhead over the clip (with the Filter applied in the timeline).
Set an In & Out in the timeline for the section you want to preview.
Click Play in the QuickView Window and the clip will Loop.
Adjust the Filter on the Clip (from the Filter Tab in the Viewer) and the QuickView will
update with your changes (First playback will be Slow, Loading into RAM)
6) How to see the Clip with & without a Filter. Bring up the Frame Viewer (Under Tools Menu)
Set to Current Frame & Current Frame without Filters.
http://vimeo.com/17101312
7) Applying Transitions - Apple + T adds the default video transition.
Apple + Option +T applies default audio transition. In FCP 7, if you select multiple clips,
then the transitions are applied to all the clips (make sure you have handles or you will get a 1 frame transition)
8)Making a Droplet to Convert Audio
Launch Compressor
Apple + 3 will bring up the Settings Tab (or Window>Settings)
Type aif in the search box
Select the AIFF 48:16 Preset
Click "save selection as droplet" (middle button top left of Settings Window), and pick Desktop for Destination.
Drop your clip to be converted on the droplet.
http://vimeo.com/17101591
9) Keep Sequences from nesting if you are editing a sequence into a sequence
Apple + F10 - Overwrite Sequence Content, Apple + F9 - Insert Sequence Content
http://vimeo.com/17101932
10) Overwrite/Insert Video only into the Timeline - Use Control + I and Control + O to JUST Target Video (audio only is Control +Option).
NOTE: "10 Things wish I knew the first time I opened FCP" can be found HERE
Clay Asbury is an editor,consultant and Apple/Adobe Certified trainer with over 12 years post-production experience.
He is currently the lead instructor at the Atlanta based FCP Trainer which offers classes in Final Cut Pro and Adobe After Effects.
His approachable and effective teaching style has developed from teaching at Apple/Adobe Training Centers and the Art Institute of Atlanta and Fordham (Tarrytown) University.
His clients include well-known companies such as Turner Networks, CNN, and the Federal Reserve Bank.
He wrote the chapter on trimming in "Edit Well: Final Cut Studio Techniques from the Pros", from Peachpit Press.
copyright © Clay Asbury 2010
This article first appeared on www.claygasbury.com and is reprinted here with permission.
All screen captures and textual references are the property and trademark of their creators/owners/publishers.
|