The hardware
Photos and photo-motion are an
essential part of films, especially documentary productions,
and the lowly flatbed scanner has taken on a new life as a major
tool in digitizing stills for use in digital video. Today's inexpensive
scanners offer incredible resolution. Scanners sporting 1200
dots per inch (DPI) optical resolution-- that is, not
invented or "enhanced" in software but actual tiny
"pixel-picker-uppers" mounted in the scanning tube--
are now easy to find among Canon, Microtek, Hewlett-Packard and
other manufacturers. One of my favorites as of this writing is
the Canon LiDE 30. Retailing for US$100.00, it's slim, storable,
and among the first without a power brick-- totally USB-powered.
I'm sure others will follow.
All scanners listed above supply a plug-in
for direct Photoshop acquisition/import. Most all inexpensive
scanners offer an 8 1/2" X 11" scanning bed. Scan oversized
images in tiled sections, and join them in Photoshop, and-- very
important-- scan each tile at the recommended dots-per-inch
(DPI) rate determined for the total width. Proper dpi rates are
discussed below.
Hardware includes megapixel digital cameras
from Nikon, Olympus, Canon, et al. Many have USB connections;
you can take a high-pixel picture, download it through iPhoto/Image
Capture, and process it further for import to Final Cut Pro,
and still be able to zoom into the image.
The mission: stamp out fuzzy photos
I don't care if you're posting
for a syndicated reality TV show, an A&E documentary, or
even a cloying AMC "Back Story" leveraging yet another
shelf of the immense 20th Century Fox archives of dead star stills
into formulaic all-new programming-- there is no excuse
for fuzzy photos. Soft, pixellating digital photo animation is
everywhere these days. It telegraphs cheapness and disregard
for craft. The goal here is to scan your photos to keep pixels
out of the picture, and leave you with the resolution limits
of the photo grain itself-- unless of course that's the effect
you really want, along with lower Neilsons.
Does this mean you should immediately
scan all your photos at 1200 dpi? Heavens, no, not unless the
photo is 2" wide and you want to zoom into it 5 times normal
for NTSC D1/DV. (You'll see shortly why I was able to rattle
that off so quickly.) Over-rich scan rates are way overkill and
for larger images put real strain on your processing power, which
invites odd display behavior, file corruption and outright freezes,
lockups and crashes due to import limits. There are always
limits, you see. The trick is how to leverage them for your
creative needs.
In August 2001 LAFCPUG's Ken Stone, also a professional photographer,
provided a nice tutorial
on scanning photos for video, showing how to factor a zoom using
two very cool freeware tools. Don't lose those! Tom Wolsky, another LAFCPUG headliner, also
provides a cogent treatment of scanning in the newest version
of his awesome Final Cut Pro 3 Editing Workshop,
from CMP Books, (and yes, my FCP KeyGuide™ is proudly included).
This tutorial takes all that wisdom a
step further and simplifies the process of getting exactly what
you need in pixels into Final Cut Pro and only what
you need-- to work creatively within import limits, to fill the
frame, to zoom in, to reduce render times and strain on the CPU
which comes from tugging around a huge imported graphic while
trying to animate it and above all, to keep the image as crystal
clear as possible.
To make this exciting and dynamic, prepare
a scanner, photos, Photoshop and FCP to play with.
To assist me I'm using the new ScanGuide™ Pro, a two-sided laminated
reference I developed for just this need. I'm frankly excited
about its utility and I hope it's contagious, because a fair
amount of research and design went into it. (The ScanGuide Pro
is available in the LAFCPUG
store.)
 |
ScanGuide™
Pro helps you plan photo zooms that stay sharp, no matter what
format. |
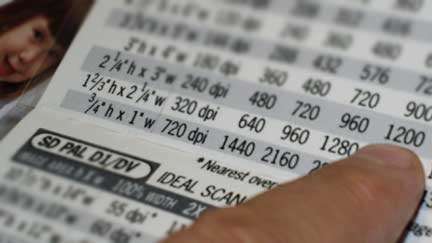
Observe Posted Limits
ScanGuide™ Pro sports built-in safety ranges which observe
graphic import limits. In a typical ScanGuide™ Pro column
header you'll note zoom multiples listed in white,
and then yellow. The white listings keep your scans under 4000
pixels-- Final Cut Pro's current import limit. The yellow listings
keep you within 16,000 pixels, easily accommodated by After Effects®.
Listed below each multiple is the scanrate needed to achieve
it, for image widths from 1" to 14" wide.

White
multiples safe for FCP; yellow for After Effects.
So what's all this fuss about pixel limits
anyway? The 4000-pixel limit is built into current QuickTime
architecture. This will definitely change; it becomes an issue
as more of us get into High Definition post and need deeper scans
to cover bigger image areas. Thus far two major HD formats have
concretized: the Sony 1080i/p standard, with a 16 X 9 window
measuring 1920 X 1080 pixels, and the Panasonic 720p format,
with a 16 X 9 window measuring 1280 X 720 pixels. ScanGuide™
Pro provides scanning tables for both. (For those of you designing
for direct film recording, there's a 16 X 9 Cineon table too.)
A glance at these tells you immediately you're in "yellow
alert": HD photomotion is currently an After Effects game.
After Effects® sidesteps the QuickTime
import limit by implementing its own rendering engine, hosting
up to 30,000 pixels square. At 16,000 pixels maximum the Pro
guide keeps you well within current limits anywhere on the sheet.
Best Scanning Content Candidates
- Continuous-tone black and white
or color photo prints. Photos from magazines or newspapers are
usually printed using the halftone dot screen system, and your
scanner will collect them exactly that way. Unless you apply
a descreening filter at the source or treat it in Photoshop,
the result can be a distressingly bizarre vibrating display called
a moiré pattern.
- Digital camera stills of 2.5 megapixels
or higher, which give you more than the data you need to zoom
in. Suddenly iPhoto becomes relevant to your workflow because
photo image capture is effortless. Rehearse zooms, see if you
have enough pixels for magnification.
Cop it, Crop it
Let's start with your raw flat
art: photos! Knowing that storytellers must proceed based upon
what they can get for scanning-- be it an aging treasure map,
a ripe 3" square Polaroid snap from a family scrapbook,
or an 8" X 10" glossy of his legendary brother Phil
at the Michael
Ochs Archive -- ScanGuide™ Pro lists them as a range
of image areas from 1" to 14" wide, with accurate ratio
heights depending upon the selected video format.
As Ken indicates in his tutorial, you
often want to crop the original and scan only a portion of it.
Most scanner software allows you to do just that in situ.
Just because your photo is 8" X 10" doesn't mean you
need to scan the whole photo. Pre-edit and keep that pixel count
down!
Plan, Then Scan
Once you've determined the actual
desired width, you can determine the height needed from the Pro
guide. Not everything you encounter will be conveniently 4:3
or 16:9-- that's life, but it's still annoying. For instance,
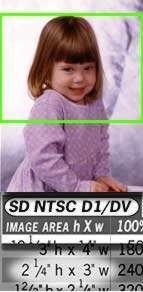
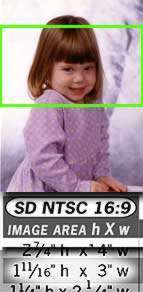
suppose we're dealing with an odd-sized wallet photo. Here's
my cute niece Alexa, original size, 2 1/2" X 3 1/2".
(She's since grown considerably.) I refer to the Pro guide to
quickly derive the required frame height for 4:3 and for 16:9
aspect ratio at a 3" width.
Now this may interest you: I choose the
3" width line because I know from experience there's conservatively
15% "wiggle room" for zooming. That is, up to a point
you can let FCP's QuickTime (or After Effect's) display engine
do some inventive, barely detectable pixel pushing for you--
it helps keep the file size down, too. Small photos generally
need very rich scans.
First I'm concerned about composition.
Pro guide tells me I'll be cropping the SD 4:3 vertical to 2
1/4". That's fine, I can always animate a tilt-up to her
face. I also know cropping becomes more severe for SD 16:9--
1 11/16" height!-- and it puts her into a choker, but I
want that too because widescreen is so cool! I can intelligently
plan "baseline" scanrates to fill either video frame
and start worrying about magnification.
Zooms Loom, Avoid Doom
The results of scanning only
for 100% width and risking a 4X zoom-in, rather than judiciously
scanning for it, are illustrated below. Want to get out of cable
access TV and into PBS or not?
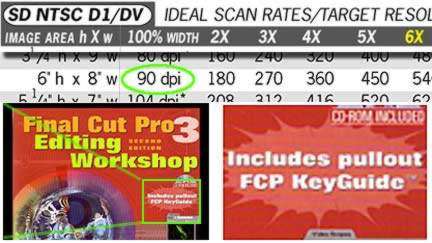
| 90 dpi "Baseline"
scan of this 7 1/2" wide cover looks great at 100%... |
... but falls apart
when zoomed in 4X. |
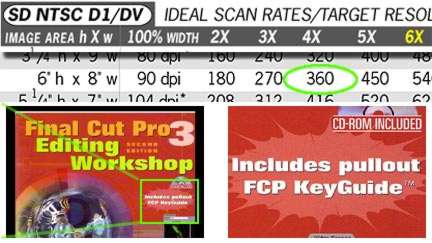
| 360 dpi "4X"
scan looks good at 100%... |
...and just as clean at 4X
zoom, after treatment for moire. |
You can determine zoom factor as a rough
calculation. For instance, assume you have an 8" H X 10"
W, you intend to start wide, and zoom into an area of interest
measuring about 2 inches across. What's the zoom factor, class?
5X! Now look it up on the 10" width line, under "5X"
to get the ideal scanrate to support the zoom-in. For this width,
zooming in five times, NTSC DV 4:3, it's 360 dpi. Make it so!
Which reminds me of another Ken Stone
wisdom-- it's fine to overscan slightly for flexibility. When
you come up with a fractional factor, it doesn't hurt to go for
the next higher zoom multiple. Many scanrates supplied in the
Pro guide are in fact slight overscan rates which hit even numbered
dimensions to avoid video weirdness.
So what do we know or infer thus far?
- That physical photos need to be scanned
to be imported into FCP.
- That a high-resolution scanner is a
good idea, and they're now cheap.
- That there are zillions of fine photos
in the 20th Century Fox archives.
- That to scan small photos to render
properly at 100% width, scan rich.
- That to maintain sharpness at the close
end of a zoom, scan richer.
- That a scan for SD won't work well for
HD; scan even richer.
- That you can scan direct, or overscan
for touchup, and then downsample.
- That there are absolute dimensional
limits to graphic import sizes-- depending.
- That ScanGuide™ Pro will guide
you through scanning based upon your photo image area, your zoom
requirements, your video format and your import limits, for $19.95.
Workflow Tips and Techniques
I don't care how miserly you are with
your pixels: never scan in Line art mode--
that's way too little data. You want at least 24-bit grays or
colors to work with, in RGB format. That mode assigns each pixel
one of 16.7 million available colors.
Overscanning is a very common strategy,
but this can result in huge file sizes-- a 6" X 8"
image scanned at 1260 dpi for DV can support a 14-to-1 zoom-in--
anything but film grain down there? But as a 24-bit file it can
weigh in around 220 megabytes! Do you really need all that data?
Storage isn't the problem these days; it's the processing, applying
filters and ultimately the time rendering your animation of that
image that gets expensive. Especially if you're doing one of
those fabulous Ken Burns-type photo documentaries about another
cool dead white guy and you've got 30 dozen of these photos to
process. (Which is why Ken's producers only scan low rez for
rehearsal animation in the NLE, and use Frame Shop to shoot final versions with motion
control on film, to be repurposed anyway they like-- an
efficient and sensible workflow.) Of course most of us working
in DV/DVCAM/Beta with fewer pieces to animate can scan for output
resolution from the start.
But why would you overscan rather than
scan direct at an ideal scan rate? Well, as Ken Stone points
out, the downsampling algorithms in Photoshop are sophisticated
and help preserve the highest tonal quality and detail. It's
especially useful to overscan if your scanner is not calibrated
via Colorsync profile to your monitor, or the photo is of secondary
quality, or major touchup is required. We like to deal with such
issues at a deep scanrate in Photoshop. For this scenario, downsampling
to an ideal target resolution which still allows you to zoom
in and stay sharp-- is a good thing. It's good bit budgeting.
You decide.
To downsample -- always the final
operation (before pixel resizing and saving) -- you merely open
Photoshop's Image Size window, keep the image dimensions just
as they are but change the Resolution value to the recommended
DPI listed in ScanGuide™ Pro for the X factor you desire,
and make certain the Resample checkbox is checked. That's it.
 |
At
6000 pixels wide this photo cannot be safely imported into FCP
or even Avid systems! Downsampling-- a form of resampling-- reduces
file size and cleverly removes excess pixels. |
While downsampling, keep an eye on the
Pro guide's Zoom Multiple heading. If you discover you must downsample
to a value "in the yellow" for desired zooming, you'll
be importing the scan into After Effects® and animating there,
so prepare to wrestle keyframes to the ground. For instance:
you scan a 5" snapshot for DV 16:9 widescreen dimensions.
You've also decided you'll need to zoom in 4X for dramatic punch.
On the Pro guide, the 5" width line reveals the 4X zoom
multiple to be listed in white- hey, cancel Yellow Alert! You're
still okay for FCP.
Image Adjustment Before Final Import
If you're stuck scanning halftone sources,
try to find the highest quality available and be prepared to
introduce 1 pixel of Gaussian Blur in Photoshop, to fuzz the
edges of halftone dots to help avoid the bizarre collision of
dots and video scanlines-- major moire. Believe it or not, small
blur -- 1 pixel or less-- can actually enhance some details on
video.
The most common scanning hazard deals
with very fine lines of detail measuring 1 pixel thickness or
less. Rich scans carry a lot of fine detail! These invite scanline
twitter especially along horizontals, because the import
just doesn't know where to place the detail --on one scanline
or the one below. During a zooms, this can be a horrible thing.
Sometimes performing a subpixel reposition of the clip itself
solves this, but the best strategy is to apply a 1-pixel Gaussian
Blur to the scene.
A phenomenon you might notice after a
rich scan is what're all these twinkly white dust spots? Even
after assiduous cleaning of the glass bed and the artwork, twinkly
white dust spots pop up. Eliminate these through image editor
touch-up tools before importing to FCP. Otherwise during zooms
they'll twinkle like stars on a cheap B-movie backdrop-- a "mini-moire"
effect.
Almost every uncalibrated scanner requires
some compensation for introducing too much green, red or blue
from the scanning lamp itself. Best done in Photoshop with Color
Balance tools.
If your scanner software allows you to
set a white and black point, this is an opportunity to build
a proper tonal scale right into the scan, (that's a Ken Stone
tutorial too) but again, many would rather do it afterwards in
Photoshop, especially since the scanning software is usually
a Photoshop plugin which brings the image right into the program.
There you can also apply the NTSC Safe Color filter and set your
Output Levels.
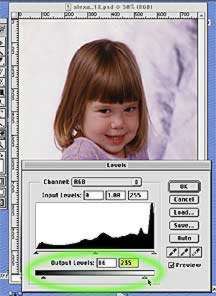 |
Output
levels for legal video: typical image adjustment in Photoshop
|
It's common to adjust the digital Levels
scale in Photoshop to the NTSC setup and white point level standards.
To properly render video levels of a computer scan, boost the
Levels Histogram black value output from 0 to 16 and the white
level down from 255 to 235. Lo and behold, without getting technical,
if you import this file and examine its readout in the FCP Toolbench
Waveform scope, the setup and white values will be legal. If
for some reason they are not, stay right inside FCP and apply
the Broadcast Safe filter, it's been blessed by professionals.
Video Monitor Previews
As with all image editing in
Photoshop, it's extremely valuable to preview your work on a
broadcast monitor, to evaluate color, applied blurs and other
enhancements affecting the image on video. If you employ one
of the qualified analog capture cards , use its live video preview,
or just get the software-based utility Echo-Fire™, a magnificent tool which
pumps the Photoshop or After Effects image out the FireWire port,
through your camera or deck to your client monitor. It also gives
you video scope overlays to check legal video values. Either
strategy eliminates many nasty surprises.
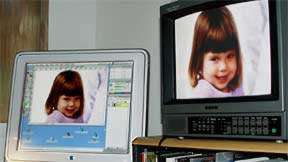 |
EchoFire™
provides a convenient, accurate software-based graphic preview |
The Resizing Rumba
Most video editors working in
Standard Definition NTSC or PAL know the resizing dance to correct
graphics for square to rectangular TV pixels, to prevent a perfect
circle from looking like an egg in video. The nice thing about
the HD formats is that we don't need to futz about compensating
for differing pixel ratios anymore. In HD, all is square, from
your Photoshop scan to final delivery format. All is square throughout
the upcoming workflow. I cannot get over it. Meanwhile, ScanGuide™
Pro provides the scaling factors required for both current NTSC/PAL.
Image Adjustment After Final Import
We've waded through all these
issues so you can finally import the photo, and start swimming.
Your import, for one reason or another,
might not display exactly as you expect right off the bat. A
rich scan may overfill the Canvas when you first view it. Don't
panic. Double-click the clip in the timeline, select the Motion
tab of the Viewer. The culprit is the Scale value, and it's easily
reset here. Experiment with values. See what the import looks
like at 100%. See if you get your wide shot by scaling back--for
instance, if you scanned for 5X, back the Scale off to 20%.
 |
A
3 1/2" X 5" snapshot scanned for SD 16:9 format and
3X zoom factor!
The scanrate to achieve this: 525 dots per inch. |
You will likely encounter oddball scaling
situations, such as the above scan for a Standard Definition
anamorphic widescreen sequence, which is fun to work in. The
original snap was a 3 1/2" X 5" snapshot of some poor
devil negative cutting A, B, C and D rolls back in the late 70's.
(The shot was taken by Michael Korolenko, and his film Since
'45 became a Student Oscar winner.) It was scanned rich for
a 3X zoom. Let's see what happens on import.
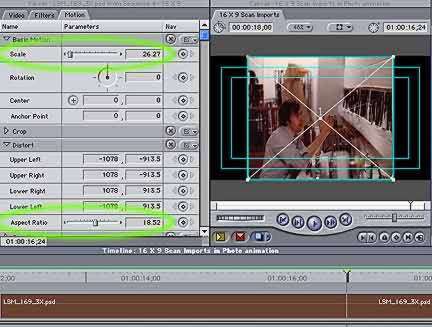 |
The scan
comes in squished horizontally and scaled to the vertical. Notice
odd Scale and Aspect Ratios. Ready to give up and return to real
estate? Wait!
|
 |
First
we expand the image to the original proportions by zeroing out
the Aspect Ratio. |
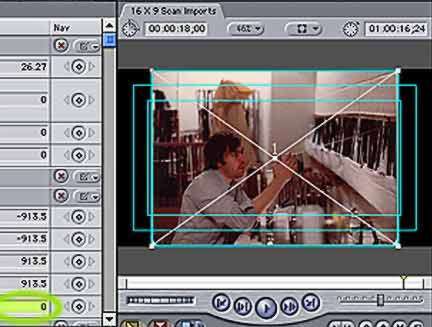
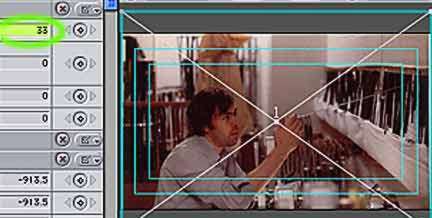 |
Now we can begin to play with our pre-built scan
values. Since the scan was 3X, change the scale from the oddball
import value to 33%. This fills the frame with a wide shot. Top
and bottom are cropped-- you're not surprised by that-- and it
gives you compositional room. |
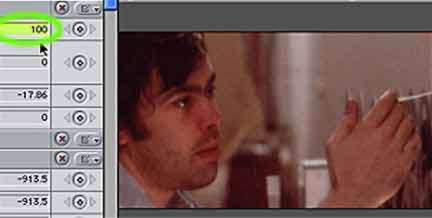 |
Finally,
check the planned zoom by setting Scale to 100%. Hey, isn't that
the young Tim Curry...? |
Photomotion itself is another topic altogether
and best learned in a good class, from an able practitioner,
or competently written procedural text along with your own time
noodling the tools. But it all begins with acceptable source
materials and your ability to scan smart puts you ahead.
Conclusion
Scan rates are really nothing
you couldn't figure with a calculator...but there are many variables:
photo image area, zoom intent, aspect ratios, resizing, alien
workflows, el niño, the stock market. To save you
time, it's all been integrated for you, all the popular international
video systems, for deep zooms, for any practical width from a
1" postage stamp to oversize 11" X 14 " prints,
in ScanGuide™ Pro.
Scan away, stay sharp, and don't make
me come down there with the big shoes: stamp out the fuzzies!
Grateful Thanks to
Ken Stone, Phil Hodgetts, Trish and Chris Meyers, Michael Korolenko,
Tom Wolsky
and of course, Alexa.
Click HERE to download the PDF
Version of this article. (4MBs)
You must
have Adobe Acrobat  to view the PDF version.
When
he's not obsessing over fuzzy photos, or differences between
Avid and FCP splicing buttons, or annoyances of the OSX interface,
Loren S. Miller is an award-winning documentary producer,
freelance editor, screenwriter, project consultant, graphic designer,
editing teacher, reporter, author, active member of both Los
Angeles and Boston Final Cut Pro User Groups, developer of ScanGuide™ Pro, and KeyGuides™ for major Macintosh media
authoring software. Reach him anytime at neotron@mindspring.com.