|
|
   
| Tutorial: Various ways you can edit video in Final Cut Pro |
Oct, 2001
"Slice and Dice"
-Various ways you can edit video in Final Cut Pro-
By Tom
Wolsky
About this article:
There is no right
way to edit a scene or a sequence or even a whole film or video;
there are only bad ways, good ways and better ways. What we're
going to do in this lesson is to look at some video and edit
it. I'm going to give you a number of different ways of working
with it, and a few different ways to cut it up; call it Slice
and Dice.
The article
is adapted from the book Final
Cut Pro 2 Editing Workshop
by Tom Wolsky.
Cutting Up Those Shots
There is no right way to edit a scene
or a sequence or even a whole film or video; there are only bad
ways, good ways and better ways. What we're going to do in this
lesson is to look at some video and edit it. I'm going to give
you a number of different ways of working with it, and a few
different ways to cut it up; call it Slice and Dice.
There are basically two strategies for
cutting long pieces of video. The first is to create short clips
while leaving the whole material intact in each clip. I call
this the Slice method. The second is to make subclips, which
divide the master clip into shorter sections, each only the length
of the selection. We'll call this the Dice or Subclip method.
They both have advantages and disadvantages. It's important to
understand the distinction between different types of clips.
First there is the source media, the actual digital material
on your hard drive. It may be a whole reel of tape, or it may
be shorter sections, either way this is the master clip for your
video. It contains every frame of the source media available
to you. A Sliced clip is the same as the master clip it's taken
from, except that a start point and an end point are defined
for a particular shot. In a Diced clip not only are the start
and end points defined, but the media that's useable by the clip
is limited and does not have all the media in the original.
Slice 1
There are two methods of Slicing up your
material, either in the Viewer or in the Timeline itself. Let's
start in the Viewer. Begin by creating a new Bin in your Browser,
then double click on the master clip in your Browser to open
it in the Viewer. Play the clip in the Viewer to find a shot.
Use the left and right arrow keys to find the first frame of
the shot and hit I to mark the In point. Play the clip and find
the end of the shot. When you've found the end hit O for Out
point. Grab the picture in the Viewer and drag it into the Browser
and drop it on the new Bin you created. You've now made a new
clip in the Browser. You can, and probably should, rename this
clip something appropriately descriptive. Twirl open Bin and
double click on the name, which will highlight it and open a
renaming box. Type in the new name. This is a copy of the master
clip that is still in the Viewer. Double click the newly named
clip in your bin to bring it back into the Viewer.
At this stage your Browser, in list view,
together with your Viewer, might look something like this.
Figure 1
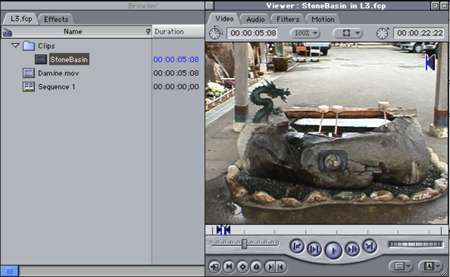
Browser and Viewer with the
Sliced Clip
Notice that the clip that's been named
Stone Basin comes in with an In and Out point marked,
and notice also that the clip contains all the video that's in
the master clip called Damine.mov. The upside of this
is obvious. The master clip is made up of a long length of material,
perhaps even a whole reel of film, or even a roll of video tape,
though I would advise against this. Because a Sliced clip is
a copy of the master clip, you can now access any shot in the
reel from inside any Sliced clip you make from the master. That's
the upside; the downside is scrubbing. It's very difficult to
do in the Viewer because even a tiny movement will move the Playhead
a long way up and down the Viewer Scrubber Bar. Unfortunately
FCP does not allow you to zoom into the Viewer Scrubber Bar,
or change the scale of the Scrubber Bar, as you can the Timeline.
It would be a very beneficial addition to FCP, and is a feature
available in a number of other non-linear editing systems.
A note on where edit points occur. The
shot change between edits actually takes place between the frames,
that is, you see one frame and then the next frame you see is
the first frame of a different shot. So when you're marking In
and Out points you should know where the shot change
is actually taking place. If you mark the In point for
a frame that you're looking at in the Viewer, that will be the
first frame of the new clip. The edit will take place in the
space before that frame. If you mark as an Out point the
frame you're looking at in the Viewer, that will be the last
frame in the clip, and the edit will take place after that frame.
Slice 2
The second Slice method is in the Timeline.
This is where you really are slicing with a digital razor blade.
Open up your master clip from the Browser
into the Viewer. It'll probably have an In and Out point marked
already. We need to clear those. If you control-click on the
Scrubber Bar at the bottom of the Viewer you will evoke a contextual
menu. Select Clear In and Out. This will, surprise, surprise,
clear the In and Out points.
If you've opened a clip from the Browser
and want to clear it's In and Out points, you can also use the
keyboard shortcut Opt-X. You can't however clear the In and Out
from a clip that's been opened from the Timeline. By definition
a clip that's in the Timeline must have marked In and Out points.
Open a new empty sequence and drag your
master clip into into the Timeline. When you place a clip
in the Timeline the playhead automatically jumps to the end of
the clip, ready for you to place another clip in position. In
this case we don't want to do that, so simply click in the Timeline
window to make it active and then hit the Home key on your keyboard
to take you back to the beginning of the Timeline.
Press the spacebar to play the master
clip in the Timeline. The video plays in the Canvas. Again use
the spacebar to stop and the left and right arrow keys to find
the start of the shot of the stone basin. When you've found it
hit Control-V. This will cut the video and audio on the clip
as if you were cutting it with a knife or a razor blade, which
is what used to be used to cut film and audio tape, and even
videotape when it was first edited. What you are doing is the
digital metaphor for the same process. Now that you've made one
cut, find the end of the shot and again use Control-V to cut
the shot.
A moment we talked about where the cut
takes place when you're editing, that the In point cuts the space
before the frame you're looking at, and the Out point cuts after
the frame you're looking at. Well, the razor blade always cuts
on the gap in front of the frame you're seeing in the canvas.
So in this Slice method to get the last frame of the shot you
want you have to be looking at the first frame of the shot after
it. If you control-V on the last frame of the shot, the next
shot will have one spurious frame at its head.
After you've made your two cuts with
the digital razor blade in the Timeline window, grab the shot
in the Timeline and drag it into a Bin in the Browser.
Using Control-V cut out a section that
you don't want to keep. After you've made the slices click on
the piece that you've cut from the master clip. This will highlight
the edited section. Hit Delete. This will remove the clip
from the timeline, but it will also leave a gap in the timeline.
So let's undo that using Cmd-Z. The undo will make the
shot reappear in the hole in the timeline. Instead of simply
deleting it, we will do what's called a Ripple Delete. Select
the clip, now hold down the Shift key, and hit delete. In addition
to removing the clip, the Ripple Delete also pulls up all the
other material shortening the timeline.
This is a good point to explain a bit
about the relationship between the clips in the Browser and the
clips in Timeline. Quite simply, there is no relationship, no
direct, linked relationship anyway. They are two separate and
distinct items. They may be copies of each other, but they are
quite separate clips that share the same media. So in the first
Slice method, when you mark up the master clip with In and
Out points, you are marking one clip and making copies of it
in the Bin. When you drag the master clip from the Browser and
place it in a Timeline, what you are placing there is a copy
of the master clip. So when you razor blade and ripple delete
the clip in the Timeline, you are not in any way affecting the
master clip that remains untouched in your Browser.
In addition to the keyboard shortcut,
Control-V, for cutting the clip in the Timeline, you can also
cut it up with the Razor Blade from the tools. The letter B for
blade will call up the Razor Blade tool.
Now as you move along your clip in the
Timeline, your cursor will show the Blade tool, rather than the
Selector. The letter A is the shortcut that will return you to
the Pointer tool. Of course with the cursor in Blade mode you
cannot select a clip. Trying to select a clip will simple cut
it, so to do your Ripple Deletes you would need to switch back
and forth between the Blade and the Pointer. This can be done
quickly using A and B. Or you can leave your cursor in
Blade mode, and instead of clicking to select a clip, hold down
the Control key when the cursor is above the clip you want to
remove. Holding down the Control key will change the cursor from
the Blade to the Contextual Menu. Mousing down will open the
menu, and from the menu you can select the function Ripple Delete.
Neat isn't it?
Slicing, whether in the Viewer or the
Timeline, has the advantage of being a quick and easy method
to access all your material while still cutting it up into shots
for editing. It has a couple of disadvantages; one is the problem
in the Viewer as we discussed earlier of not being able to scrub
the video easily. The other disadvantage is the problem of transitions,
but I'll talk about that a bit later after I show you the Dice
or Subclip method.
Dice
I call it Dicing because, as you'll see,
we're making clips, which, though the same size as the clips
in the Slice method, are more finely honed so only the clip's
defined duration remains with each clip. Once again open your
master clip into the Viewer.
In the Viewer find a shot you want to
keep. Mark up the In and Out points as you did in the first Slice
method. Now instead of just dragging the clip into the Browser,
hit Cmd-U. Why U I don't know, but U it is. Cmd-U creates
a subclip that automatically appears in the Browser with the
same name as the clip it was taken from and with the name highlighted.
You could also use the Modify menu and go to Make Subclip. Notice
the different icon created for subclips, indicating that they
are torn out of another clip.
Figure 2

Subclip in
Bin
Let's see how the Dice method is different
from Slicing. Open the newly created subclip into the Viewer.
Unlike a Sliced clip that has its In and Out as a small portion
of the master clip, in the subclip the In point and Out
point do not appear at all.
Figure 3

Subclip in the Viewer
The subclip is treated as a separate
piece of media, though in reality it's not. Notice the film sprocket
holes on the left side of the frame in Figure 3. Whenever you
see this, on the left or right edge of the frame, it's the indicator
that you're at the limit of the media for that clip. Though the
Subclip is only a portion of the piece of media on your hard
drive for your master clip, it's treated in FCP as a complete,
self-contained piece of media, hence the film sprocket indicator.
The real advantage to working in the subclip method of editing
is that it's of course very easy to scrub the clip, running the
mouse along the length of the media, but if you need to access
more of the media within that clip it's a little more difficult.
All you have to do is select from the Modify menu Remove
Subclip Limits.
When you do this the clip, if it's in
the Viewer, will suddenly disappear and a Slug will be loaded
in its place. I'm not sure why the application does that, but
it does. If you again open that clip after the subclip limits
are removed, the clip has reverted to its whole length. You can
also remove subclip limits from a shot or a whole bin of shots
if you wish directly in the Browser. Just select the bin and
pull down Remove Subclip Limits from the Modify menu.
All the subclips will revert to full length clips.
The fact that you can't normally exceed
the limits of the subclip is also an advantage, while being a
problem with the Slice method described earlier. The problem
is transitions. These take extra media, extending the shot to
create space for themselves. Transitions will take any available
media. In the Slice method that media may include sudden zooms,
garbage frames, or bits of another shot. These will appear as
a sudden flash during a transition, barely noticeable, but disconcerting.
Because subclips can't extend the media beyond their duration,
this will never happen with a subclip. The trick to Dicing is
to make sure that you include in your subclip not just the really
good bit of the shot you want to use, but extra material, in
fact probably as much material as you can safely without including
any garbage or spurious frames. This will allow the transition
room to extend the material as long as required.
c)Organizing the Clips
Once you've got your material diced up
you should spend some time getting it put away in some fashion
that lets you find things again. There are no firm rules about
this, and I find each project tends to dictate it's own organizational
structure. Usually I begin with one bin that holds all the master
shots. These are usually pretty big chunks of video, 10, 20,
30 minutes, sometimes smaller, usually not. From the master shots
the material is separated out into bins. Keeping the master shots
has the advantage that you can go back to the bulk of the material
to look through it. I like to do this as the project nears completion,
to see if there is anything I overlooked, which might be useful
in light of the way the material gets cut together.
The separate bins can be organized in
a variety of ways. Narrative projects tend to have material broken
down in scene bins, with sub-bins for different types of shots
or characters depending on how complex the scene. Documentary
projects tend to break the material down into subject matter,
a bin for all the forest shots, another for logging scenes, another
for road work, another for weather perhaps, another for all the
interviews, another for sound, another for narration tracks,
another for music, another for graphics. As I said there are
no hard and fast rules on how material is organized. It's a bit
like the Eskimos, if your subject is snow, you may have 20 different
bins for different types of snow, but if your project is weather
in general, there may only be a single generic snow bin.
The real trick is to break down your
material into enough bins so that your material is organized,
but not too many bins so it becomes difficult to find material.
As you move clips into bins add notes, lots of them. The more
information on the clips you can include the easier it will be
to find material.
This part of the editing process, cutting
up your shots and organizing them into Bins is critical to working
efficiently, particularly for long form work. The longer the
project, the more tapes you have, the more sequences you, the
more complex everything becomes and having your material well
organized is crucial. Fortunately FCP provides ways to help you
organize what you're doing. Principally you have Bins, and Bins
within Bins. But at the most visible level you have labels, color-coded
and user definable as we have seen in the Browser. The Browser
also provides a number of Comment fields, a Label field, a Description
field, Log Notes and well as a Good check mark. Do not overlook
or hurry through the note taking and entering process. Every
editor will have his or her own way of organizing material, loading
information into the computer, and keeping it consistent. However
you do it, it opens up to you one of computer-based editing's
great boon, the computer's ability to search through huge amounts
of data almost instantly. To be able to use these search capabilities
you have to enter the information first. You can enter it either
directly in the fields in the Browser, or by Control-clicking
and selecting Item Properties, in the tabbed Logging Info panel.
copyright©2001Tom
Wolsky
The
article is adapted from the book Final Cut Pro 2
Editing Workshop by Tom Wolsky. To purchase this book or for more information,
click HERE.
About Tom
Wolsky
Tom is the author
of Final Cut Pro 2 Editing
Workshop,
He graduated with honors from the London School of Film Technique,
spent several years as a screenwriter; then worked at ABC News'
London Bureau and in New York as a producer and operations manager
for nearly 20 years at World News Tonight, World News Now, and
Good Morning America. He's been teaching Television and Video
in Northern California since 1992 and added Final Cut Pro to
his editing repertoire 2 years ago.
He has his own production company, South Coast Productions, which
is based on the Media100, and is currently working on a short
documentary for the Mendocino Land Trust.
About the book Final Cut Pro 2 Editing
Workshop
Final Cut Pro
2 has been extensively documented by Apple with a 1,400-page
manual. Final Cut Pro 2 Editing Workshop is designed to complement
this software documentation with a series of tutorials that provide
practical lessons in using the application. Through demonstration
projects, entry-level editors and Final Cut users learn editing
principles and how to realize them with Final Cut Pro 2. The
book teaches readers how to edit using FCP - with the same tips
and principles given in film schools. The companion CDROM contains
all of the necessary materials, including raw footage and sequences
the reader needs to gain a working knowledge of FCP.
|