We talked before about the two types
of transitions with DVD Studio Pro 3. In
Part I, we focused on using transitions with Standard Transitions
as the focal point. I would like to now describe the other transition,
known as Alpha Transitions.
Apple provides Alpha Transitions which
you can use within your DVD Studio Pro 3 projects. The usage
of these Alpha Transitions is the same as the Standard Transitions,
so we won't go over that again. Instead, this article will focus
on the Alpha Transition itself, since this feature provides you
with a unique opportunity in terms of customizing your project
look and feel. That opportunity is the creation of your own Alpha
Transitions.
This article will serve as a basic overview
of this new feature by examining a simple Alpha Transition that
you can download and inspect for yourself. If you are an Adobe
After Effects owner, you will also have access to the small project
files used to create this sample Alpha Transition described here.
By the end of this article you should be able to create basic
Alpha Transitions and import those transitions into DVD Studio
Pro 3 so that you can re-use them over and over again. With that
said, let's get started.
Inside Alpha Transitions
Alpha Transitions use up to three separate
animation clips or videos combined to form a single transition.
Let's take a look at a screen shot of one mid-way through its
transition so as to give a foundation for this discussion.
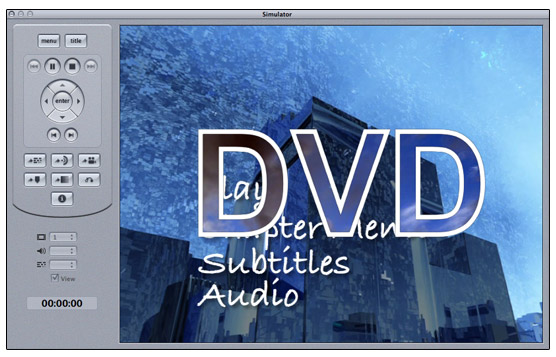
What you see in the graphic above is
really two menus and a transition video. The word DVD appears
to have a fill inside, but it does not. The word DVD is an animated
transition that starts from afar and gets closer and closer to
the screen until you are inside the text. The outside of the
word is the menu I am in, and the inside of the word is the track
asset I am in transition to. The Alpha Transition is really nothing
more than an animated outline. However, the method used to create
this transition, that is, the names of the QuickTime-based animations
used, and the colors used, all play an important role in how
this simple animated outline knows to display one menu in the
background and another inside my animated outline text.
Once this Alpha Transition is created
and imported into DVD Studio Pro, I can re-use it, and each time,
the background and filled area inside the text outline will depend
on the source and the destination of the assets that make use
of this transition. For example, if I use this transition from
a menu to a track asset, then the menu is the source or background,
and the fill area is the target or end. I only have to create
the transition once, and DVD Studio Pro does all the rest of
the hard work for me again and again in all my future uses of
this transition.
Now, there are two good methods used
to create this kind of Alpha Transition:
Method One
Method one uses two animated clips to
create the single transition.
Clip One
This clip contains an animation or video
with a premultiplied alpha transition.
Clip Two
The second clip uses a background matte
to determine which areas of the animation or video will become
the start of the transition and the end of the transition. The
start is the first frame of the menu we are currently in, and
the end is the first frame of the target we are in route to.
Transitions are all about going from one menu or slide to another
menu or track or slide. The background matte clip uses two colors
to define these two elements. The white area of this clip becomes
the background, aka the menu or slide I am currently in. The
black area of this same clip defines the end. This is the target
asset I am in transition to.
Method Two
Method two uses three clips.
Clip One
The first clip is the animation or video
clip. This is the same as the first clip in method one with the
exception that there is no premultiplied alpha channel in the
animation.
Clip Two
The second clip is a matte clip, which
takes the place of the alpha channel normally used in the first
clip.
Clip Three
This is the same as the first method's
last clip. The clip uses a background matte to determine which
areas of the animation or video will become the start of the
transition and the end of the transition. The start is the first
frame of the menu we are currently in, and the end is the first
frame of the target we are in route to.
This three-clip method, in my opinion,
is much less prone to user-error, and easier for the average
person to understand and create with a wider base of software.
If you fully understand the three-clip method, feel free to strip
it down into a two-step process. I will go over the three-clip
process here.
With that understood, let's get started.
Down below are three graphic images representative
of my three clips used to create the Alpha Transition you see
in the DVD preview up at the top. I created my three animated
clips using Adobe After Effects. The naming convention of these
three clips is important to how the clips work together and how
they import into DVD Studio Pro. We'll go over that after we
describe the clips, but for now, take note that each clip has
a name and that name is based on a standard naming convention.
The name of the folder we'll later use to import these three
clips into DVD Studio Pro is also based on this same naming convention.
Let's get started with clip one now.

Name:
DVD.mov
This first animation clip uses a text
outline against a black background. This is known as the "video
clip" of the three clips. This whole image is simply black
and white. Starting as a tiny image from afar, it grows over
two seconds in time to completely fly past the screen towards
the viewer. The goal is that you get so close to the letter V
in DVD, that you cannot see anything else except for what is
inside the text. Inside the text will later become the menu or
track of the transition target.

Name:
DVD-matte.mov
This second clip here is known as the
"matte clip", and is in this case a copy of the first
clip. However, this clip is used in a different way, defined
by the color used within and by the name of the file itself.
The white area for example defines where my outlined text will
appear. This is easy to see since it is the same outline shown
in the video clip. The text outline in the video clip could be
any color. I just happened to choose white. In this matte clip
however, I must use white to illustrate where the video or animation
in this case will need to be preserved. The black areas surrounding
the white area act as a matte. The matte tells the transition
that this is the background. This color must be black. So far
we have defined two states. The first is what my animation is,
and the second is where it is not.

Name:
DVD-backgroundMatte.mov
This is the third and final animation
clip known as the backgroundMatte. Now take notice that this
is not quite the opposite of the second clip, though you may
have quickly assumed that. Note there is no outline in this clip.
The text DVD is a solid black, not an outline, and all that surrounds
the words DVD is solid white. This is the background matte.This
background matte is used to define where the start and end of
the transition are placed.
The menu I am in now is placed outside
the white area, becoming the background of this transition. The
black-filled area becomes filled with the video or menu of the
target of this menu or button associated with this transition.
As this animated DVD text approaches me, so does that field of
view, until it becomes my entire view.
Take a look at the simulator image again.
Here we see I am in a menu. We can make out the text in the menu
now covered by this transition captured mid-way through. The
outside is the white area, which is filled with my current menu.
The inside of the DVD text, which is the black area of background
matte clip, is now filled with the footage of the track I am
in route to. The outline text defined in the video clip, and
preserved in the matte clip, remains unchanged.
Let's take a closer look at the background
matte in After Effects.
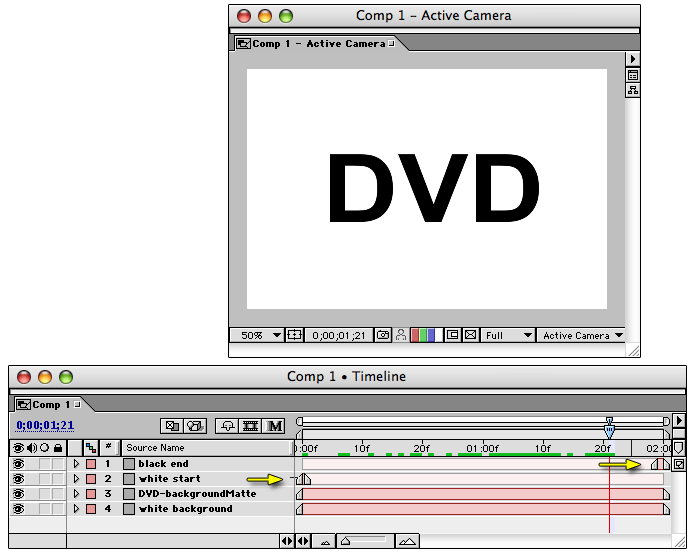
The timeline above is my third animation,
called DVD-backgroundMatte.mov. As a general rule, Apple recommends
that the first frame in the Alpha Transition be pure white, while
the last frame should be pure black. You should note the four
tracks in my timeline. Starting from the top down I have black
end which if you note the yellow arrow all the way to the right,
shows a few frames in pure black. This is because my DVD text
never actually consumes the entire screen. So I used the last
few frames to fill in the effect here. This way, the entire target
consumes the viewer in my transition.
Let's look one track down. Note the yellow
arrow mid-way left. The layer is called white start. This is
my full frame of white to kick off my transition. Otherwise,
it's never actually pure white. The text DVD is off in the background.
The third layer is my black DVD fill.
Again, this combined with the fourth layer, which is pure white,
gives this clip its full compliment of required properties.
By now you are likely interested in seeing
this for yourself. To do that, we need to import our set of DVD
clips into DVD Studio Pro in such a way that it becomes an option
in the transitions pull-down menu. To do that, we have to be
clear on some standards that we must follow in terms of the names
of the files we import, and where they go.
To help you, I have the very set we have
been discussing here ready for you to use in two ways.
1. If you have After Effects 5.5 or better,
you can load the clip projects I have created in After Effects.
They are very simple to understand once you see them.
2. I also have all three small clips
as full 720 x 480 animation codec-based clips ready for you to
import into DVD Studio Pro now. This is only a 623K download,
so go ahead and grab this.
> Alpha-Transition
Clips and Projects <
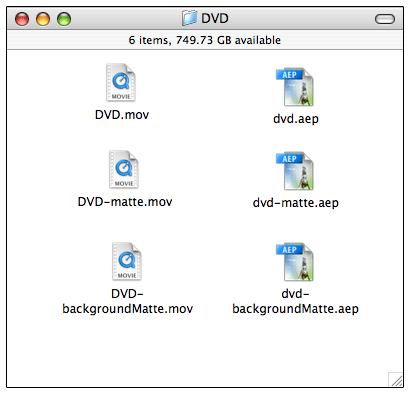
Take a good look at the naming of the
files in this folder. Notice the names I gave these files are
the same names outlined throughout the article. This is very
important to the success of using these clips in a transition.
The first clip, which contains my animation text, is called DVD.mov.
The next one down, which we described as the matte for clip one,
is called DVD-matte.mov. It carries the same name with the addition
of -matte in lower case, just as it is shown. The final clip,
which we described as the clip that defines the start and end
of the transition, is called DVD-backgroundMatte.mov. The b in
background is in lower case, but the M in matte is in upper-case.
This is exactly what you need to do in your own clip creations.
If you scroll up to the descriptions of the three clips you will
notice I have name tags on each of them. Those match exactly
the order displayed here.
Now, also take note that my folder is
called DVD. Both the folder, and the assets, must all start with
the name of the transition clips. So by naming my first clip
DVD, I must continue to use the prefix of DVD in each of the
other clips, and as the folder name. This folder named DVD, with
my three clips, must go inside a folder called Transitions. Here
is a step by step guide to help you.
Importing the Alpha Transition
1. Open your home folder.
2. Open the Library folder in your home folder.
3. Open Application Support.
4. Open DVD Studio Pro.
5. Create a folder called "Transitions" if this folder
does not already exist.
6. Create a folder called "DVD".
7. Copy the three clips into the folder: "DVD" into
the folder called DVD inside the Transitions folder.
1. DVD.mov
2. DVD-matte.mov
3. DVD-backgroundMatte.mov
Your file locations should look like
this when properly imported:
- ~/Library/Application Support/DVD Studio
Pro/Transitions/DVD/DVD.mov
- ~/Library/Application Support/DVD Studio
Pro/Transitions/DVD/DVD-matte.mov
- ~/Library/Application Support/DVD Studio
Pro/Transitions/DVD/DVD-backgroundMatte.mov
The bold text area is likely what you
must create on your own.
Once you have these imported, go ahead
and load up DVD Studio Pro 3, and test this. Open any menu and
create a transition between a menu and another menu, or a menu
to a track asset. In my example below I am using a button's property
to define my transition.
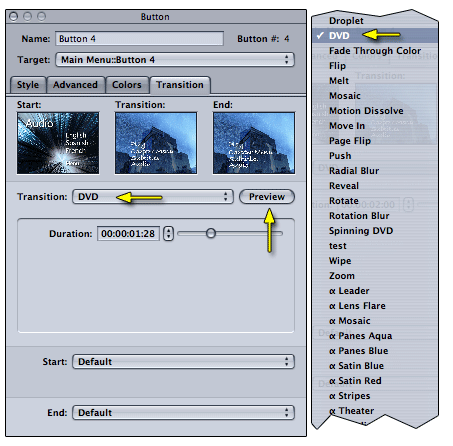
Select the Transition and note that though
this is an Alpha Transition, it does not sit with the other Alpha
Transitions. It is simply stored in alphabetical order. It will
be up to you to come up with your own naming convention to keep
your own Alpha Transitions separated from the rest of the transitions.
Conclusion
I hope this at least gives you a basic
foundation from which to further explore the potential of these
Alpha Transitions. This is just a summary of the very basics
of their potential. I am sure that in no time, many third-party
transitions will become available as add-ons to DVD Studio Pro
3. In the mean time, I hope this article gets you started on
creating your own.
 |
©Copyright
2004 Alex Alexzander
All Rights Reserved
All
artwork and screen shots are the property of Alex Alexzander
|