Introduction
We have talked about Transitions, Alpha
Transitions, and of course the Graphical View. Now it is time
to go over the less known but very welcomed new enhancements
behind those incredible new features.
These new features include the ability
to modify Photoshop-based assets in the menu without requiring
us to unload and reload DVD Studio Pro to see the results. Instead,
we have instant access to our modified Photoshop assets. You
can now add a layer, change or remove a layer, and so on and
see the results reflected directly in DVD Studio Pro the instant
you save your Photoshop modifications.
DVD Studio Pro 3 also supports more recordable
formats, DTS audio, Jacket picture creation, and other more subtle
editing enhancements.
Please join me for a brief overview of
these new features:
DTS
Audio Support
DVD Studio Pro 3 adds support for Digital
Theatre Systems single channel through 5.1 channel surround sound,
also known simply as DTS. This is similar to the way DVD Studio
Pro supports AC-3 with the exception that the encoder is not
included as it is for AC-3 with the addition of A.PACK. As a
result, you'll need to introduce a third-party encoder into your
workflow to add this sound format to your DVD project.
One such encoder is the SurCode DVD-DTS
encoder (SurCode DVD-DTS Encoder
from Minnetonka Software). This encoder runs on the Microsoft
Windows platform and as such may require some extra work from
anyone using a Macintosh since the encoder requires mono .wav
formatted files as its source material for encoding to DTS.
The workflow is similar to what you are
used to with A.PACK; however, rather than starting with AIFF
as your uncompressed audio standard, you will need to start with
the .WAV format, which is the uncompressed audio format common
to Windows. For Final Cut Pro 4 users you may wish to open your
exported .AIF audio with Peak 3.3, and then export as dual mono
.WAV format as a starting point for bringing your audio into
the SurCode DTS-DVD encoder.
Encoding
The graphic above is a screen shot of
the encoder. As with A.PACK you can see we start with the ability
to encode varying separate uncompressed channels into a single
DTS encoded file suitable for importation into DVD Studio Pro
3. This differs from A.PACK in that the channels must be in mono
before the encoder will accept them.
DTS Formats
Saving DTS files also differs from what
you know of saving AC3 formatted files. Unlike A.PACK's .AC3
format, there is not one single file type created with the DTS
encoder. Once you are ready to encode, you have the option of
saving to three varying types of DTS.
1. DTS Padded (.dts)
2. DTS Compact (.cpt)
3. DTS WAV (.wav)
The .CPT file format, also known as Compact
DTS, is the preferred DTS file type as it does not pad buffers
with zeros until they are full. Import a .CPT based DTS audio
asset and reveal its properties through the property inspector.
Note the graphic above showing the recognized formats. The white
arrows show two samples of DTS audio. Both are 5.1 encoded. I
call the one on top "sample_cpt_1536.cpt". Likewise
the one on the bottom is called, "sample_cpt_768.cpt".
This use of 1536 and 768 is because this is the bit rate at which
each has been encoded. 1536 represents my 1.536Mb/sec encoded
DTS file while the 768 is my 768k/sec encoded sample. The 768k
is obviously meant to save space and reduce the overall bit rate
consumption of this sample project.
The .DTS file type is a padded file type,
and will not import with Apple's import function. The .WAV file
format is used ordinarily for monitoring purposes and not for
authoring. Importing the .WAV file will be seen by DVD Studio
Pro as an ordinary PCM formatted audio asset.
If you are not sure if your file is properly
recognized, you can click on the imported audio asset in the
Asset tab and refer to its property inspector. When we check
the property of the .WAV file format, we see it is viewed as
2-channel wave audio: however, the .CPT file format is properly
seen as DTS Audio, with all of its channels properly indicated
and reproduced by DVD Studio Pro 3.
Previewing AC-3 / DTS
There are several ways to preview your
DTS audio:
- Using the SurCode DVD-DTS encoder software.
- Using your hardware DVD set-top player
with capable DTS decoder.
- Using the Apple Software DVD Player
with optional DTS decoder.
Previewing DTS - SurCode DVD-DTS Encoder
Let's start with the most obvious, which
is to simply use the encoder itself the same way you would with
A.PACK for AC3. To do this you will need to use the options pull-down
menu to set the default device options.

Here you will select the hardware or
output that connects a DTS decoder to your hardware as the playback
device. Once this is completed, you are ready to preview DTS
encoded audio. SurCode allows you to preview using the source
uncompressed .WAV channels you have imported in the encoder screen,
or select destination to listen to any DTS encoded file you have
just encoded.

While in preview, you can use the mute
and solo to selectively listen to certain channels as needed.
Previewing DTS - Using Apple's DVD
Software Player
The Apple DVD Player software alone cannot
output DTS audio without a DTS decoder. According to the Apple
manual, you have a few choices:
1. Attach a decoder to your Power Macintosh
G5's digital audio port.
2. Use an external USB based decoder.
3. Use an external FireWire based decoder.
In my own test, I was not able to hear
any DTS audio tracks through the software DVD player when connected
to my DTS decoder. I was not able to test any USB or FireWire
based solutions for the software DVD player.
If you would like to test your own DTS
decoder, you will need to configure the Apple DVD player software
through preferences to route the audio to the decoder using the
Audio section of the Player preferences shown below.
Previewing DTS - Using a DTS Capable
DVD Player and DTS Decoder
If you already have a DTS DVD player
and a DTS decoding sound system, you may simply burn a DVD-R
disc and sample the audio on your home DTS sound system. This
method worked very well for me. Using a simple Toshiba DTS DVD
player with an optical output going into my Sony DTS decoder,
the decoder instantly recognized the DTS audio encoding on the
DVD-R disc and played the 5.1 encoded DVD perfectly.
Note the graphic above. What you see
here is the Video Title Set of my burned DVD-R using the .CPT
DTS file format. Note that the red outline shows that DTS is
the audio type, and that all 6 channels are properly set.
[top]
Improved
Integration with Adobe Photoshop
Another new feature inside DVD Studio
Pro 3 is its improved integration with Adobe Photoshop. If you
have used DVD Studio Pro in the past, then you know that once
you brought in an asset, that was it. If that asset required
a modification of any kind, often you were required to restart
DVD Studio Pro in order to see any changes you had made with
assets already in use by DVD Studio Pro.
Those days are now behind you as DVD
Studio Pro 3 allows you to edit any in-use Adobe Photoshop asset
directly in Photoshop. The results of that edit will be updated
immediately, and reflected for your view inside DVD Studio Pro
3 the moment you save that edited asset inside Adobe Photoshop.
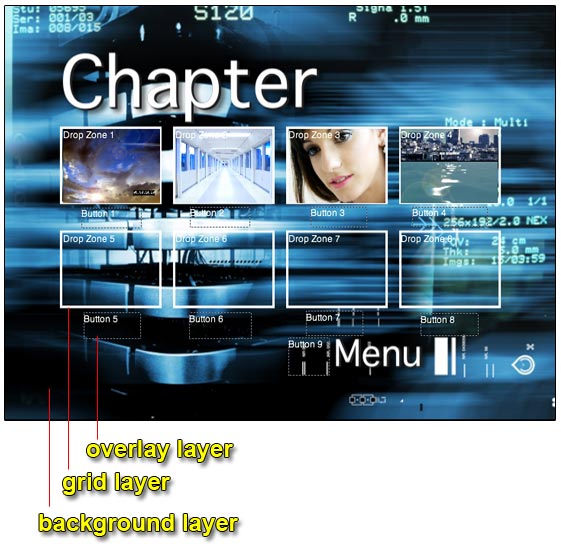
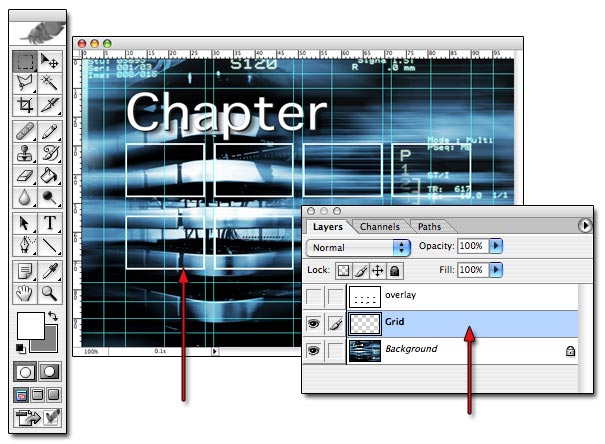
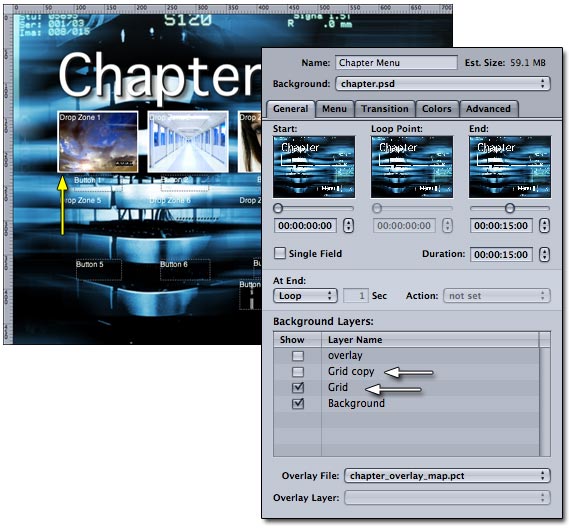
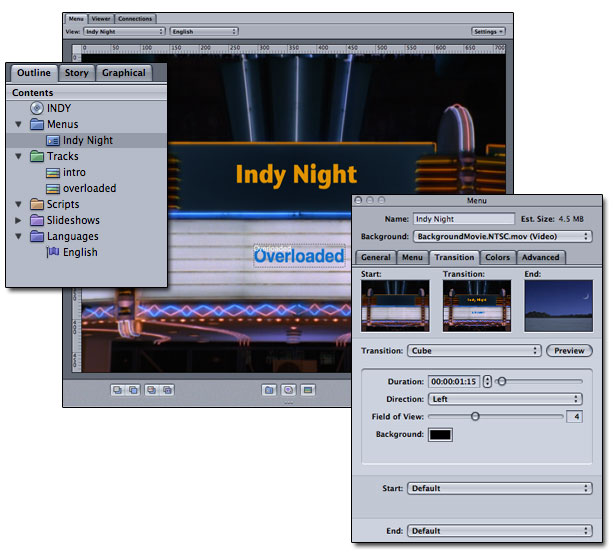
Here I have a chapter menu inside DVD
Studio Pro 3. This chapter menu is a series of layers created
using Adobe Photoshop CS. For you DVD Studio Pro 1.x users, PSD
layers can be used in still menus to compose a background inside
DVD Studio Pro 2.x and 3.x. In this particular menu, I have drawn
eight white boxes and defined them into two rows of four. Inside
each of these boxes I had intended to add eight drop zones where
I would drop eight assets used to link eight story assets for
my chapter menu.
I am using an Adobe Photoshop layered
document to give me added functionality for the background artwork
of this menu. The background is separate from the grid of white
boxes, which will become my eight drop zones. This way, I am
free to make changes to the grid much more easily without affecting
the background artwork at all.
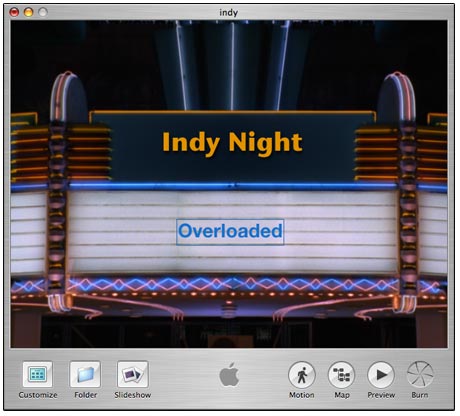
The graphic above is the current property
inspector of my chapter menu. Here you can see that I have three
layers set as the background of the chapter menu property. The
top layer, which is marked overlay, has been turned off from
view. That layer is used to create an overlay for my button highlights.
We will not need to talk about that layer to illustrate this
new feature.
The last two layers however are where
we are focused. The middle layer, called Grid, is my eight white
boxes. It is a separate layer from the layer called Background.
So just keep it in mind that we have three layers here, because
we are going to add to these layers without ever unloading DVD
Studio Pro. We will see instantly the effect the changes inside
Photoshop have on our chapter menu inside DVD Studio Pro.
1. overlay
2. grid
3. background
As mentioned before, this chapter menu
has eight boxes; however, I will only need four of them. I will
use the new "Open With" integration feature to live
edit this layer and remove the bottom row of four white boxes.
Before I do, however, I want to make a duplicate of that layer
and hide it from view in case I change my mind later and want
it back.
In order to edit this asset while it
is in use in DVD Studio Pro 3, all I need to do is go into DVD
Studio Pro's Asset tab and select the layered background asset.
I will right-mouse click or control-click on that asset to produce
a floating options menu. I will select the function, "Open
With...". This opens my Applications folder, prompting me
to choose an application to open this background asset with.
I choose Adobe Photoshop CS.
Once inside Adobe Photoshop you can see
I have access to each of the three layers we saw inside the chapter
menu property inspector. I am going to duplicate the layer called
"Grid" using Adobe's layer tab. You can do this as
well by right-mouse clicking or control-clicking on a layer in
the layer tab and then select Duplicate from the floating options
menu. This duplicate will serve as my backup of the original
layer called "Grid" with all eight white boxes. I do
this so that I am prepared if I change my mind in the future.
Restoring all eight boxes is now as simple as turning on a layer
in the chapter menu property inspector. Now I am able to edit
the new duplicate layer to reduce the eight boxes to four.
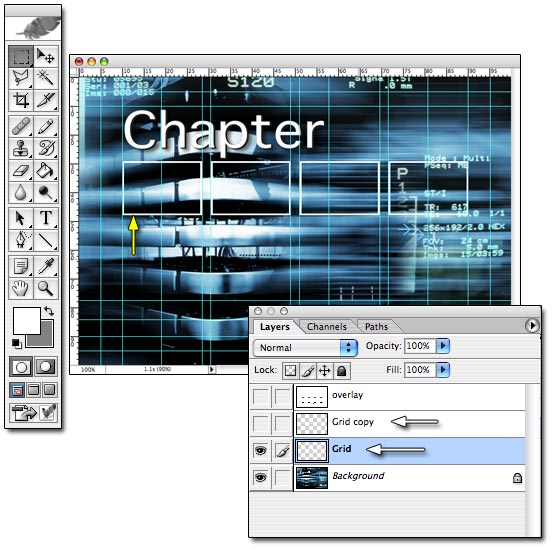
Take a look at the results above. We
have four layers now, not three. The duplicated grid layer, called
Grid copy, is not set as a visible layer in Adobe Photoshop.
Looking at the modified graphic, we can also see I have erased
the bottom row of boxes. Let's switch back to DVD Studio Pro
3 and see what changes have been made to the chapter menu.
Here we see the existing chapter menu
is still loaded and in view; however, it has automatically changed
to reflect the changes we just made in Adobe Photoshop. I did
not reload DVD Studio Pro 3. The menu view shows the bottom row
of boxes are gone, and looking at this chapter menu's property
inspector reveals that there now exists four layers where only
three existed before. Notice that the layers and their visibility
settings have carried over from Photoshop into DVD Studio Pro
3. The bottom two layers are visible, while the new layer is
not, exactly as it is in Adobe Photoshop.
[top]
Jacket
Picture Creation
Another new addition to our topic of
new features is the added support for Jacket Pictures, used mostly
by multi-disc DVD players to give a visual representation of
any DVD currently loaded. This is a somewhat rare feature in
single disc DVD players. The idea here is, when you press stop,
the jacket picture is loaded rather than the DVD default background
if that player supports this feature. This is often a difficult-to-include
feature, now made incredibly easy with this update.
If you would like to add support for
Jacket Pictures, simply import an image you would like as the
Jacket Picture into the assets tab.
Next, open the Outline tab or the Graphical
view tab and select the DVD asset itself.
In the Outline tab, select the DVD icon
at the top to see the DVD property inspector.
In the new graphical view, simply click
on the background of the graphical view just as well to gain
access to the DVD property inspector.
Now select the property inspector for
the DVD, then select the Advanced tab all the way on the right.
At the bottom of the Advanced tab, use
the Jacket Picture pull-down menu to select any image in the
assets bin as your jacket picture.
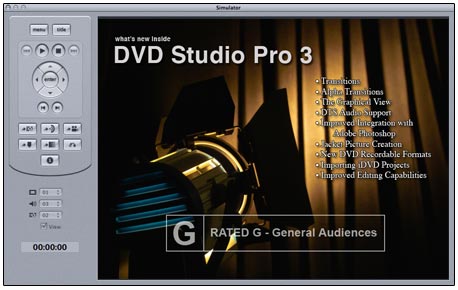
To test your jacket picture, simply simulate
your DVD project with the simulator, and as it is in simulation,
press STOP. You should see your jacket picture appear in the
simulator window.
Once the DVD project has been built,
a new folder is added beyond the normal VIDEO_TS and AUDIO_TS
folders you are used to. This folder is called JACKET_P. JACKET_P
simply holds each of three assets used in varying situations
where jacket pictures are supported.
[top]
New
DVD Recordable Formats
Since the release of the Apple branded
SuperDrive, Apple has always supported the DVD-R DVD format.
There is a competing format called DVD+R, which first appeared
on the WinTel PCs. For some time, we also have had two kinds
of general media types available in the stores: DVD-R and DVD+R.
To add to the confusion, many DVD burners are now DVD-R, -RW,
+R, and +RW compatible. This has caused tremendous confusion
as many DVD Studio Pro customers use drive types other than the
built-in Apple branded SuperDrive.
As faster and more modern DVD burners
reach the market, some DVD burners used inside Macintosh computers
sold today, such as the Power Macintosh G5, use the Pioneer 106D,
which is a DVD±RW drive, meaning the device itself supports
-R, -RW, +R, and +RW.
New to DVD Studio Pro 3 is support for
these so-called, DVD±RW DVD burners. If you have a Pioneer
106D, OSX 10.3.3, and DVD Studio Pro 3, you have all the support
you need for either format.
If you are not sure if you meet the requirements
for these formats, you can use a terminal command to see the
various formats your device supports.
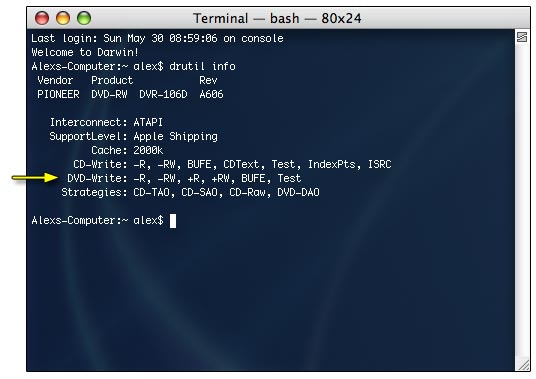
Terminal is found in the \Applications\Utilities
folder. The following is a short instruction you can follow to
see what write capabilities your DVD burner supports.
- Open Terminal
- At the command prompt type the following:
drutil info
- Hit Return
Take note of the yellow arrow pointing
to my DVD-Write capabilities in the graphic above. You can see
that my Pioneer 106D DVD burner supports the +R format. It should
be noted that many including myself find the +R formats to be
less compatible with players that do not directly support consumer-burned
DVDs. My own Toshiba SD-2800 for example refuses to play DVD+R
discs burned with either DVD Studio Pro 3 on the Macintosh using
the Pioneer 106D or Adobe Encore 1.01 on the PC using the Sony
DRU-530A. The same player will play a burned DVD-R DVD from either
the Pioneer or the Sony burner where the DVD-R is burned at the
same speeds using the same projects. Test any player in which
you intend to use recorded DVDs with both formats to find which
competing standard is best for you. My own tests use the RiTek
4x DVD-R blank DVDs for -R type DVD burning, and I use TDK 4x
+R for +R type DVDs with my burning applications.
[top]
Importing
iDVD4 Projects
Now, for the iDVD4 users who wish to
upgrade to the latest version of DVD Studio Pro, you'll be happy
to know you can take your projects with you, and even improve
upon them. DVD Studio Pro 3 carries on the tradition of iDVD
importation with support for iDVD4 projects. DVD Studio Pro 2
supports the importing of iDVD2 and 3 project files.
To import your iDVD project, make sure
all your material in the iDVD project is linked through menus,
then save the project and use the following quick list to import
the project into DVD Studio Pro 3.
- Start DVD Studio Pro 3.
- Select File > Open.
- Select the iDVD project; name.dvdproj
file.
- Select Open.
This begins the iDVD import process.
The graphic above shows a project using
one of my favorite themes from iDVD, brought into DVD Studio
Pro 3 complete with transition intact, and the intro to the animation
to the main menu. Here I noticed that Apple used a track asset
for the animated intro of the main menu. Once you become more
familiar with DVD Studio Pro 3, you could alter this from using
a track asset to using a menu asset instead. This will lessen
the pause that occurs after the transition from the intro animation.
Once you have finished importing your
iDVD4 project you should click on any buttons and verify that
your buttons are pointing to the proper track assets. Use the
new simulator and fully test your project.
[top]
Improved
Editing Capabilities
DVD Studio Pro 3 adds a number of improvements
to the authoring process. Along with the many new features comes
integration in new ways as well as simpler additions that can
save you a lot of time. Simple functions like Copy and Paste
for example reduce the time it takes to complete the script writing
process by allowing us to quickly paste over and over repetitive
lines of codes rather than fully re-writing them using the graphical
code input system. Let's look at how to use Copy and Paste to
improve our authoring speed.
Copy
and Paste Enhancements
Copy and Paste has been added to several
sections using the standard Command-C and Command-V for Copy
and Paste, respectively. We will go over copy and paste with
the script editor, buttons and drop zones, and the subtitle editor.
Script Editor
Highlight any line of script, then copy
using the standard Macintosh command, Command-C. Now paste that
copied command with Command-P. The line is automatically pasted
to the next location after any highlighted item.
This can be used as an insert tool just
as easily.
To insert a single or several lines of
script in between existing script, simply highlight the script
line where you would like the inserted code line or lines to
follow and then paste. The pasted lines of script insert themselves
between the current highlighted line and those that follow.
The graphic above shows a script with
many repetitive lines. In this example, just copy line 4, and
then paste repeatedly as needed, after which, simply make simple
edits to the pasted lines of script to achieve exactly the code
you are after much more quickly then fully entering each line
one at a time manually.
Buttons, Drop Zones, and Text Objects
You can use this same technique to copy
buttons, drop zones, and text objects from one menu to another.
Select the item you want, then copy, and paste into the same
menu or another menu.
Subtitles
Copy and Paste functionality has also
made its way into our subtitles functions. Below I have the OS
X standard text editor open. I have created three lines of text
with the Tempo font in heavy condensed, 24-point size. Not the
best choice of fonts for a subtitle, but let's show off this
new feature.
Here I have copied the text from the
text editor using the keyboard command of command-c for copy.
The font type, and size, and position, in this case, centered
text, are all coming with me now when I paste this into the subtitle
editor.
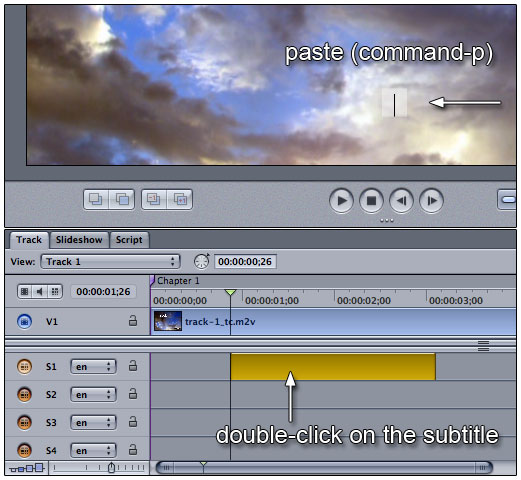
In my subtitle stream S1, I have double-clicked
to add a subtitle entry point. This gives me the blinking cursor
in the subtitle editor which is visible in the track viewer window
above the subtitle track timeline. I am going to paste my formatted
text right into the subtitle editor. Using the standard command,
command-p for the paste into function, I have pasted my text.
Let's look below at the results now.
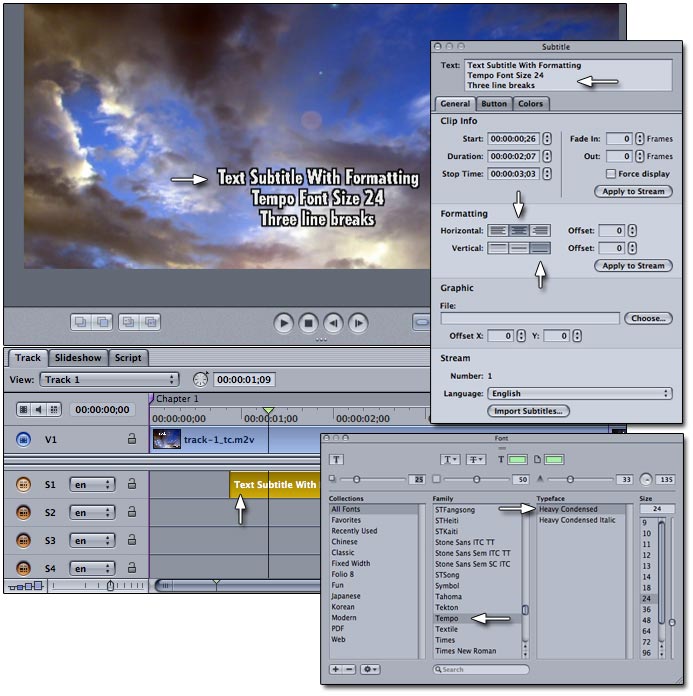
Here you can see I have my subtitle now
entered. All the text formatting from the text editor has been
retained and pasted into the subtitle editor with the paste function.
Let's review: I had three lines of text using the Tempo font,
size 24. The text remains centered because I used centered text
in the text editor. Keep that in mind if you plan to use this
technique to paste formatted text into your subtitle editor.
I may not want to bring in formatted
text, so for that we have another option shown below.
When we would like to paste text into
the subtitle editor without any formatting, we can use the text
box in the property inspector of the subtitle itself. Simply
paste the text into the subtitle property inspector text box
rather than the subtitle editor track viewer. This way, you are
simply adding text to the existing format already in place with
the subtitle stream.
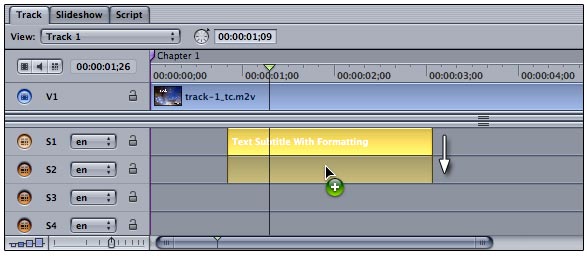
In addition to this feature, you can
easily copy a subtitle stream from one stream to another. Click
and hold the subtitle with the mouse, then use the keyboard command
Option-Shift while dragging the subtitle block downward or upward.
This produces the green plus sign you see above, letting you
know you are making a copy, and not simply dragging the subtitle
from one stream to the next.
Option-Shift means to use the same timecode
location, while just using the option key alone allows you to
position the subtitle block to the left or right of the original
above or below it.

This feature is further enhanced by allowing
this same interaction beyond just text. For example, if you have
a defined a subtitle button over video, and you choose to copy
that to the next stream, you also get that graphic, the button,
and the assignments of that button.
Improved Editing with the Graphical
View
The Graphical tab, already great on its
own, also adds an improvement to the editing capabilities of
DVD Studio Pro 3. Tiles can not only be moved within the graphical
view, they can also be lifted from the graphical view and dragged
into the Menu tab, for direct access to button linking.
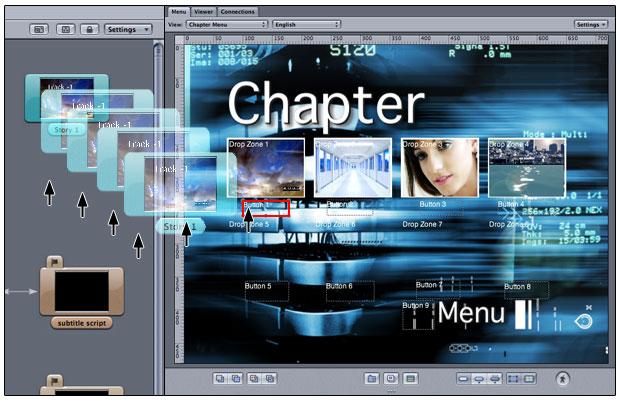
Open a menu asset by double-clicking
on its tile asset in the graphical view. If your monitor supports
viewing both the graphic view and the menu preview at the same
time, you will be able to take advantage of a great new feature.
In the graphic above I have my chapter menu open. In the graphical
view, I am going to click and hold my story tile. Holding the
story tile for a second lifts the tile up, allowing me to drag
it off the graphical view and over to the button outline of the
first drop zone in the menu tab.
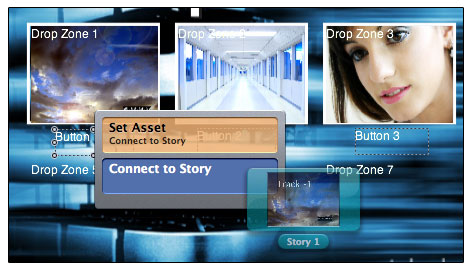
Hovering over the button outline prompts
me with a short menu of options. Here I can choose Connect
to Story, to assign the Button 1 target to Story 1 tile I
am holding. This allows me to use the graphical view combined
with the menu tab to set my button targets. Because we are working
with the graphical view, I also see the link establish itself
between the chapter menu tile to the story tile as a visual confirmation
of the Connect to Story option I have taken.
[top]
Conclusion
We have talked briefly about several
new or improved features within this release of DVD Studio Pro
3. While many may feel this release not worthy of the full 3.0
title, and I'll leave that up to you, I feel that there are many
time-saving features that really change the way we work. Someone
once said to me that if the product changes the way I work, then
it is worth a full point upgrade. Consider that you have built-in
transitions now. If you were using an outside application to
create these transitions, then that will change the way you work.
Consider that you now have Alpha Transitions that interact with
the source and destination of the two assets involved. Under
normal circumstances you would be required to create these on
your own, with a third-party application, and manage the multiple
tracks that creating transitions creates.
DVD Studio Pro now directly supports
the +R media format, an added option many have waited for. Support
for DTS audio is another feature many have waited for. Copy and
Paste has offered us additional functionality with the existing
script interface, allowing us to much more quickly complete longer,
repetitive scripts. All simple enough new features, but added
together in single release, they combine into one big shock of
an upgrade. Alpha Transitions alone is worth the price of admission,
as is Copy and Paste in the script editor. Of course, for DVD
Studio Pro 1.x users, the simulator provided in 2.x and 3.x alone
will have you sending thank you cards to Apple. DVD Studio Pro
also continues to show us the state of all the registers in the
DVD simulator, which allows us to more easily create our scripting
ideas. If you are existing 1.x users, you are in for the biggest
shock. This is absolutely the best $199 you'll spend this year.
[top]
 |
©Copyright
2004 Alex Alexzander
All Rights Reserved
All
artwork and screen shots are the property of Alex Alexzander
sponsor lafcpug.org
copyright © Michael Horton 2000-2010 All rights reserved
|