|
   
| What's new inside DVD Studio Pro 3 Part 1 Transitions |
May, 2004
What's
New Inside -
DVD
Studio Pro 3
Part
1: Transitions
By
Alex Alexzander
This
is part one in a series, by Alex Alexander on Whats new
in DVD Studio Pro 3, and how to use these new features.
Apple has added a great new feature called
Transitions with DVD
Studio Pro 3. These transitions work with Menus or Tracks,
and come in two flavors:
- Standard Transitions
- Alpha Transitions
The biggest difference between the two
types of transitions is how they look visually while in transition.
A standard transition will not have some kind of video that is
part of the transition process itself. Instead, a standard transition
will take both the end of the frame you are leaving and the beginning
of the frame you will arrive at and join these two in a transition
such as a wipe, a fade, a 3D box spin, and so on.
The alpha transition on the other hand
will do the same with the exception that a video is part of that
process described above. For example, you might want to have
a fine cloth pulled away from menu one, exposing menu two. The
two menus have their own distinctive look, while the cloth was
added to enhance the effect of leaving one menu and entering
the other. Another example would be of two menus you wish to
transition between, that both involve race cars. You could use
a checkered flag whipping across the screen to reveal the chosen
menu. Both menus are in the transition, but the flag was used
to join the two together in a way that enhances the menu design.
Where to use transitions:
1. At the start of the DVD itself as
you begin to play the primary menu.
2. When going from one menu to another.
3. When a button within a menu is selected.
I am going to build on a term Apple has
coined within their own manual. I will call transitions that
play before a menu or track starts an "intro-transition".
Transitions that play when selecting a button or leaving a menu
or track in general are simply going to be referred to as "transitions"
hereafter.
Let's start with #1, and describe intro-transitions
for menus.
Intro-Transitions for Menus
There are many methods used to create
intro-transition menus:
1. Intro-menu to Menu Transitions
2. Track to Menu Transitions
3. Single Menu with a looping parameter
built in
Probably one of the best methods to create
a menu with an intro-transition is to simply use option 1, Intro-menu
to Menu Transition. The first menu contains the animated pre-sequence
before the menu buttons actually appear as a menu onto itself.
Once this animated menu has finished playing, a timeout and target
parameter send control to another menu, where the menu buttons
are made available to the user.
This is a good idea for a few reasons:
- As the DVD author, you may wish to have
the user return to just the menu with the selections after the
menu has played once before.
- Selecting Menu or Top Menu on the remote
can be defined specifically to go to the menu where selections
are made available without requiring the user to replay the opening
intro-transition of that menu.
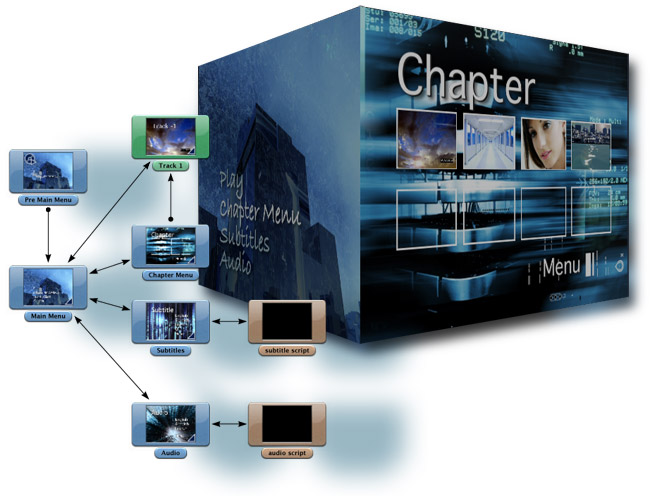
- Menus are stored physically closer together
than tracks are in the DVD's domain architecture.
I created this type of transition menu
in LiveType by cutting a single LiveType timeline into a few
parts. The first part is the menu itself, animating into position.
The second part is a 26-second continuation of the first part
with the exception of the text animating. The text remains stationary,
providing us with an area in which to use overlays in our menu
and offer the user the ability to make track and menu selections.
There is a third part, where we create separate, per button,
transitions. We'll go into that a little later on.
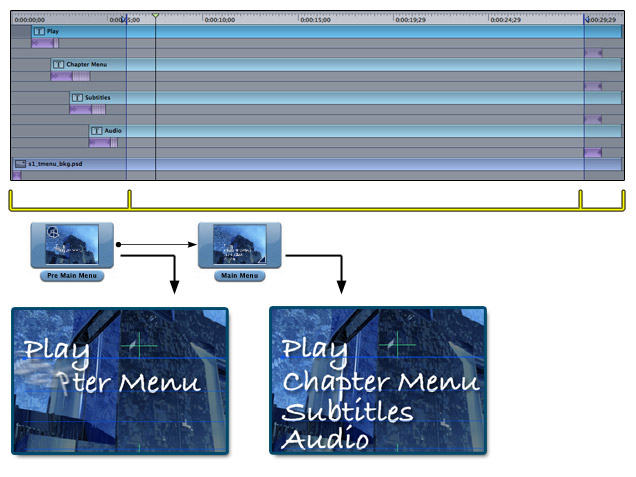
I have imported the first part of my
menu into DVD Studio Pro as a menu asset for my pre main menu
object. The pre main menu plays for a few seconds animating my
text, then opens the main menu, which is a second menu object
in DVD Studio Pro 3. That object contains stationary text, while
music play and the rest of the menu continues to animate.
The single drawback to this method is
that there is a slight pause between these two menu objects.
The act of going from one menu to another causes a brief interruption
in playback.
Let's look at the second option: Track
to Menu Transitions
This is exactly the same as the above
described method of Intro-menu to Menu Transition, except you
use a track asset rather than a menu asset as the animated pre-menu
area of the main menu.
The drawback here is a longer delay since
the track asset is physically in another domain away from the
menu asset on the DVD.
This brings us to the third method: Single-Menu
with a Looping parameter built in.
Motion menus with a looping parameter
set use a single animated sequence as the whole menu. The DVD
author will create a pre-animated section in the first part of
this single sequence that later becomes stationary for the purpose
of giving users the ability to choose buttons on the menu object.
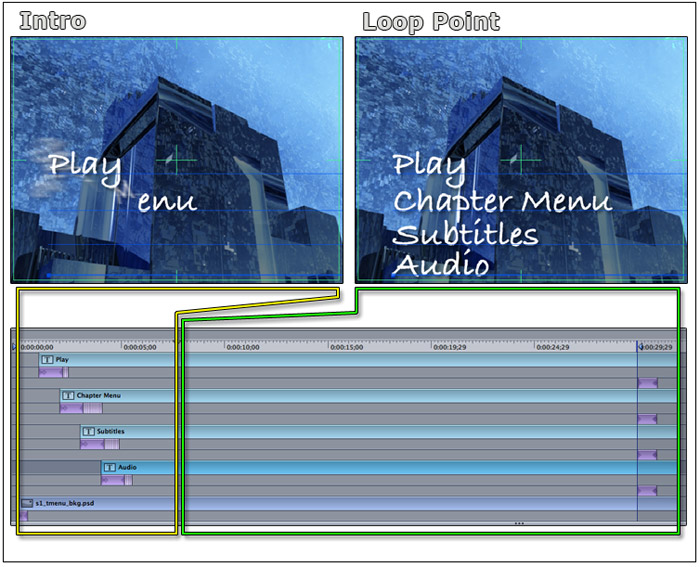
Here I have a single timeline defined
for export in LiveType for my motion menu. The first area outlined
in yellow contains the animated text that will form my menu selections.
The second outlined area defined in green contains stationary
text while the rest of the background continues to animate. Since
the text is stationary, I will be able to use an overlay here
that allows the user to make a selection from my menu.
At this point, I need to import this
animation into DVD Studio Pro 3, and define it as my motion menu.
Once I have done this, I will need to define when the overlay
becomes activated. This activation of the overlay is known as
the loop point in the motion menu.

Here I have the property of the motion
menu. I am using the General tab to choose the Start,
Loop Point, and End of my motion menu. My
opening menu, fades from black, followed by the animated text.
The text becomes stationary at six seconds, where I have defined
my loop point. When the motion menu reaches the end of its duration,
it will begin again, but not at the beginning. Instead the menu
will loop starting with the defined loop point.
There is a benefit and a drawback to
this method.
The benefit is that it is one contained
item. There is no transition or delay going from the animated
text to the stationary text because it is one seamless animation.
The drawback is that each time the user
comes back to this menu, either from an End Jump or a Menu or
Top Menu call from the remote, the entire menu plays again. The
loop is ignored, and only plays at that loop point if the menu
itself reaches its duration time and restarts from within itself.
So, we have defined three methods of
using an Intro-Transition. Now it is time to get knee-deep in
the new features of DVD Studio Pro 3. We're going to go over
the transitions from the point of view of the menu and the buttons
within the menu, and go over track transitions a little as well.
Menu Transitions
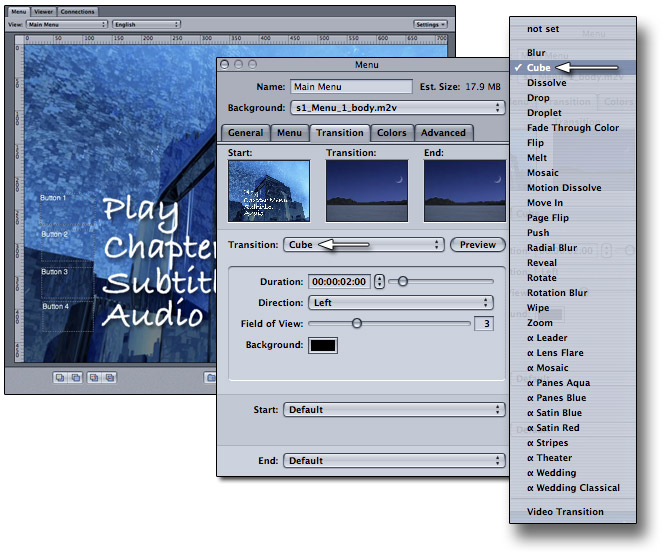
Look at the three items in the graphic
above. From left to right, we have a menu, the menu property
inspector, and the transitions available for the menu object
itself. This new tab, called the Transition tab, has a few features
we'll go over now.
Once you have selected the Transition
tab, you will see the three small preview windows as shown in
the graphic above. When selecting a transition for the menu itself,
you are allowing each button therein to subscribe to that transition
with a setting called, "Same as Menu", which we will
go over when we talk about button transitions. For now, let's
focus on the transition opportunities with this menu.
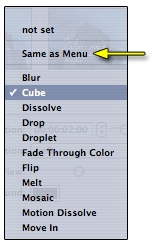
If you look just under the three preview
boxes, you will note the Transition selection pull-down menu.
Once you select that, you will see many choices for canned transitions
provided for with DVD Studio Pro 3. The third graphic on the
right illustrates what these transitions are. Look at that third
graphic; we see, "not set", followed by Blur and ending
with Video Transition. There are some differences in this list
however, and so we need to further break it down and categorize
it.
Notice that some of the transitions have
a symbol that looks something like a fish, or a tie lying sideways.
This is a lower-case, greek alpha symbol, used to denote Alpha-Transitions
apart from standard transitions. The alpha transitions start
with Leader, and end with Wedding Classical. Above the alpha
transitions are the standard transitions. That set starts with
Blur, and ends with Zoom. Finally, all the way at the bottom
we see Video Transition.
As we talked about before, standard transitions
do not contain a video within the transition itself. You can
use the standard, the alpha, or your own custom-made transition
with the Video Transition option at the bottom. You can also
choose, not set, and not use any transition at all.
Take a closer look at the center graphic.
You will see that the start frame is my menu, but that the other
two frames are of a crescent moon scene. This crescent moon scene
is not part of any menu or track I have in my project. Instead,
this is meant to describe in a generic way what the transition
animation will look like when it is chosen. Since the transition
doesn't yet know where it will go, this image of a destination
is a generic image. By default, the start of the transition is
the first frame of the menu we are leaving. The End is the first
frame of the target menu or track we will arrive at with our
button. If a script is the target, then the target transition
will simply be black. The center item holds the transition itself.
To see this let's begin the next section.
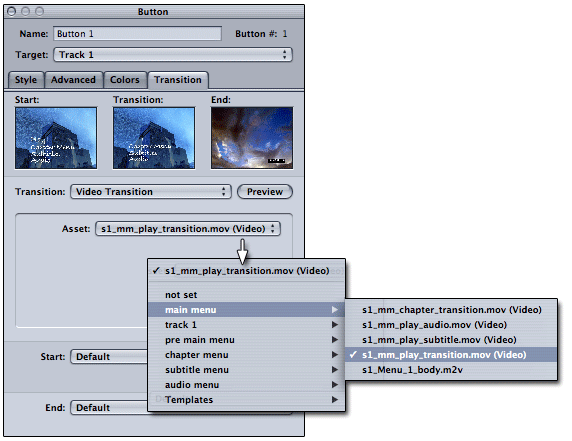
Button Transitions
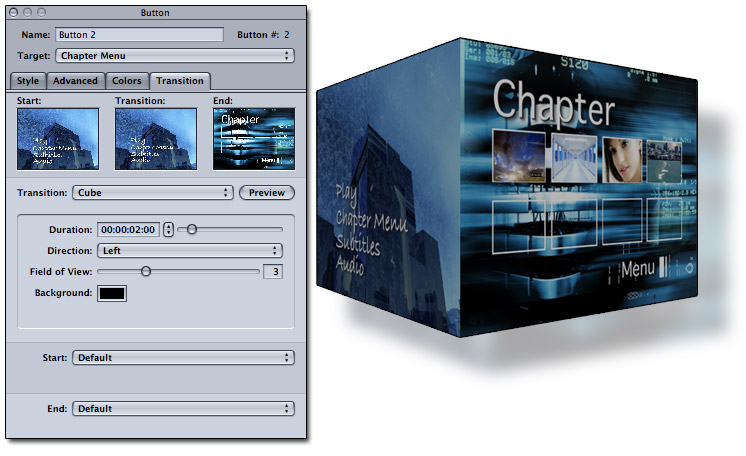
This graphic above is the property of
a button asset, not the menu asset. Notice the tabs have changed.
This is the Transition tab for the button itself. Here I have
a transition from my main menu to the chapter menu. If you carefully
look at the property inspector, you will see this is Button 2,
and that the target states, Chapter Menu.
Let's look at the three preview boxes
again. See how they have changed. The menu transition was a generic
representation of what the effect of the cube transition would
be, where as the button transition has defined exactly where
we are and where we will go. Again, the first frame of the menu
is used as the start of the transition, while the first frame
of the target is used for the end of the transition.
Now, there are other settings as you
can see at the bottom of the graphic. These are the Start, and
the End, which are currently set to Default each. When Start
is set to Default, you are accepting that the first frame of
the item you are making your transition from will be the start
of the transition. Likewise, when you choose Default for the
End setting, you are choosing the first frame of the target as
the end of the transition. Button transitions also have the opportunity
to use a "Same as Menu" which is a setting in the Transition
selection pull-down. In addition to choices of Not Set, Standard
Transitions, Alpha Transitions, Video Transitions, you also have
Same as Menu, when using a Button Transition.
Let's continue with the settings of the
Start and End at the bottom in the next section.
Setting the Start and End Transition
Manually
The Start and End settings on the transition
tab each pull down the same two menus. With these settings you
may choose to modify how the start and end transition will start
and end. This means you can modify what the start and end frame
are based on within the transition you are using. Before I had
said that the transition starts by taking the first frame of
the menu we are in, and ends its transition with the first frame
of the target item we are going into.
This is not always the case. An example
of this would be when we use chapters or stories within a track
asset. Going from a chapter menu to a story or a chapter within
a track will use the first frame of that chapter or story as
the end of the transition. This is what you might expect to happen;
however, the same doesn't hold true for looping menus, which
is why I bring it up.
In a looping menu, you might expect the
loop point to be the end of the transition, but instead, the
start of the looping menu is the end of the transition. Since
the user is starting the menu over from the start, you will see
that start frame as the transition end. If you started your looping
menu from a complete black field you may wish to modify the transition
so as to reflect the menu we are going to, and not an empty black
target. This can be done by setting the End setting in the button
transition property.
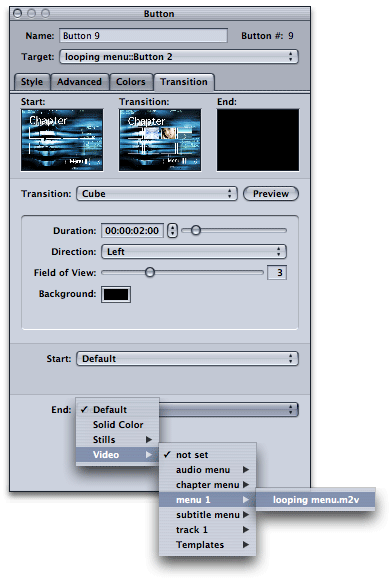
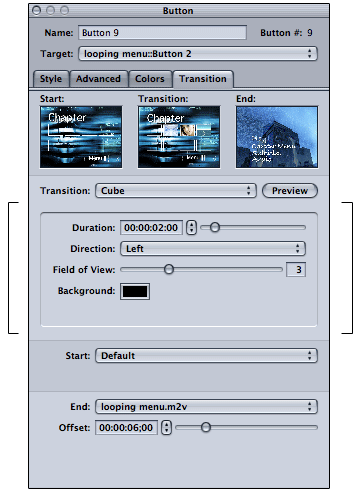
To accomplish this, change the End of
the transition to the same timecode as the start of the loop
in the looping menu. Take a look at the graphic above. Here I
have the End setting altered to Video > Menu 1 > Looping
Menu.m2v. This is the Looping menu asset. Selecting a video asset
such as this will yield the following option:
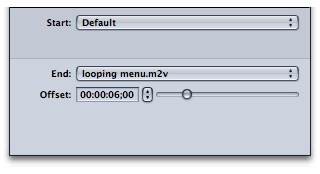
Looking at the graphic above, you will
notice I adjusted the end of the transition to an offset of six
seconds of the looping menu MPEG asset. The end of the transition
no longer uses the first frame of this asset as we said earlier.
There are other settings in these menus
as well. You may, if you choose, decide you want to go to a solid
color, or a still image, or some other timecode location in some
other video that is not related at all. It's completely up to
you. With that, let's move on to the next section, and talk a
little about fine-tuning these standard transitions.
Transition Properties
Take a look at the graphic above. Look
at the center area. As you see, the standard transition is the
selected transition. By default, the direction of the cube spin
is Left. You can change this to right, or top or a bottom if
you like. As the cube spins, the background is black. You may
choose another color. Each of the transitions has varying options
that are associated with it. There is a very nice ripple transition
that allows you to change just how pronounced the ripple itself
is, for example. It's up to you to explore these transitions
to create the effect that best suits your menu's style.
So far, we have a pretty good idea of
how to work with Standard Transitions. Alpha Transitions function
in usage the same as the Standard Transitions. The added benefit
with Alpha Transitions is that you can create your own. We'll
go over that in the next article after this one. For now, let's
skip to the final section, which is using Video Transitions.
Video Transitions
So far, everything we have discussed
has been very menu centric. The transitions have all been focused
on the transition of the menu. Whether the transition has been
set using the menu's transition tab or the button's transition
tab, the transitions themselves have been the same. This is where
Video Transitions add that extra value you might be looking for.
A Video Transition is a transition you make yourself, and set
using either the button's or menu's transition tab.
Making the transition yourself is no
different from how or why you made transitions in the past without
these new transition features inside DVD Studio Pro 3. What is
different and much better now is the ease of implementing your
transitions. Prior to version 3, all your transitions were in
the form of a menu or a track asset. You had to create a separate
track or menu asset for each transition. You then had to point
the end jump of your menu to the transition, and in turn the
transition pointed to the track the user had intended to go directly
to.
With Video Transitions in DVD Studio
Pro 3, in most cases you only need to create the transitions,
and not the track asset that would normally go along with it.
Instead of creating lots of tracks, you simply appoint an MPEG
video transition you create to a menu or button through the transition
property and DVD Studio Pro 3 does the rest for you. There is
no need for the middle man.
Let me provide you with a good use for
such a transition. Let's assume you have a menu and that menu
has buttons on it. Rather than a standard transition that flips
the entire menu, you would like only the button that was activated
to transition off the screen. This is so specialized that it
is beyond the scope of Apple's implementation of canned transitions.
However, that doesn't mean you can't accomplish your goal. Just
as easily as I created animated buttons for my motion menu, I
can also create tiny videos for each button. These videos are
animations of one button at a time in transition off the menu.
Using the button's transition property,
I can assign Video Transition and apply my little transition
video, on a per-button basis, thus giving me the exact transition
I am looking for.
Conclusion
I think it is easy to see how great this
new feature is. Transitions in menus have always been one of
those extra features that required a lot more work just to add
that extra polish to the final product. With this new feature,
much of that work has been simplified. Even if you didn't want
to use the built-in transitions, you still have the ability to
create your own alpha transitions. The video transition workflow
for your button actions is so much easier now. That alone makes
this a great time-saver. Keep in mind that all these transitions
do add to the size of the final DVD.

©Copyright 2004 Alex Alexzander
All Rights Reserved
All artwork and screen shots are the property of Alex Alexzander
sponsor lafcpug.org
copyright © Michael Horton 2000-2010 All rights reserved
|