Introduction
It is important for the 1.x users to
see the radical interface change that is version 3.0 before going
over the new graphical view. While 2.x users will only be interested
in the graphical view itself, 1.x users are in for the biggest
shock and may benefit from going over this very brief introduction.
The 2.x users should feel free to skip past this and go right
into the graphical view area.
1.x to 3.x Interface Overview
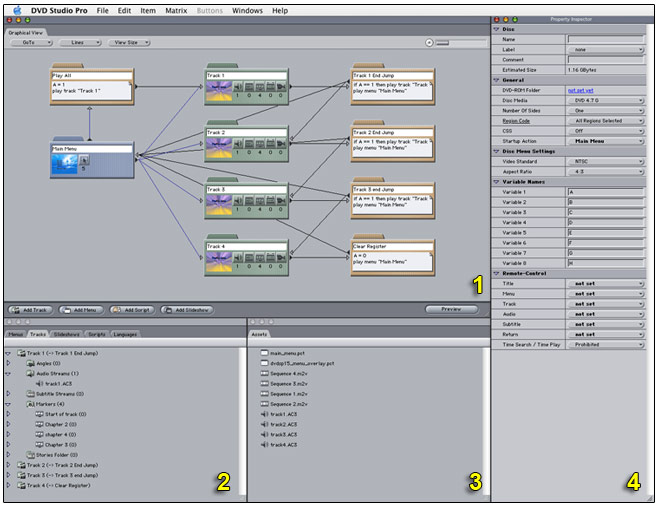
Below is a full screen shot of the last
of the DVD Studio Pro 1.x series; 1.5.2. In this series we enjoyed
the use of a graphical view in which to add tile assets such
as menus, tracks, slideshows, and of course, scripts. Our interface
was divided into six basic sections. I have numbered four of
them here. The other two that you do not see are the effect of
double-clicking on a menu or a track within the graphical view.
Each of those actions will open a menu view or a track view,
respectively. The four remaining sections where most of the work
is accomplished are shown below.
The largest section, numbered section
1, is of course the graphical view. In section 2 we have a series
of tabs, which are the organized view of the assets once assembled
in the graphical view. Section 3 holds any assets we have imported
into our DVD project. Section 4 is the property inspector.
Much of the work flow remains similar
but the presentation in our newest edition of the DVD Studio
Pro series dramatically expands on these now basic principles,
giving the author a far more flexible and at-a-glance view of
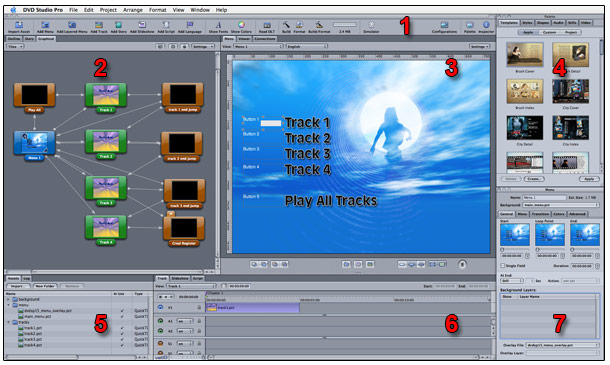
much more information. Let's quickly contrast 3.x with the 1.x
series. Take a look at the image below and note there are several
more sections. Though difficult to tell from this screen image,
each section with the exception of section 1 also contains multiple
tabs. These tabs are Apple's way of divide and conquer. They
give us extremely fast access to any asset within the entire
DVD without the clutter of screens overlaying one another as
they did in the DVD Studio Pro 1.x series.
Section Overview
Section 1
replaces DVD Studio Pro 1.5's four buttons that add Track, Menu,
Script, and Slideshow to the graphical view. Many more quick
functions in addition to those have been added, such as importing,
Build, Build and Format, adding a story, or even hiding the property
inspector.
Section 2
is where we'll be focused in this article; we see the graphical
view, new to DVD Studio Pro 3 and absent in SP2. Section 2 also
contains two other tabs: an Outline view, not available in 1.5,
and a Story Editor.
In section 3 you will notice a
huge change from 1.5. Here I have the graphical view and my menu
opened at once and within easy view of each other. The graphical
view is no longer covered when opening menu tiles or track tiles.
In fact, you can swap the tabs from section to section to best
suit your needs and monitor real estate.
Section 4
is completely new to 1.5 users. This section holds ready-made
assets you can re-use over and over. We won't be covering that
at all in this section.
Section 5
is the new assets bin, with an easy to use interface allowing
for folder creation and organization of assets, among other goodies.
We will skip this section in this article as well.
Section 6
holds three tabs, the first of which is the Track tab, which
gives a timeline view of the track angles, audio, and subtitle
streams. Section 6 also holds our slideshow editor and a new
script editor, which is part of a two-panel graphical input system
that uses section 7.
Section 7
is the property inspector. The property inspector consumes less
space from top to bottom because the twisty drop-down views have
been replaced with a new tabbed view.
With these new interfaces changes in
mind, we'll focus the rest of this article specifically on the
usage of the new graphical view.
Graphical
Tab Overview
Our new graphical view has several organizing
functions accessible at the top of the interface. Note the white
arrows in the image below. From left to right we have a new tiles
pull-down option, a zoom tool, a macro view, a lock and unlock,
and finally a setting pull-down menu. In this section, let's
look at each of these new tools.
The Tiles Menu
The tiles menu allows you to toggle on
and off all the varying tile types in any combination. Imagine
you want to work on only the script tiles in a crowded view.
Use this tool to mask out all other tile types, allowing you
to find just the tile you're looking for that much easier.
Zoom to Fit
Zoom to fit quickly fills the current
graphical view size with your tiles at the largest possible size.
This works with small or large tiles, which are a setting in
the setting pull-down menu.
Show / Hide Macro View
Macro view is especially handy for large
projects. Here we have many more tiles than fit in our current
display. This would make finding specific tiles a guessing game
of chance, searching in all directions for the exact tile we
are looking for. The macro view gives us a map view of all the
tiles in our project. The red box outline is the current graphical
view within the map view. Shifting the red box outline shifts
the graphical view. So if you want to see a larger view of the
tiles in the lower right-hand corner, simply shift the red outline
in the macro view to the lower right-hand corner. You can toggle
the macro view on and off by hitting the M key.
Lock / Unlock Locations
Lock / Unlock is a toggle key that prevents
movement of any tile in the graphical tab. This is perfect for
showing off your design without the worry of others making accidental
changes. You can toggle the Lock / Unlock by hitting the L key.
The Settings Menu
Use the settings selection menu to instantly
toggle the viewing properties of the graphical view. This single
menu allows you to set four view types:
1. Relative Connections or All Connections.
2. Basic, Standard, or Advanced Connections.
3. Small or Large Tiles.
4. Snap to Grid.
Relative Connections allows you to select
any one tile and expose only its connections. The views of all
the other connections are turned off. All Connections turns on
all the tile connections throughout the graphical view.
Basic, Standard, or Advanced Connections
displays a varying level of connection detail. For example, under
basic connections, a menu and an assigned prescript will not
show their connection relationship; however, standard and advanced
connections will. Connections defined using the subpicture stream
within a track asset are displayed in Advanced Connections while
hidden in Standard Connections.
Small or Large Titles defines the tile
size.
Snap to Grid of course helps you more
easily line up your tile assets with the graphical view.
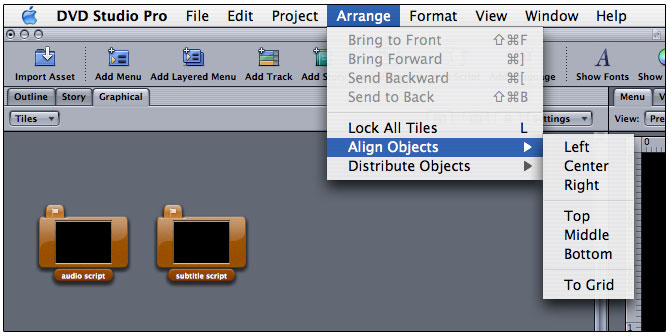
The
Arrange Menu Item
The Arrange menu item allows the aligning
and distribution of tiles within the graphical view. Select any
two or more tiles to make the best use of this feature. You can
quickly select all the items in your graphical view with the
standard Command-A key combination.
Align Objects
Select any two or more tiles and choose
to align those tiles anywhere in the graphical view. If you choose
lots of tiles, you will often see them become overlapped. Of
particular help in this menu is the To Grid option, which can
help clean things up a bit.
Distribute Objects
You can also choose to distribute selected
tiles by type or autolayout, horizontally or vertically. Use
Command-A to select all your tiles within the graphical view
and select Distribute Objects. Choose Horizontally or Vertically,
By Type or Autolayout.
By Type
By type quickly changes the current graphical
view into a grid by type view. Here we can see the menu tiles
followed by the layered menu tiles, then the track tiles followed
by the story tile, then the slideshow tile. And lastly the scripts
tiles are displayed.
Autolayout
Autolayout is great for a quick cleanup
of all tiles in a view. The graphic above is a horizontal view
of the autolayout option.
Printing the Graphical View
Apple has also included a great new feature
that allows you to print your graphical view. This makes use
of Apple's existing printing infrastructure, which means you
can print not just to paper, but to PDF, or even to FAX. You
print exactly the same as you would in any other application.
Command-P from any window will print the Graphical view.
Working
with Tiles
Context Sensitive Graphical View
The graphical view is also context sensitive.
Right-Mouse or hold control and click in the empty area to produce
a context sensitive options menu. Use this options menu on the
empty field to set the first play, add tile assets, or load a
script. Use this option on a tile to simulate, flag, delete or
duplicate, or set a First Play attribute.
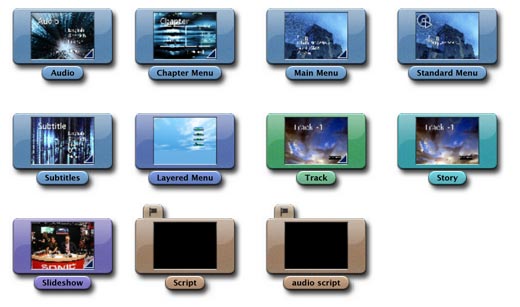
Tile Types
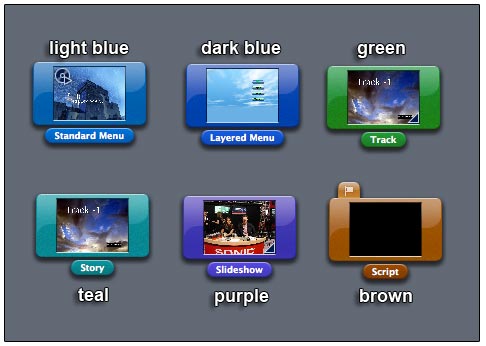
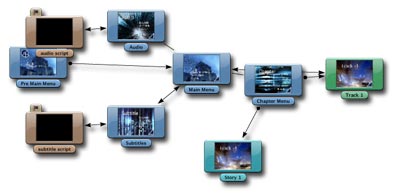
Looking at the graphic above we can see
that Apple distinguishes through color the varying types of tiles.
Added to the list of tiles in the graphical view from the 1.x
series are a layered menu and the story tile.
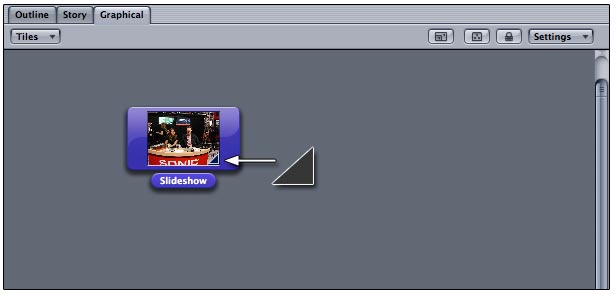
Setting First Play
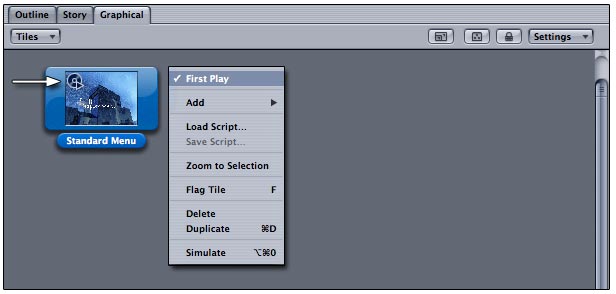
To set the first play through the graphical
view, control-click or right-mouse click on the asset of your
choice. An options menu appears. As shown above, simply select
First Play. Note the white arrow pointing at the tiny graphic
inside the tile. The small DVD with a triangle denotes this is
now the First Play tile.
Add a Story
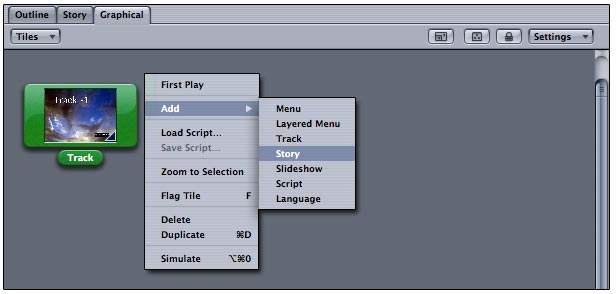
Adding a story is as simple as a right-mouse
click or a control-click on any track tile in the graphical view,
then selecting Add, Story from the floating options menu. Double-click
on the story tile to open the story editor to quickly add chapters
to your new story. You can even name your story simply by double-clicking
the story tile default name to highlight, and rename.
Flag a Tile
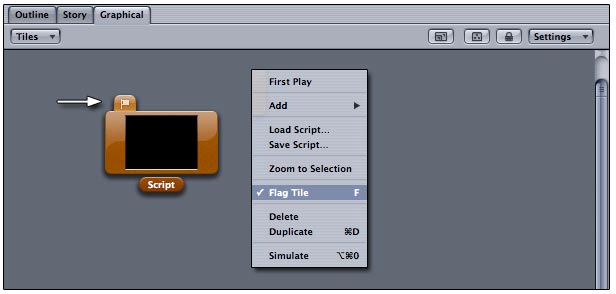
Flag a tile to remind yourself to pay
special consideration to that tile later on. To flag a tile,
simply click on the tile and press the F key. You may also use
the context sensitive menu to select multiple tiles in the graphical
view. This allows you to flag multiple tiles at once. If you
prefer the mouse, control-click or right-mouse click on the tile
or selected tiles and choose Flag Tile. Note the white arrow
at the top of the script tile example. A special flag graphic
is added to the tile.
Tile Transition Icon
When you add a transition to a tile,
you will see a special tile transition icon on the lower right-hand
side of the tile. To add a transition to a tile, double-click
the tile, and use the property inspector. In the property inspector
select the Transition tab to configure any transition.
Expanding the Virtual View
You can expand or contract the virtual
view size of the graphical view by dragging tile assets in certain
directions. Note the three white arrows in the graphic below.
Dragging all my tile assets to the upper left-hand corner reduces
the total size of the graphical view.
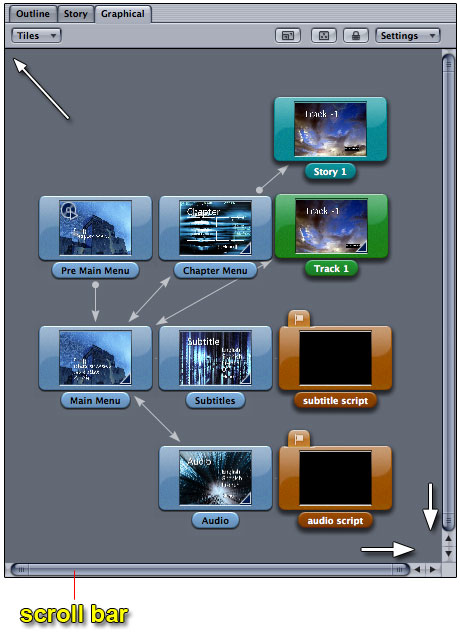
Dragging any tile asset to down or right
expands the virtual space in that direction, giving me a larger
size area in which to work. This is handy to create a larger
field just before adding lots of new tiles. You can expand in
the direction you want, then quickly add multiple tiles without
cluttering your existing tiles.
As you do this, you will see the scroll
bars reduce in size. This also affects the print handling of
your graphical view. For best results printing, keep the virtual
field size as close to the actual size required to nicely house
all your tile assets. Remember, to shrink the size of the graphical
view, grab all your assets and drag towards the upper left-hand
side. The quick-key command for Select-All is Command-A.
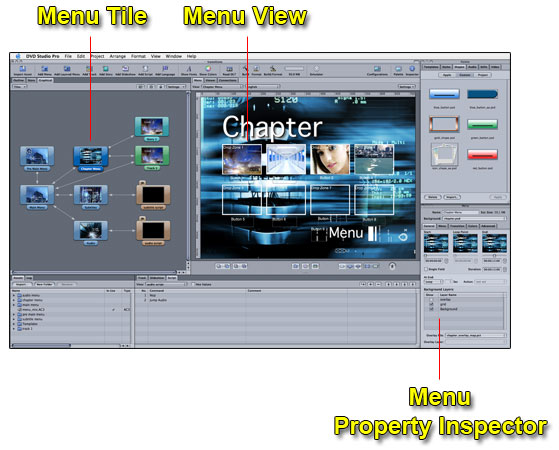
Exposing Properties and Settings
Tiles in the graphical view have associated
tabs across the entire project. By double-clicking on tiles,
you expose other properties of that tile. For example, double
click on a menu tile to open the menu viewer, and the menu property
inspector. Double click on a track tile and open that track timeline,
viewer, and property inspector.
Additionals
The Graphical view also allows for tile
duplication and deletion. These use the standard Apple commands
such as Command-D to duplicate or the Delete key to permanently
remove a tile from a project. Other handy commands are listed
below.
Quick Key Command Reference
Conclusion
The new graphical view will surely become
a favorite tool among many already great tools. For DVD Studio
Pro 1.x users, you have quite a learning curve to endure; however,
as you can see from the layout of the tabs, you have never had
so much information so readily available at a single glance.
For 2.x users, you have a great new tool
that I encourage you to explore. Try scripting and watching the
connections form as you script the possible targets in your script.
You will get instant visual confirmation with the graphical view.
Soon you will find yourself as hooked on it as I am.
[top]
 |
©Copyright
2004 Alex Alexzander
All Rights Reserved
All
artwork and screen shots are the property of Alex Alexzander
|